We are very pleased to announce an important piece of news: credativ GmbH is now a certified training partner of Proxmox Server Solutions GmbH. This expands our many years of Proxmox expertise with an official training offering – delivered by our certified trainers, with a certificate of participation directly from Proxmox.
(more…)What is PegaProx?
![]()
PegaProx is becoming a central platform for modern Proxmox VE-based virtualization, offering a free and open source approach to managing virtualization at scale. It is increasingly seen as a powerful multi cluster solution designed for more demanding enterprise setups. Where traditional tools start to fall short and even the native Proxmox Datacenter Manager does not yet cover many key requirements, PegaProx fills that gap by providing a consistent and clearly structured way to manage complex infrastructures.
As a central control unit, PegaProx unifies all aspects of cluster management (including multi-cluster management and Proxmox Backup Server) in a single interface, creating a consistent view of all resources, workloads, and systems. Administrators no longer need to switch between individual clusters, nodes, or isolated monitoring solutions; instead, they gain a fully integrated environment that significantly increases transparency, control, and efficiency. Especially in growing infrastructures with multiple clusters, this approach becomes a decisive advantage. In daily operations, virtualization managers repeatedly face the same challenges. Resources must be monitored across clusters, bottlenecks identified early, and maintenance work coordinated without jeopardizing availability. At the same time, increasing complexity raises the risk of misconfigurations, inconsistent states, and unplanned outages. Other features familiar from other well-known enterprise virtualization solutions also play a central role in PegaProx. PegaProx addresses these problems with a consistently centralized architecture, real-time metrics, and intelligent automation that simplifies operational processes and implements previously missing functionalities.
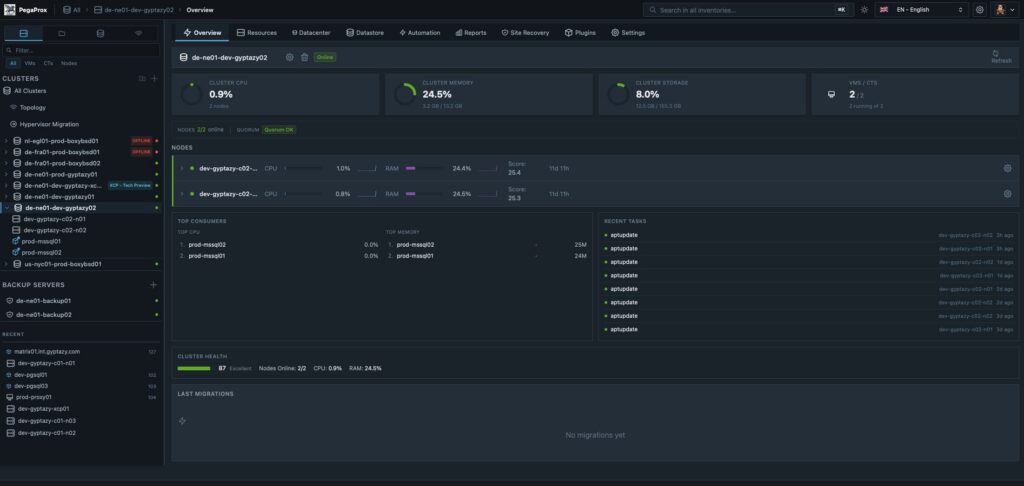
PegaProx for Proxmox: Cluster Overview
Developed by a small, focused team with strong practical relevance, which includes our colleague Florian Paul Azim Hoberg (also known as gyptazy) as a core contributor, PegaProx places particular emphasis on real requirements from the enterprise environment. Functions such as managing multiple clusters as a logical unit, a global overview of snapshots including a clean-up function, or the dynamic distribution of workloads based on current resource data (ProxLB) are not theoretical concepts, but specifically developed solutions for productive use. The result is a platform that elevates Proxmox VE to a new level and offers companies a powerful, scalable, and understandable solution for their virtualization strategy.
What does PegaProx offer?
PegaProx combines a variety of functions specifically developed for the professional operation of Proxmox VE-based infrastructures. The focus is clearly on central control, automation, and transparency across multiple clusters. Instead of fragmented tools, an integrated platform emerges that simplifies daily operations and reliably maps complex enterprise requirements.
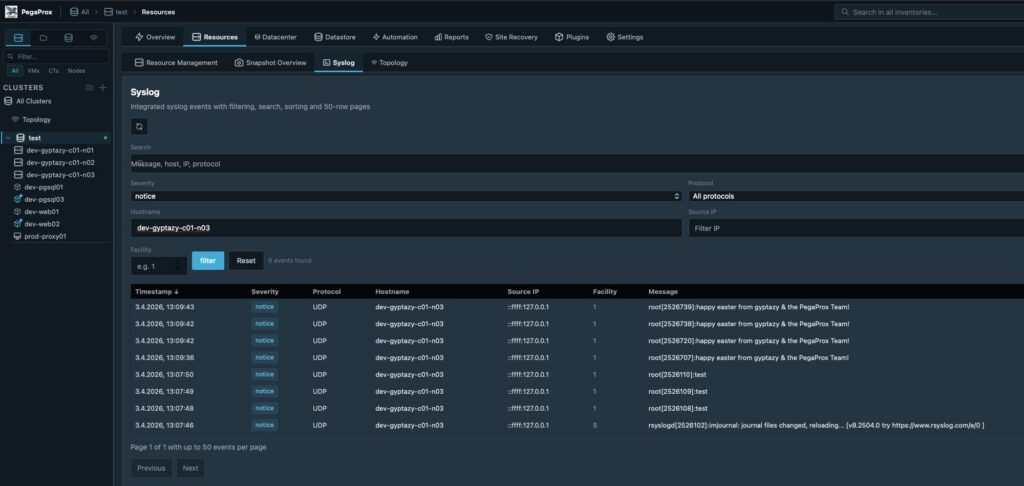
PegaProx with central, aggregated logging overview
To align this with the ProxTools Collection, created by @gyptazy, such as ProxLB, ProxCLMC, ProxPatch, ProxSnap, and ProxLog, have also been integrated and now offer a way to administer them via PegaProx’s graphical interface for easy usability. Key functions include:
- Multi-Cluster Management
- Unified Dashboard
- Multi-Tenancy & End-User Self-Service Portal
- Live Metrics
- Cross-Cluster Load Balancing
- Live Migration
- Cross-Cluster Live Migration
- High Availability and Automatic Failover
- Snapshots and Snapshot Replication
- Centralized Snapshot Overview
- Backup Management including Verification
- Role-Based Access Control and Multi-Tenancy
- Integration of External Authentication Systems
- Automation and Scheduled Tasks
- Rolling Updates / Patch Management for Cluster Nodes
- Integrated Syslog Server
- Ceph Management
- Audit Logging and Monitoring Alerts
- and much more
This represents only some of the capabilities PegaProx already offers today. Many other functions and continuous developments constantly expand the platform, closely aligning with the real requirements of modern virtualization environments. A complete overview of all features, technical details, and current developments can be found on the official PegaProx GitHub page, where all functions are transparently documented and continuously updated.
Installation & Configuration of PegaProx
The installation of PegaProx is deliberately designed to be flexible, covering a wide range of environments and requirements. Whether for quick evaluation, integration into existing infrastructures, or productive enterprise use, PegaProx can be deployed in several ways and seamlessly integrated into existing Proxmox VE landscapes. All installation methods pursue the same goal: the simplest, most reproducible, and transparent deployment possible without unnecessary complexity.
The following options are available for installation:
- Bash Script
A quick and easy way to get started using an automated installation script (however, we strongly advise against this method, even though it is becoming increasingly popular again):curl -sSL https://raw.githubusercontent.com/PegaProx/project-pegaprox/refs/heads/main/deploy.sh | sudo bash - Docker Container Image
Deployment as a container for maximum portability and easy integration into existing container environments - LXC Appliance
Prebuilt LXC template for direct use in Proxmox VE with minimal setup effort - VM Appliance
Fully preconfigured virtual machine for fast and isolated commissioning - Debian Package
Native installation via a Debian package for systems that are intentionally to be operated without containers - Debian Repository
Central package source for easy updates, versioning, and integration into existing package management processes
Regardless of the chosen method, the basic configuration is quickly completed, so PegaProx is available as a central management platform for multiple Proxmox VE clusters within a very short time.
Conclusion
PegaProx is rapidly developing into one of the most exciting solutions in the field of Proxmox VE-based virtualization and is already generating great enthusiasm in the community. Many companies already see PegaProx as the central platform they have been missing in the Proxmox ecosystem, especially when it comes to multi-cluster management, automation, and a consistent overall overview.
The clear structure, practical range of functions, and consistent focus on real requirements in the enterprise environment clearly demonstrate the platform’s potential. PegaProx not only closes existing gaps but also defines a new standard in many areas for managing complex virtualization landscapes.
Despite this positive development, it should be noted that PegaProx is currently still in its beta phase. Even though much already functions stably and thoughtfully, problems or unexpected behavior can occur at any time. For productive environments, its use should therefore be carefully considered and, if necessary, first implemented in test or staging scenarios.
Errors, wishes, or suggestions for improvement can be reported at any time via the project on GitHub. Additionally, the developers are available directly via the gyptazy projects Discord server for exchange and support.
Proxmox® installation is a crucial step for companies looking to implement a professional virtualization solution. This comprehensive guide will walk you through the entire Proxmox VE installation process and help you set up a stable hypervisor environment. You will need basic Linux® knowledge and approximately 2–3 hours for the complete installation and basic configuration. For this Proxmox guide, you will need a dedicated server with at least 4 GB RAM, an 8 GB USB stick, and access to the target computer’s BIOS. After completing these steps, you will have a fully functional Proxmox VE system for your server virtualization. Please note, however, that this hardware configuration is far too limited for a production system. For initial steps, however, it is suitable. (more…)
The decision for credativ Proxmox Enterprise Support depends on your business requirements, the criticality of your virtualization environment, and your available internal IT resources. Enterprise Support offers professional assistance, stable updates, and advanced features, while the Community Edition remains free but without guaranteed support. This analysis will help you make the right decision for your company.
What is Proxmox Enterprise Support and how does it differ from the Community Edition?
Proxmox Enterprise Support is the paid version of the virtualization platform, offering professional support, stable updates, and access to enterprise repositories. The community repositories provide the same basic functionality for free, but without a support guarantee and with less thoroughly tested updates. Both versions are provided by Proxmox Server Solutions GmbH under the AGPL license. However, there is an important additional distinction: those who wish to save costs can gain access to the enterprise repositories by purchasing a so-called Community Subscription. This, however, only includes access and no further support.
The most significant difference lies in the support level. Enterprise customers receive direct access to the Proxmox team for technical issues, while community users rely on forums and community assistance. Enterprise Support includes various service levels, from Standard to Premium, with different response times.
The update cycles differ significantly. Enterprise repositories contain thoroughly tested, stable updates optimized for production environments. Community updates appear more frequently but are less intensively tested and can be more unstable.
Additional enterprise features include advanced backup options, cluster management tools, and specialized monitoring options. These features are not available in the Community Edition and are specifically tailored to enterprise requirements.
When is Proxmox Enterprise Support worthwhile for businesses?
Enterprise Support is particularly worthwhile for companies with critical production environments, limited internal IT resources, or strict compliance requirements. Companies with approximately 50 employees or more, or those with high availability demands, generally benefit from professional support.
A critical factor is the availability requirements of your systems. If outages cause high costs or significantly disrupt business processes, investing in Enterprise Support is justified. This applies particularly to e-commerce, financial service providers, or manufacturing operations.
Internal IT expertise plays a crucial role. If specialized virtualization experts are lacking in the team, Enterprise Support provides valuable assistance with complex problems. Smaller IT teams particularly benefit from the available expertise.
Compliance requirements may necessitate Enterprise Support. Many industries require documented support for audit purposes. Enterprise Support provides the necessary documentation and traceability for regulated environments.
What does Proxmox Enterprise Support cost and what licensing models are available?
Proxmox Enterprise Support is licensed per CPU socket with various support levels. Prices start at 120 Euros per socket per year for access to the enterprise repositories without support, while Premium Support incurs significantly higher costs but offers faster response times. (As of January 1, 2026)
The Basic or Standard package includes access to enterprise repositories, updates, and email support during business hours. This level is suitable for smaller environments without particularly high availability requirements.
Premium Support offers shorter response times and extended services. The costs are significantly higher, but for critical systems, they are well justified by minimized downtime.
Additional cost factors include the number of CPU sockets, desired response times, and special services such as on-site support or individual training. Larger deployments often receive volume discounts.
What alternatives are there to Proxmox Enterprise Support?
Alternatives to official Enterprise Support include Community Support, third-party service providers, in-house expertise development, or hybrid approaches. Each option offers different advantages and disadvantages depending on the company’s situation.
Community support via forums and documentation remains free but offers no guarantees for response times or problem resolution. Experienced IT teams can often find solutions independently, while less experienced teams may struggle.
Support from specialized third-party providers like credativ GmbH can be more cost-effective than official Enterprise Support. These providers often understand local requirements better and offer more flexible service packages. However, quality varies among providers.
Developing in-house expertise through training and certifications offers long-term independence but requires investment in personnel and time. Hybrid approaches combine internal expertise with external open-source support for particularly complex problems.
How credativ® helps with Proxmox decisions and support
credativ® supports you in the strategic decision for the appropriate Proxmox support strategy and offers comprehensive technical support for your virtualization environment. As a vendor-independent open-source specialist, we analyze your requirements and develop tailored support concepts.
Our Proxmox services include:
- Needs analysis and support strategy consulting for your virtualization environment
- 24/7 technical support with direct access to Linux and virtualization experts
- Optional: Proactive monitoring and maintenance of your Proxmox clusters
- Migration and implementation of Proxmox solutions
- Training and knowledge transfer for your IT teams
- Hybrid support models as an alternative to pure Enterprise Support
With over 25 years of experience in the open-source sector, we offer you the security of professional support without vendor lock-in. Contact us for a free consultation on your optimal Proxmox support strategy.
The choice between ZFS, LVM, and Ceph in Proxmox depends on your specific requirements. ZFS offers integrated data redundancy and snapshots for local systems, LVM enables flexible volume management with high performance, while Ceph provides distributed storage solutions for cluster environments. Each technology has different strengths in terms of performance, scalability, and maintenance effort.
What is the difference between ZFS, LVM, and Ceph in Proxmox?
ZFS is a copy-on-write file system with integrated volume management and data redundancy. It combines a file system and volume manager into one solution and offers features such as snapshots, compression, and automatic error correction. ZFS is particularly suitable for local storage scenarios with high data integrity requirements.
LVM (Logical Volume Manager)
Ceph represents a fully distributed storage architecture that replicates data across multiple nodes. It provides object, block, and file storage in a single system and scales horizontally. Ceph is suitable for large cluster environments with high availability requirements.
Which storage solution offers the best performance for different workloads?
LVM with ext4 or XFS delivers the highest performance for I/O-intensive applications such as databases. The low overhead makes it the first choice for latency-critical workloads. ZFS follows with good performance alongside data integrity features, while Ceph exhibits higher latency due to network overhead.
For database workloads, LVM with fast SSDs and direct access is recommended. The minimal abstraction layer reduces latency and maximizes IOPS. ZFS can offer competitive performance here through ARC cache and L2ARC acceleration, especially for read-heavy workloads.
File services benefit from ZFS features such as deduplication and compression, which save storage space.
Ceph is suitable for distributed file services with high availability requirements, even if performance is limited by network communication. Here, virtual machines can be migrated from host to host with virtually no delay, whether using a tool like ProxLB or in the event of a failover.
Virtual machines run well on all three systems. LVM offers the best raw performance, ZFS enables efficient VM snapshots, and Ceph provides live migration between hosts without shared storage.
| Feature | LVM | ZFS | Ceph |
|---|---|---|---|
| Architecture Type | Local (Block Storage) | Local (File System & Volume Manager) | Distributed (Object/Block/File) |
| Performance (Latency) | Excellent (Minimal Overhead) | Good (Scales with RAM/ARC) | Moderate (Network Dependent) |
| Snapshots | Yes | Yes (very efficient) | Yes |
| Data Integrity | Limited (RAID-dependent) | Excellent (Checksumming) | Excellent (Checksumming) |
| Scalability | Limited (Single Node) | Medium (within host) | Very high (Horizontal in cluster) |
| Network Requirements | Standard (1 GbE sufficient) | Standard (1 GbE sufficient) | High (min. 10-25 GbE recommended) |
| Main Application Area | Maximum single-node performance | High data security & local speed | Enterprise cluster & high availability |
| Complexity | Simple | Moderate | High |
How do you decide between local and distributed storage architecture?
Local storage solutions such as ZFS and LVM are suitable for single-host environments or when maximum performance is more important than high availability. Distributed systems like Ceph are necessary when data must be available across multiple hosts or when automatic failover mechanisms are required.
Infrastructure size plays a decisive role. Individual Proxmox hosts or small setups with two to three servers work well with local storage solutions. From three to four hosts, Ceph becomes interesting as it enables true high availability without a single point of failure. Ceph requires a quorum, so an odd number of nodes is always required for Ceph. Cluster setups with an even number are therefore always subject to some variation in usage – but manual adjustments are also required in Proxmox VE here.
Network requirements differ significantly. Local storage systems only require a standard network for management, while Ceph requires dedicated 10GbE connections for optimal performance. Today, for certain performance needs, 25GbE connections are preferred for the data load. Ideally, these connections are available exclusively to the Ceph system and are in addition to the virtualization requirements. The network infrastructure therefore significantly influences the storage decision.
Maintenance effort and complexity increase with distributed systems. ZFS and LVM are easier to understand and maintain, while Ceph requires specialized knowledge for configuration, monitoring, and troubleshooting.
Proxmox VE with ZFS offers a middle ground between true shared storage and local data storage with pe-sync. This allows hosts to be kept in sync automatically. However, this is not synchronous but occurs at specific intervals, such as every 15 minutes. For certain workloads, this can be perfectly sufficient.
What are the most important factors in Proxmox storage planning?
Hardware requirements vary greatly between storage technologies. ZFS requires sufficient RAM (1 GB per TB of storage) so that the integrated ARC cache can reach its full performance, LVM runs on minimal hardware, and Ceph requires dedicated network hardware, as well as sufficient RAM and multiple hosts. Hardware equipment often determines the available storage options.
Backup strategies must match the chosen storage solution. ZFS snapshots enable efficient incremental backups, LVM snapshots offer similar functionality, while Ceph backups are implemented via RBD snapshots or external tools. Backup requirements significantly influence the choice of storage.
Scalability planning should take future growth into account. LVM allows for easy volume expansion, ZFS pools can be expanded with additional drives, and Ceph scales by adding new hosts. The planned growth direction influences the optimal storage architecture.
Budget considerations include not only hardware costs but also maintenance effort and the required expertise. Simple LVM setups have low total costs, while Ceph clusters require higher investments in hardware and training.
Bonus: ZFS and Ceph both offer integrated checksumming procedures that actively help against so-called "bit rot" – creeping data corruption – and can automatically detect and correct it through redundancy. LVM without additional layers like a RAID layer does not allow for this.

How credativ® supports Proxmox storage optimization
credativ® offers comprehensive consulting and implementation for optimal Proxmox storage decisions based on your specific requirements. Our open-source experts analyze your workloads, infrastructure, and growth plans to recommend the ideal storage architecture.
Our services include:
- Detailed storage architecture assessment and technology selection
- Professional implementation and configuration of ZFS, LVM, or Ceph
- Performance optimization and monitoring setup for selected storage solutions
- 24/7 support and maintenance for production Proxmox environments
- Training for your IT team on storage management and best practices
With over 25 years of experience in the open-source sector and direct access to our permanent Linux specialists, you receive professional Proxmox support without going through call centers. Contact us for a personalized consultation on your Proxmox storage strategy and benefit from our proven enterprise support.
Proxmox system requirements vary significantly depending on the deployment scenario. For a basic installation, you need at least a 64-bit CPU with virtualization support, 2 GB of RAM, and 32 GB of storage space. However, production environments require considerably more resources, depending on the number of virtual machines and their workloads. Correct hardware sizing determines the performance and stability of your Proxmox infrastructure.
(more…)
After the successful kick-off in December, we are now moving into the second round! On March 5th, we invite you again to the Open Source Virtualization Gathering at our premises in Mönchengladbach.
As last time, the focus is on professional exchange in a relaxed atmosphere. We have slightly streamlined the schedule to create more room for the talks. We look forward to two high-caliber talks that will demonstrate the versatility of open-source virtualization in practice.
The schedule for the evening
This time, we will start the program a little earlier:
- 5:15 PM: Admission and arrival – Cold drinks are on us!
- 5:30 PM: Talk #1 – Efficient Proxmox Cluster Management with PegaProx
- Speaker: Florian Paul Azim Hoberg @gyptazy
- 6:15 PM: Socializing & short break
- 18:30 Uhr: Talk #2 – 5G Mobile Private Networks auf Proxmox
- Speaker: Sven Lankes, COCUS AG
- 7:15 PM: Open discussion / Socializing in the office with drinks
- 8:30 PM: Joint conclusion at the Italian restaurant (directly in the building, at your own expense)
The first talk: Proxmox management in-depth
The kick-off will be given by Florian Hoberg (gyptazy), Technical Lead for Virtualization at credativ and developer of well-known open-source tools such as ProxLB.
He will introduce PegaProx – a management platform specifically developed for Proxmox clusters. Florian will demonstrate how PegaProx goes beyond the functionality of the official Proxmox Datacenter Manager and will show in a live demo how it can be used to centrally and efficiently manage complex multi-node environments.
The second talk: High-Tech Connectivity meets Open Source
Wir freuen uns sehr, für den zweiten Slot Sven Lankes von der COCUS AG gewonnen zu haben. Sven hilft Kunden seit über 25 Jahren, ihre IT-Systeme sicher und effizient umzusetzen, und ist seit zwei Jahrzehnten aktiv in diversen Open-Source-Communities.
Die COCUS AG liefert schlüsselfertige 5G Mobile Private Networks (Campus-Netze), die die Connectivity-Möglichkeiten von Unternehmen massiv erweitern. In seinem Vortrag “5G Mobile Private Networks auf Proxmox”gibt Sven zunächst einen generellen Überblick über diese Technologie. Im Anschluss geht er auf die Besonderheiten bei Entwicklung, Wartung und Deployment der hauseigenen “Campus-To-Go Solution” ein und zeigt, wie sie dafür Proxmox-Virtualisierung erfolgreich mit modernen Cloud-Technologien verbinden.
Catering & Registration
During the event in the office, we will provide you with cold drinks. For later hunger, we will move together at 8:30 PM to the Italian restaurant on the ground floor (important note: they do not serve pizza there, but excellent pasta and other dishes). Dinner is at your own expense.
Please register via Luma so that we can coordinate the drink planning and the reservation at the Italian restaurant: 👉 https://luma.com/dmphypvn If you do not wish to use an external service, you can also simply contact us by email.
We look forward to seeing you!
ProxCLMC – What is it?
Live migration is one of the most powerful and frequently used functions in a Proxmox VE Cluster. However, it presupposes a requirement that is often underestimated: consistent CPU compatibility across all nodes. In real-world environments, clusters rarely consist of identical hardware where you could simply use the CPU type host. Nodes are added over time, CPU generations differ, and functional scopes continue to evolve. Although Proxmox VE allows a flexible CPU configuration, determining a safe and optimal CPU baseline for the entire cluster has so far been largely a manual and experience-based task.

ProxCLMC (Prox CPU Live Migration Checker) was developed by our colleague Florian Paul Azim Hoberg (also known as gyptazy) in Rust as an open-source solution under the GPLv3 license to close this gap in a simple, automated, and reproducible way. The tool examines all nodes of a Proxmox VE cluster, subsequently analyzes their CPU capabilities, and calculates the highest possible CPU compatibility level supported by each node. Instead of relying on assumptions, spreadsheets, or trial and error, administrators receive a clear and deterministic result that can be used directly when selecting VM CPU models.
Comparable mechanisms already exist in other virtualization ecosystems. Enterprise platforms often offer integrated tools or automatic assistance to detect compatible CPU baselines and prevent invalid live migration configurations. Proxmox VE currently does not have such an automated detection mechanism, so administrators must manually compare CPU flags or rely on operational experience. ProxCLMC closes this gap by providing a cluster-wide CPU compatibility analysis specifically tailored to Proxmox environments.
How does ProxCLMC work?
ProxCLMC is designed to integrate seamlessly into existing Proxmox VE clusters without requiring additional services, agents, or configuration changes. It is written entirely in Rust (fully open source under GPLv3), compiled as a static binary, and provided as a Debian package via the gyptazy repository to facilitate easy installation. The workflow follows a clear and transparent process that reflects how administrators think about CPU compatibility but automates it reliably and reproducibly.
After starting, the tool parses the local corosync.conf on the node on which it is running. This allows ProxCLMC to automatically detect all members of the cluster without relying on external inventories or manual input. The determined node list thus always corresponds to the actual state of the cluster.
Once all cluster nodes are identified, ProxCLMC establishes an SSH connection to each node. Via this connection, it remotely reads the content of /proc/cpuinfo. This file provides a detailed and authoritative view of the CPU capabilities provided by the host kernel, including the complete set of supported CPU flags.
From the collected data, ProxCLMC extracts the relevant CPU flags and evaluates them based on clearly defined x86-64 CPU baseline definitions. These baselines are directly based on the CPU models supported by Proxmox VE and QEMU, including:
- x86-64-v1
- x86-64-v2-AES
- x86-64-v3
- x86-64-v4
By mapping the CPU flags of each node to these standardized baselines, ProxCLMC can determine which CPU levels are supported per node. The tool then calculates the lowest common CPU type shared by all nodes in the cluster. This resulting baseline represents the maximum CPU compatibility level that can be safely used for virtual machines while still allowing unrestricted live migrations between all nodes. To get a general idea of the output:
 test-pmx01 | 10.10.10.21 | x86-64-v3
 test-pmx02 | 10.10.10.22 | x86-64-v3
 test-pmx03 | 10.10.10.23 | x86-64-v4
 Cluster CPU type: x86-64-v3
With this approach, ProxCLMC brings automated CPU compatibility checking to Proxmox VE-based clusters. Comparable concepts are already known from other virtualization platforms, such as VMware EVC, where CPU compatibility is enforced cluster-wide to ensure secure migrations. ProxCLMC transfers this basic idea to Proxmox environments but implements it in a lightweight, transparent, and completely open manner, thus integrating seamlessly into existing operating procedures and workflows.
Installation of ProxCLMC
ProxCLMC was developed with the goal of enabling easy deployment and integrating cleanly into existing Proxmox VE environments. It can be used directly from the source code or installed as a packaged Debian binary, making it suitable for both development and production environments.
The complete source code is publicly available on GitHub and can be accessed at the following address:
https://github.com/gyptazy/ProxCLMC
This enables complete transparency, auditability, and the ability to adapt or build the tool to individual requirements.
Prerequisites and Dependencies
Before installing ProxCLMC, the following prerequisites must be met:
- A Proxmox VE cluster
- SSH authentication between all Proxmox VE nodes
- Network connection between all cluster members
ProxCLMC uses SSH to remotely examine each node and read CPU information. Passwordless SSH authentication is therefore recommended to ensure smooth and automated execution.
Installation via the Debian Repository
The recommended way to install ProxCLMC on Debian-based systems, including Proxmox VE, is via the Debian repository provided by gyptazy. This repository is also used to distribute the ProxLB project and integrates seamlessly into the usual package management workflows.
To add the repository and install ProxCLMC, execute the following commands:
Using the repository ensures that ProxCLMC can be easily installed, updated, and managed together with other system packages.
Installation via a Debian Package
Alternatively, ProxCLMC can also be installed manually via a pre-built Debian package. This is particularly useful for environments without direct repository access or for offline installations.
The package can be downloaded directly from the gyptazy CDN and installed with dpkg:
This method offers the same functionality as installation via the repository, but without automatic updates.
Conclusion
ProxCLMC exemplifies how quickly gaps in the open-source virtualization ecosystem can be closed when real operational requirements are directly addressed. Similar to the ProxLB project (GitHub), which provides advanced scheduling and balancing functions for Proxmox VE-based clusters, ProxCLMC focuses on a very specific but critical area that was previously largely left to manual processes and experience.
By introducing automated CPU compatibility detection, ProxCLMC brings a functionality to Proxmox VE clusters that is commonly expected in enterprise virtualization platforms but has not yet been available in automated form. It shows that open-source solutions are not limited by missing functions but rather offer the freedom to extend and adapt platforms exactly where it is most important.
With ProxCLMC, operators can now automatically determine the most suitable CPU type for virtual machines in a Proxmox VE cluster, ensuring secure live migrations and consistent behavior across all nodes. Together with projects like ProxLB, this underscores the strength of the open-source model: missing enterprise functions can be transparently added, adapted to real requirements, and shared with the community to continuously improve the Proxmox ecosystem. Should you also require further adjustments or developments around or for Proxmox VE, we would be happy to support you in the realization! Do not hesitate to contact us – we would be happy to advise you on your project!
Efficient Storage Automation in Proxmox with the proxmox_storage Module
Managing various storage systems in Proxmox environments often involves recurring tasks. Whether it’s creating new storage, connecting NFS, CIFS shares, iSCSI, or integrating more complex backends like CephFS or Proxmox Backup Server, in larger environments with multiple nodes or entire clusters, this can quickly become time-consuming, error-prone, and difficult to track.
With Ansible, these processes can be efficiently automated and standardized. Instead of manual configurations, Infrastructure as Code ensures a clear structure, reproducibility, and traceability of all changes. Similar to the relatively new module proxmox_cluster, which automates the creation and joining of Proxmox nodes to clusters, this now applies analogously to storage systems. This is precisely where the Ansible module proxmox_storage, developed by our highly esteemed colleague Florian Paul Azim Hoberg (also well-known in the open-source community as gyptazy), comes into play. It enables the simple and flexible integration of various storage types directly into Proxmox nodes and clusters, automated, consistent, and repeatable at any time. The module is already part of the Ansible Community.Proxmox Collections and has been included in the collections since version 1.3.0.
This makes storage management in Proxmox not only faster and more secure, but also seamlessly integrates into modern automation workflows.
Ansible Module: proxmox_storage
The proxmox_storage module is an Ansible module developed in-house at credativ for the automated management of storage in Proxmox VE. It supports various storage types such as NFS, CIFS, iSCSI, CephFS, and Proxmox Backup Server.
The module allows you to create new storage resources, adjust existing configurations, and completely automate the removal of no longer needed storage. Its integration into Ansible Playbooks enables idempotent and reproducible storage management in Proxmox nodes and clusters. The module simplifies complex configurations and reduces sources of error that can occur during manual setup.
Add iSCSI Storage
Integrating iSCSI storage into Proxmox enables centralized access to block-based storage that can be flexibly used by multiple nodes in the cluster. By using the proxmox_storage module, the connection can be configured automatically and consistently, which saves time and prevents errors during manual setup.
- name: Add iSCSI storage to Proxmox VE Cluster
  community.proxmox.proxmox_storage:
  api_host: proxmoxhost
  api_user: root@pam
  api_password: password123
  validate_certs: false
  nodes: ["de-cgn01-virt01", "de-cgn01-virt02", "de-cgn01-virt03"]
  state: present
  type: iscsi
  name: net-iscsi01
  iscsi_options:
  portal: 10.10.10.94
  target: "iqn.2005-10.org.freenas.ctl:s01-isci01"
  content: ["rootdir", "images"]
The integration takes place within a single task, where the consuming nodes and the iSCSI-relevant information are defined. It is also possible to define for which “content” this storage should be used.
Add Proxmox Backup Server
The Proxmox Backup Server (PBS) is also considered storage in Proxmox VE and can therefore be integrated into the environment just like other storage types. With the proxmox_storage module, a PBS can be easily integrated into individual nodes or entire clusters, making backups available centrally, consistently, and automatically.
- name: Add PBS storage to Proxmox VE Cluster
  community.proxmox.proxmox_storage:
  api_host: proxmoxhost
  api_user: root@pam
  api_password: password123
  validate_certs: false
  nodes: ["de-cgn01-virt01", "de-cgn01-virt02"]
  state: present
  name: backup-backupserver01
  type: pbs
  pbs_options:
  server: proxmox-backup-server.example.com
  username: backup@pbs
  password: password123
  datastore: backup
  fingerprint: "F3:04:D2:C1:33:B7:35:B9:88:D8:7A:24:85:21:DC:75:EE:7C:A5:2A:55:2D:99:38:6B:48:5E:CA:0D:E3:FE:66"
  export: "/mnt/storage01/b01pbs01"
  content: ["backup"]
Note: It is important to consider the fingerprint of the Proxmox Backup Server system that needs to be defined. This is always relevant if the instance’s associated certificate was not issued by a trusted root CA. If you are using and legitimizing your own root CA, this definition is not necessary. .
Remove Storage
No longer needed or outdated storage can be removed just as easily from Proxmox VE. With the proxmox_storage module, this process is automated and performed idempotently, ensuring that the cluster configuration remains consistent and unused resources are cleanly removed. A particular advantage is evident during storage migrations, as old storage can be removed in a controlled manner after successful data transfer. This way, environments can be gradually modernized without manual intervention or unnecessary configuration remnants remaining in the cluster.
- name: Remove storage from Proxmox VE Cluster
  community.proxmox.proxmox_storage:
  api_host: proxmoxhost
  api_user: root@pam
  api_password: password123
  validate_certs: false
  state: absent
  name: net-nfsshare01
  type: nfs
Conclusion
The example of automated storage integration with Ansible and Proxmox impressively demonstrates the advantages and extensibility of open-source solutions. Open-source products like Proxmox VE and Ansible can be flexibly combined, offering an enormous range of applications that also prove their worth in enterprise environments.
A decisive advantage is the independence from individual manufacturers, meaning companies do not have to fear vendor lock-in and retain more design freedom in the long term. At the same time, it becomes clear that the successful implementation of such scenarios requires sound knowledge and experience to optimally leverage the possibilities of open source.
While this only covers a partial area, our colleague Florian Paul Azim Hoberg (gyptazy) impressively demonstrates here in his video “Proxmox Cluster Fully Automated: Cluster Creation, NetApp Storage & SDN Networking with Ansible” what full automation with Proxmox can look like.
This is precisely where we stand by your side as your partner and are happy to support you in the areas of automation, development and all questions relating to Proxmox and modern infrastructures. Please do not hesitate to contact us – we will be happy to advise you!
Automated Proxmox Subscription Handling with Ansible
When deploying Proxmox VE in enterprise environments, whether for new locations, expanding existing clusters, or migrating from platforms like VMware, automation becomes essential. These scenarios typically involve rolling out dozens or even hundreds of nodes across multiple sites. Manually activating subscriptions through the Proxmox web interface is not practical at this scale.
To ensure consistency and efficiency, every part of the deployment process should be automated from the beginning. This includes not just the installation and configuration of nodes, automated cluster creation, but also the activation of the Proxmox subscription. In the past, this step often required manual interaction, which slowed down provisioning and introduced unnecessary complexity.
Now there is a clean solution to this. With the introduction of the new Ansible module proxmox_node, the subscription management is fully integrated. This module allows you to handle subscription activation as part of your Ansible playbooks, making it possible to automate the entire process without ever needing to open the web interface.
This improvement is particularly valuable for mass deployments, where reliability and repeatability matter most. Every node can now be automatically configured, licensed, and production-ready right after boot. It is a great example of how Proxmox VE continues to evolve into a more enterprise-friendly platform, while still embracing the flexibility and openness that sets it apart.
Ansible Module: proxmox_node
With automation becoming more critical in modern IT operations, managing Proxmox VE infrastructure through standardized tools like Ansible has become a common practice. Until now, while there were various community modules available to interact with Proxmox resources, node-level management often required custom workarounds or direct SSH access. That gap has now been closed with the introduction of the new proxmox_node module.
This module was developed by our team at credativ GmbH, specifically by our colleague known in the community under the handle gyptazy. It has been contributed upstream and is already part of the official Ansible Community Proxmox collection, available to anyone using the collection via Ansible Galaxy or automation controller integrations.
The proxmox_node module focuses on tasks directly related to the lifecycle and configuration of a Proxmox VE node. What makes this module particularly powerful is that it interacts directly with the Proxmox API, without requiring any SSH access to the node. This enables a cleaner, more secure, and API-driven approach to automation.
The module currently supports several key features that are essential in real-world operations:
- Managing Subscription Licenses
One of the standout features is the ability to automatically upload and activate a Proxmox VE subscription key. This is incredibly helpful for enterprises rolling out clusters at scale, where licensing should be handled consistently and automatically as part of the provisioning workflow. - Controlling Power States
Power management of nodes can now be handled via Ansible, making it easy to start (via Wake-on-Lan) or shutdown nodes as part of playbook-driven maintenance tasks or during automated cluster operations.
- Managing DNS Configuration
DNS settings such as resolvers and search domains can be modified declaratively, ensuring all nodes follow the same configuration policies without manual intervention.
- Handling X509 Certificates
The module also allows you to manage TLS certificates used by the node. Whether you’re deploying internal PKI-signed certificates or using externally issued ones, theproxmox_nodemodule lets you upload and apply them through automation in a clean and repeatable way.
By bringing all of this functionality into a single, API-driven Ansible module, the process of managing Proxmox nodes becomes much more reliable and maintainable. You no longer need to script around pveproxy with shell commands or use SSH just to manage node settings.
Subscription Integration Example
Adding a subscription to a Proxmox VE node is as simple as the following task. While this shows the easiest way for a single node, this can also be used in a loop over a dictionary holding the related subscriptions for each node.
- name: Place a subscription license on a Proxmox VE Node
  community.proxmox.node:
    api_host: proxmoxhost
    api_user: gyptazy@pam
    api_password: password123
    validate_certs: false
    node_name: de-cgn01-virt01
    subscription:
        state: present
        key: ABCD-EFGH-IJKL-MNOP-QRST-UVWX-YZ0123456789
Conclusion
For us at credativ, this module fills a real gap in the automation landscape around Proxmox and demonstrates how missing features in open-source projects can be addressed effectively by contributing upstream. It also reinforces the broader movement of managing infrastructure declaratively, where configuration is versioned, documented, and easily reproducible.
In combination with other modules from the community Proxmox collection like our recent proxmox_cluster module, proxmox_node helps complete the picture of a fully automated Proxmox VE environment — from cluster creation and VM provisioning to node configuration and licensing. If you’re looking for help or assistance for creating Proxmox VE based virtualization infrastructures, automation or custom development to fit your needs, we’re always happy to help! Feel free to contact us at any time.
Efficient Proxmox Cluster Deployment through Automation with Ansible
Manually setting up and managing servers is usually time-consuming, error-prone, and difficult to scale. This becomes especially evident during large-scale rollouts, when building complex infrastructures, or during the migration from other virtualization environments. In such cases, traditional manual processes quickly reach their limits. Consistent automation offers an effective and sustainable solution to these challenges.
 Proxmox is a powerful virtualization platform known for its flexibility and comprehensive feature set. When combined with Ansible, a lightweight and agentless automation tool, the management of entire system landscapes becomes significantly more efficient. Ansible allows for the definition of reusable configurations in the form of playbooks, ensuring that deployment processes are consistent, transparent, and reproducible.
To enable fully automated deployment of Proxmox clusters, our team member, known in the open-source community under the alias gyptazy, has developed a dedicated Ansible module called proxmox_cluster. This module handles all the necessary steps to initialize a Proxmox cluster and add additional nodes. It has been officially included in the upstream Ansible Community Proxmox collection and is available for installation via Ansible Galaxy starting with version 1.1.0. As a result, the manual effort required for cluster deployment is significantly reduced. Further insights can be found in his blog post titled “How My BoxyBSD Project Boosted the Proxmox Ecosystem“.
By adopting this solution, not only can valuable time be saved, but a solid foundation for scalable and low-maintenance infrastructure is also established. Unlike fragile task-based approaches that often rely on Ansible’s shell or command modules, this solution leverages the full potential of the Proxmox API through a dedicated module. As a result, it can be executed in various scopes and does not require SSH access to the target systems.
This automated approach makes it possible to deploy complex setups efficiently while laying the groundwork for stable and future-proof IT environments. Such environments can be extended at a later stage and are built according to a consistent and repeatable structure.
Benefits
Using the proxmox_cluster module for Proxmox cluster deployment brings several key advantages to modern IT environments. The focus lies on secure, flexible, and scalable interaction with the Proxmox API, improved error handling, and simplified integration across various use cases:
- Use of the native Proxmox API
- Full support for the Proxmox authentication system
- API Token Authentication support
- No SSH access required
- Usable in multiple scopes:
- From a dedicated deployment host
- From a local system
- Within the context of the target system itself
- Improved error handling through API abstraction
Ansible Proxmox Module: proxmox_cluster
The newly added proxmox_cluster module in Ansible significantly simplifies the automated provisioning of Proxmox VE clusters. With just a single task, it enables the seamless creation of a complete cluster, reducing complexity and manual effort to a minimum.
Creating a Cluster
Creating a cluster requires now only a single task in Ansible by using the proxmox_cluster module:
- name: Create a Proxmox VE Cluster
  community.proxmox.proxmox_cluster:
    state: present
    api_host: proxmoxhost
    api_user: root@pam
    api_password: password123
    api_ssl_verify: false
    link0: 10.10.1.1
    link1: 10.10.2.1
    cluster_name: "devcluster"
Afterwards, the cluster is created and additional Proxmox VE nodes can join the cluster.
Joining a Cluster
Additional nodes can now also join the cluster using a single task. When combined with the use of a dynamic inventory, it becomes easy to iterate over a list of nodes from a defined group and add them to the cluster within a loop. This approach enables the rapid deployment of larger Proxmox clusters in an efficient and scalable manner.
- name: Join a Proxmox VE Cluster
  community.proxmox.proxmox_cluster:
    state: present
    api_host: proxmoxhost
    api_user: root@pam
    api_password: password123
    master_ip: "{{ primary_node }}"
    fingerprint: "{{ cluster_fingerprint }}"
    cluster_name: “devcluster"
Cluster Join Informationen
In order for a node to join a Proxmox cluster, the cluster’s join information is generally required. To avoid defining this information manually for each individual cluster, this step can also be automated. As part of this feature, a new module called cluster_join_info has been introduced. It allows the necessary data to be retrieved automatically via the Proxmox API and made available for further use in the automation process.
- name: List existing Proxmox VE cluster join information
  community.proxmox.proxmox_cluster_join_info:
    api_host: proxmox1
    api_user: root@pam
    api_password: "{{ password | default(omit) }}"
    api_token_id: "{{ token_id | default(omit) }}"
    api_token_secret: "{{ token_secret | default(omit) }}"
  register: proxmox_cluster_join
Conclusion
While automation in the context of virtualization technologies is often focused on the provisioning of guest systems or virtual machines (VMs), this approach demonstrates that automation can be applied at a much deeper level within the underlying infrastructure. It is also possible to fully automate scenarios in which nodes are initially deployed using a customer-specific image with Proxmox VE preinstalled, and then proceed to automatically create the cluster.
As an official Proxmox partner, we are happy to support you in implementing a comprehensive automation strategy tailored to your environment and based on Proxmox products. You can contact us at any time!
ProxLB – Version 1.1.0 of the Advanced Loadbalancer for Proxmox Clusters is Ready!
Finally, it’s here – and it’s no April Fool’s joke! The long-awaited version 1.1.0 of ProxLB has been officially released! This new version features a complete code refactoring, making maintenance easier and laying the groundwork for future expansions. Additionally, numerous bugs have been fixed, and more features have been implemented. ProxLB is the result of the dedication of our employee Florian Paul Azim Hoberg, better known as gyptazy, who has applied his knowledge and passion to create a powerful open-source solution for Proxmox clusters. We – as credativ GmbH – believe in the power of open-source software and support him by spending time to this project during the business time.
Closing the gap
 ProxLB fills the gap left by the absence of a Dynamic Resource Scheduler (DRS) in Proxmox. As a powerful load balancer, it intelligently migrates workloads or virtual machines (VMs) across all nodes in the cluster, ensuring optimal resource utilization. ProxLB takes CPU, memory, and disk usage into account to prevent over-provisioning and maximize performance.
Automatic maintenance mode handling
One of the standout features of ProxLB is its maintenance mode. When one or more nodes are placed in maintenance mode, all VMs and containers running on them are automatically moved to other nodes, ensuring the best possible resource utilization across the cluster. This allows for seamless updates, reboots, or hardware maintenance without disrupting ongoing operations.
Custom affinity rules
Furthermore, ProxLB offers extensive customization options through affinity and anti-affinity rules. Administrators can specify whether certain VMs should run together on the same node or be deliberately separated. This is particularly useful for high-availability applications or specialized workloads. Another practical feature is the ability to identify the optimal node for new guests. This function can be easily integrated into CI/CD pipelines using tools like Ansible or Terraform to automate deployments and further enhance cluster efficiency. You can see how this works with ProxLB and Terraform in this example.
ProxLB also stands out with its deep integration into the Proxmox API. It fully supports the Access Control List (ACL), eliminating the need for additional SSH access. This not only enhances security but also simplifies management.
Whether used as a one-time operation or in daemon mode, ProxLB is a flexible, transparent, and efficient cluster management solution. Thanks to its open-source license, users can customize the software to meet their specific needs and contribute to its further development.
Download
ProxLB can be installed in many different ways where it can operate and run inside of an dedicated VM (even inside the Proxmox cluster), on bare-metal, on a Proxmox node itself or on containers like LXC or Docker. The project also provides ready to use container images that can directly be used in Docker or Podman. The project’s docs provide you a more detailed overview of the different types and ways to install and use ProxLB, which can simply be found right here. While you can find below resources for a quick-start you should think about switching to the project’s Debian based repository for long-term usage.
| Typ | Download |
| Debian Package | proxlb_1.1.0_all.deb |
| Container Image | cr.gyptazy.com/proxlb/proxlb:latest |
Conclusion
With version 1.1.0, ProxLB lives up to its reputation as an indispensable tool for Proxmox administrators, especially for those transitioning from VMware. Try out the new version and experience how easy and efficient load balancing can be in your cluster! We are also happy to support you with the integration and operation of ProxLB in your cluster, as well as with all other Proxmox-related topics, including planning a migration from other hypervisor technologies to Proxmox!