bhyve als Hypervisor unter FreeBSD – Erstellen einer Virtualisierungsumgebung
| Kategorien: | credativ® Inside Virtualisierung |
|---|---|
| Tags: | bhyve FreeBSD |
Erstellen einer Virtualisierungsumgebung
Heutzutage spricht jeder über Containerisierung, aber es gibt immer noch viele Gründe, virtuelle Maschinen zu betreiben, und es muss nicht immer Proxmox VE auf Linux-Systemen sein, um eine Virtualisierungsumgebung mit Open-Source-Tools zu erstellen!
Neben dem bekannten Proxmox gibt es auch andere Open-Source-Alternativen für die Virtualisierung. Eine vielversprechende Lösung bietet auch bhyve (ausgesprochen bee-hive), das auf FreeBSD-basierten Systemen läuft. Es wurde ursprünglich für FreeBSD geschrieben, läuft aber mittlerweile auch auf einer Reihe von illumos-basierten Distributionen wie OpenIndiana. bhyve bietet eine robuste und leistungsstarke Virtualisierungslösung, die direkt auf der Bare-Metal-Hardware läuft und die Hardware-Virtualisierungsfunktionen für verbesserte Leistung und Isolation zwischen virtuellen Maschinen nutzt. bhyve ist bekannt für seine Leistung, Stabilität und Sicherheit und ist in FreeBSD integriert, wodurch es von der Zuverlässigkeit des FreeBSD-Kernels profitiert. Natürlich bietet es auch die typischen Funktionen wie Snapshots und Klonen von VMs. Insbesondere in solchen Fällen profitiert es von zusätzlichen Funktionen in FreeBSD wie dem ZFS-Dateisystem. Leider bietet bhyve kein Web-Frontend für seine Verwaltung. Hier kommt bhyve-webadmin (BVCP) ins Spiel, um diese Lücke zu schließen. In diesem Blogbeitrag behandeln wir die Ersteinrichtung und die Funktionen von bhyve und bhyve-admin, um eine voll nutzbare Virtualisierungsumgebung bereitzustellen.
Features
bhyve-webadmin (auch bekannt als BVCP) bietet eine API, eine CLI und eine sichere Webschnittstelle für die Verwaltung von bhyve und virtuellen Maschinen. Die wichtigsten Funktionen von bhyve-webadmin:
- Modularität
- Backend, Frontend, API und Hilfsprogramme arbeiten unabhängig voneinander und verfügen über separate Berechtigungen.
- Multi-Node
- Mehrere Server/Instanzen können über eine einzige Schnittstelle koordiniert werden.
- Sicherheit
- Native Anwendung
- Rollen
- Bereitstellung von Benutzerverwaltung einschließlich mehrerer Rollen.
Anforderungen
Um bhyve zusammen mit bhyve-webadmin ausführen zu können, müssen einige allgemeine Anforderungen erfüllt sein:
- System mit einer minimalen FreeBSD-Image-Installation.
- 64-Bit-CPU
- POPCNT-Prozessorfunktion (POPulation Count)
Zusätzliche Konfigurationen hinsichtlich des zugrunde liegenden Speichers und der Netzwerkkonfiguration sind erforderlich, aber da diese für jede Einrichtung individuell sind, werden sie in diesem Leitfaden nicht im Detail behandelt.
Installation
Dieser Leitfaden basiert auf FreeBSD 14 und bhyve-webadmin v1.9.8p9, um eine Virtualisierungsinfrastruktur bereitzustellen. Das Konzept von bhyve-webadmin basiert darauf, so nah wie möglich am FreeBSD-System zu arbeiten und dessen Konfiguration nicht zu verändern. Stattdessen werden alle Komponenten in dedizierten Verzeichnissen, Konfigurationen und Diensten installiert und verwaltet. Dadurch kann die gesamte Installation einschließlich aller weiteren Abhängigkeiten und Konfigurationen in wenigen Minuten durchgeführt werden.
Übersicht
Dateistruktur
Standardmäßig verwendet bhyve-webadmin die folgenden Verzeichnisse für den Inhalt:
- /var/lib/nPulse/BVCP: Inhalt von bhyve-webadmin
- /var/lib/nPulse/BVCP/bvcp.conf: Konfigurationsdatei
- /vms
- /vms/instances
- /vms/iso-images
- /vms/db
- /vms/logs
- /vms/tmp
- /vms/bootrom
In diesen Verzeichnissen finden Sie zusätzliche Hilfsprogramme. Ein vergessenes Passwort kann beispielsweise durch Ausführen des folgenden Befehls zurückgesetzt werden:
- /var/lib/nPulse/BVCP/Backend/vmm reset_password
Dienstleistungen
Wie bereits erwähnt, besteht es aus mehreren unabhängig voneinander arbeitenden Softwarekomponenten, die auch orchestriert werden können.
Frontend:
service bvcp-frontend start / stop / restart
Backend:
service bvcp-backend start / stop / restart
Helper:
service bvcp-helper start / stop / restart
Software-Installation
Zunächst muss der benötigte Code aus dem GitHub-Projekt abgerufen und in das Verzeichnis /tmp/ heruntergeladen werden. Anschließend muss das Archiv .tar.gz mit dem Befehl tar extrahiert werden:
cd /tmp/
fetch https://github.com/DaVieS007/bhyve-webadmin/archive/refs/tags/v1.9.8p9.tar.gz
tar xfvz v1.9.8p9.tar.gz
sha256sum /tmp/bhyve-webadmin-1.9.8p9.tar.gz
$> 758f5900c75a1832c980ed23c74a893f05252aa130e7c803843dac1d2531516f  /tmp/bhyve-webadmin-1.9.8p9.tar.gz
Anschließend kann die Installation von bhyve-admin gestartet werden. Der Installationsprozess ist als „Ein-Klick“-Installer konzipiert und führt alle Schritte selbstständig durch:
cd bhyve-webadmin-1.9.8p9/
./install.sh
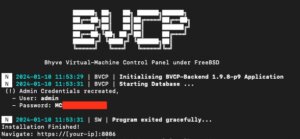
Nach Abschluss der Installation wurden alle erforderlichen Verzeichnisse, Konfigurationen und Dienste erstellt, und die Dienste laufen bereits auf dem System. Auf der CLI werden die Anmeldedaten für die Weboberfläche bereitgestellt, und eine Anmeldung auf dem Web-Frontend unter https://<ip>:8086 ist möglich. Standardmäßig werden selbstsignierte Zertifikate für die Verschlüsselung des Web-Frontends und der VNC-Sitzungen generiert. Die generierten selbstsignierten Zertifikate können später durch geeignete Zertifikate ersetzt werden (z. B. mit Let’s Encrypt).
Hinzufügen von ISO-Images
ISO-Images für virtuelle Maschinen befinden sich in /vms/iso_images. Das Hinzufügen von Images erfolgt einfach durch Ablegen der Images in diesem Verzeichnis. Dies kann durch Hochladen der Images über SCP, SFTP oder auf dem System selbst durch Herunterladen eines Images von einem Remote-Server erfolgen, wie im folgenden Beispiel gezeigt:
cd /vms/iso_images/
fetch https://download.freebsd.org/releases/amd64/amd64/ISO-IMAGES/14.0/FreeBSD-14.0-RELEASE-amd64-bootonly.iso
Konfiguration
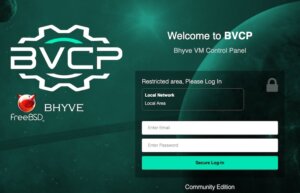
Eine erste Anmeldung am Web-Frontend ist nun möglich. Das Web-Frontend ist unter https://<ip>:8086 erreichbar und verwendet standardmäßig selbstsignierte Zertifikate. Die Anmeldedaten für den root-Benutzer wurden während der Einrichtung auf der CLI ausgegeben.
bhyve BVCP Login
Nach erfolgreicher Anmeldung wird die Standard-Übersichtsseite angezeigt.
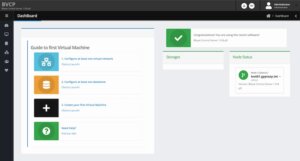
Nach der Erstinstallation werden Sie durch die folgenden drei Schritte geführt, die im Detail behandelt werden:
- Netzwerk konfigurieren
- Speicher konfigurieren
- VM erstellen
Netzwerk konfigurieren
Die Vernetzung ist einer der wichtigsten und komplexesten Aspekte in virtualisierten Umgebungen. Noch komplexere Konfigurationen, einschließlich VLAN-Trennungen usw., sind möglich, werden jedoch in diesem Leitfaden nicht behandelt, der sich in erster Linie auf eine einfache Bridged– und NAT-Netzwerkkonfiguration konzentriert.
Bridged-Netzwerk
Ein einfaches Bridged-Netzwerk kann durch Klicken auf die erste Option 1. Konfigurieren Sie mindestens ein virtuelles Netzwerk erstellt werden, wo wir ein neues Netzwerk auf unserem Cluster erstellen können. Das Erstellen eines neuen Netzwerks ist einfach, da nur die gewünschte Netzwerkschnittstelle auf dem Cluster ausgewählt werden muss.
In diesem Leitfaden wählen wir die folgenden Optionen aus, die je nach Ihrer persönlichen Konfiguration variieren können:
Network Gateway to bound: (+) [em0] (mtu: 1500) 10.10.10.77
Unique Network Name: uplink-dev
Descriptive Text: Uplink network for the dev environments
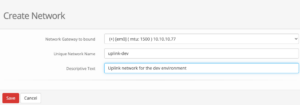
bhyve BVCP – Create Network
Im angezeigten Dropdown-Menü werden alle verfügbaren Netzwerkkarten mit ihrem Schnittstellennamen und den zugewiesenen IP-Adressen angezeigt, sodass Sie leicht die richtige auswählen können. Nach dem Speichern der Konfiguration ist das neu erstellte Netzwerk sofort einsatzbereit.
NAT-Netzwerk
NAT gilt bereits als fortgeschrittenere Netzwerkeinrichtung, wird jedoch häufig bei der Arbeit mit RFC 1918-Adressen benötigt. NAT wird standardmäßig nicht unterstützt und muss manuell konfiguriert werden. In dieser Anleitung wird ein NAT-Netzwerk für die Schnittstelle em1 mithilfe von PF (einer in FreeBSD integrierten Firewall) erstellt.
Dazu aktivieren wir den PF-Dienst in der Datei rc.conf, indem wir den folgenden Befehl ausführen, IP-Forwarding aktivieren und die Firewall-Konfigurationsdatei direkt bearbeiten:
echo ‚pf_enable=“YES“‚ >> /etc/rc.conf
echo "net.inet.ip.forwarding=1" >> /etc/sysctl.conf
sysctl -f /etc/sysctl.conf
vi /etc/pf.conf
Die Firewall-Konfiguration für das NAT-Netzwerk auf der Schnittstelle em1 wird um folgenden Inhalt erweitert:
nat on em1 from {10.10.10.1/24} to any -> (em1)
Optional: In dieser Datei kann auch eine Portweiterleitung definiert werden, wofür Folgendes hinzugefügt werden müsste:
# Forward SSH (tcp/22) to NAT destination host 192.168.1.99
rdr on em1 proto tcp from any to em1 port 22 -> 192.168.1.99 port 22
Als letzter Schritt muss eine Dummy-Schnittstelle erstellt werden, die im Web-Frontend-Dienst ausgewählt werden kann. Dadurch wird Folgendes zur Datei /etc/rc.conf hinzugefügt:
cloned_interfaces="nat0"
ifconfig_nat0="inet 192.168.1.1 netmask 255.255.255.0 up"
Schließlich können die erforderlichen Dienste durch Ausführen des folgenden Befehls neu gestartet werden:
service netif restart && service routing restart
Speicher konfigurieren
Im nächsten Schritt muss der Speicher konfiguriert werden. Dazu klicken Sie einfach auf 2. Konfigurieren Sie mindestens einen Datenspeicher in der Web-Benutzeroberfläche. Standardmäßig ist keiner erstellt und konfiguriert:

bhyve BVCP – Storage Overview
Durch Klicken auf Speicher erstellen wird ein neuer Speicher erstellt. Neu erstellte Speicher müssen ein Einhängepunkt sein.
VM erstellen
Im letzten Schritt wird die erste virtuelle Maschine erstellt. Dies kann schließlich durch Klicken auf 3. Erstellen Sie Ihre erste virtuelle Maschine erfolgen, wo die Optionen für die VM definiert werden.
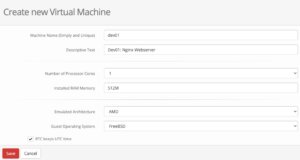
bhyve BVCP – Create VM
In diesem Menü müssen ein eindeutiger Name, eine Beschreibung, die Hardware-Ressourcen wie Anzahl der Kerne und Speicher sowie die zugrunde liegende Hardware-Architektur definiert werden. Nach dem Speichern wird das VM-Objekt erstellt und wir können zusätzliche Aufgaben ausführen, wie z. B. die Definition eines ISO-Images, das in der VMgebootet werden soll.
bhyve BVCP – Add ISO Image to VM
Wie bereits im Kapitel „Dateistruktur“ erwähnt, müssen sich alle verfügbaren ISO-Images im Verzeichnis /vms/iso-images befinden. Die dort abgelegten Images können direkt aus dem Dropdown-Menü ausgewählt werden.
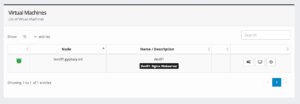
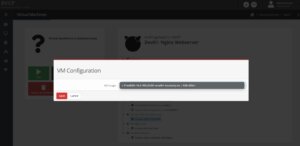
Im letzten Schritt kann die VM durch Klicken auf die Wiedergabetaste gestartet werden. Wenn Sie zurück zur Übersicht der virtuellen Maschinen (Liste der virtuellen Maschinen) wechseln, wird die VM mit einem grünen Symbol angezeigt, um anzuzeigen, dass diese virtuelle Maschine aktiv ist und läuft.
Auf die VM kann nun über den integrierten VNC-Server zugegriffen werden, indem Sie auf das Monitorsymbol in der Mitte des Optionsmenüs klicken.
Statistik
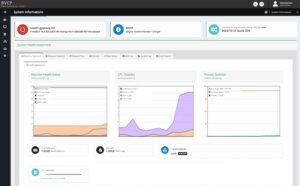
Leistungskennzahlen und Statistiken zur Systemnutzung sind eine wichtige Aufgabe. BVCP bietet viele Optionen zur Überprüfung des Maschinenzustands, darunter Leistungskennzahlen und Statistiken zur Speicher-, CPU-, Speicherplatz- und Netzwerknutzung usw., um negative Auswirkungen auf einen überlasteten Host-Knoten schnell zu erkennen. Darüber hinaus kann es auch dabei helfen, die Ursache von Leistungsproblemen in der Konfiguration oder einer einzelnen virtuellen Maschineninstanz zu ermitteln.
Fazit
Es muss nicht immer Proxmox auf Linux-Systemen sein, um eine schnelle und sichere Virtualisierungsumgebung mit Open-Source-Tools zu schaffen. FreeBSD, bhyve und bhyve-webadmin (BVCP) bieten eine großartige Komplettlösung für den Betrieb einer dedizierten Virtualisierungsinfrastruktur, für die der Endbenutzer keine Kenntnisse in FreeBSD, bhyve oder CLI-Befehlen benötigt. Dank des integrierten IAM können sich Benutzer bei einem grafischen Web-Frontend anmelden und ihre virtuellen Maschinen selbst verwalten.
Als Spezialisten für Open-Source- und Open-Source-Infrastrukturen unterstützen wir Sie und Ihr Unternehmen gerne bei BSD-basierten Systemen und deren Funktionen wie ZFS, PF, Jails, bhyve usw. Seit 1999 ist credativ® dafür bekannt, einen 24/7-Open-Source-Support anzubieten, der mit dem Support der Hersteller konkurrieren kann. Wir bieten nicht nur technischen Support, sondern auch alle anderen Dienstleistungen über den gesamten Lebenszyklus von Open-Source-Landschaften hinweg, ergänzt durch ein hohes Maß an Flexibilität.
| Kategorien: | credativ® Inside Virtualisierung |
|---|---|
| Tags: | bhyve FreeBSD |

über den Autor
gyptazy
Senior DevOps Consultant
zur Person
In meinem technischen Repertoire stehen FreeBSD und föderierte Dienste nicht nur als persönliche Präferenz, sondern als Symbol für mein Bekenntnis zum Ethos der Open Source. Ich bin fest davon überzeugt, dass Entwickler, darunter DevOps, SysOps und die Open-Source-Community, in einer symbiotischen Beziehung zueinander stehen. Während ich weiterhin Teams in der sich ständig weiterentwickelnden Technologielandschaft leite, spiegelt sich ihr Engagement für Open-Source-Beiträge und ihr Eintreten für dezentrale und föderierte Dienste nicht nur in dem Code wider, den sie schreiben, sondern auch in der Ethik, die sie den Teams vermitteln.