Integrating Proxmox Backup Server into Proxmox Clusters
Integrating Proxmox Backup Server into Proxmox Clusters
Proxmox Backup Server
In today’s digital landscape, where data reigns supreme, ensuring its security and integrity is paramount for businesses of all sizes. Enter Proxmox Backup Server, a robust solution poised to revolutionize data protection strategies with its unparalleled features and open-source nature.
At its core, Proxmox Backup Server is a comprehensive backup solution designed to safeguard critical data and applications effortlessly in virtualized environments based on Proxmox VE. Unlike traditional backup methods, Proxmox Backup Server offers a streamlined approach, simplifying the complexities associated with data backup and recovery.
One of the standout features of Proxmox Backup Server is its seamless integration with Proxmox Virtual Environment (PVE), creating a cohesive ecosystem for managing virtualized environments. This integration allows for efficient backup and restoration of Linux containers and virtual machines, ensuring minimal downtime and maximum productivity. Without the need of any backup clients on each container or virtual machine, this solution still offers the back up and restore the entire system but also single files directly from the filesystem.
Proxmox Backup Server provides a user friendly interface, making it accessible to both seasoned IT professionals and newcomers alike. With its intuitive design, users can easily configure backup tasks, monitor progress, and retrieve data with just a few clicks, eliminating the need for extensive training or technical expertise.
Data security is a top priority for businesses across industries and Proxmox Backup Server delivers on this front. Bundled with solutions like ZFS it also brings in all the enterprise filesystem features like encryption at rest, encryption at transition, checksums, snapshots, deduplication and compression but also integrating iSCSI or NFS storage from enterprise storage solutions like from NetApp can be used.
Another notable aspect of Proxmox Backup Server is its cost effectiveness. As an open-source solution, it eliminates the financial barriers (also in addition with the Proxmox VE solutions) associated with proprietary backup software.
Integrating Proxmox Backup Server into Proxmox Clusters
General
This guide expects you to have already at least one Proxmox VE system up and running and also a system where a basic installation of Proxmox Backup Server has been performed. Within this example, the Proxmox Backup Server is installed on a single disk, where the datastore gets attached to an additional block device holding the backups. Proxmox VE and Proxmox Backup Server instances must not be in the same network but must be reachable for each other. The integration requires administrative access to the datacenter of the Proxmox VE instance(s) and the Backup Server.
Prerequisites
- Proxmox VE (including the datacenter).
- Proxmox Backup Server (basic installation).
- Administrative access to all systems.
- Network reachability.
- Storage device holding the backups (in this case a dedicated block storage device).
Administration: Proxmox Backup Server
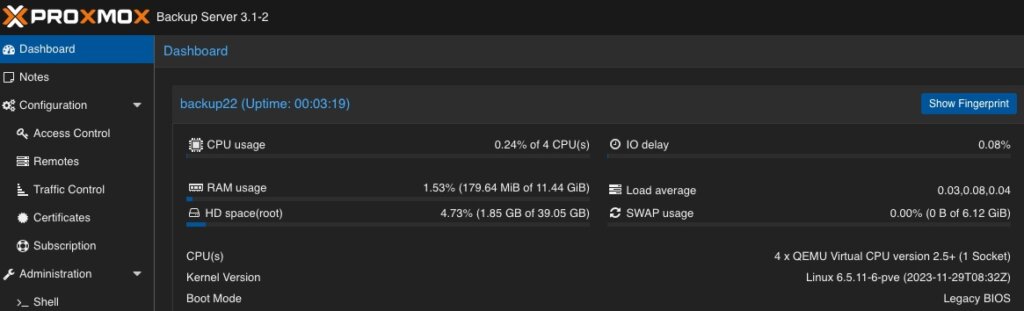
Like the Proxmox VE environment, the Proxmox Backup Server comes along with a very intuitive web frontend. Unlike the web frontend of Proxmox VE, which runs on tcp/8006, the Proxmox Backup Server can be reached on tcp/8007. Therefore, all next tasks will be done on https://<IP-PROXMOX-BACKUP-SERVER>:8007.
After logging in to the web frontend, the dashboard overview welcomes the user.

Adding Datastore / Managing Storage
The initial and major tasks relies in managing the storage and adding a usable datastore for the virtualization environment holding the backup data. Therefore, we switch to the Administration chapter and click on Storage / Disks. This provides an overview of the available Devices on the Proxmox Backup Server. 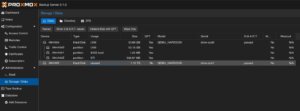 As already being said, this example uses a dedicated block storage device which will be used with ZFS to benefit from checksums, deduplication, compression which of course can also be used in addition with multiple disks (so called raidz-levels) or with other solutions like folder or NFS shares. Coming back to our example, we can see the empty /dev/sdb device which will be used to store all backup files.
By clicking on ZFS in the top menu bar, a ZFS trunk can be created as a datastore. Within this survey, a name, the raid level, compression and the devices to use must be defined. 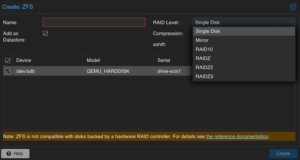 As already mentioned, we can attach multiple disks and define a desired raid level. The given example only consists of a single disk, which will be defined here. Compression is optional, but using LZ4 as a compression is recommended. As a lossless data compression algorithm, LZ4 aims to provide a good trade off between speed and compression ratio which is very transparent on today’s system.
Ensure to check Add as Datastore option (default) will create the given name directly as a usable datastore. In our example this will be backup01.
Keep in mind, that this part is not needed when using a NFS share. Also do not use this in addition with hardware RAID controllers.
Adding User for Backup
In a next step, a dedicated user will be created that will be used for the datastore permissions and for the Proxmox VE instances for authentication and authorization. This allows even complex setups with different datastores, different users including different access levels (e.g., reading, writing, auditing,…) on different clusters and instances. To keep it simple for demonstrations, just a single user for everything will be used.
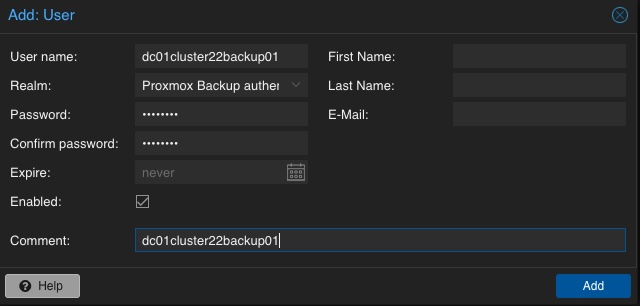 A new user is configured by selecting Configuration, Access Control and User Management in the left menu. There, a new user can be created by simply defining a name and a password. The default realm should stay on the default for the Proxmox Backup authentication provider. Depending on the complexity of the used name schema, you may also create reasonable users. In the given example, the user is called dc01cluster22backup01.
Adding Permission of User for Datastore
Mentioning already the possibility to create complex setups regarding authentication and authorization, the datastore must be linked to at least a single user that can access it. Therefore, we go back to the Datastore and select the previously created backup01 datastore. In the top menu bar, the permissions can be created and adjusted in the Permissions chapter. Initially, a new one will be created now. Within the following survey the datastore or path, the user and the role must be defined:
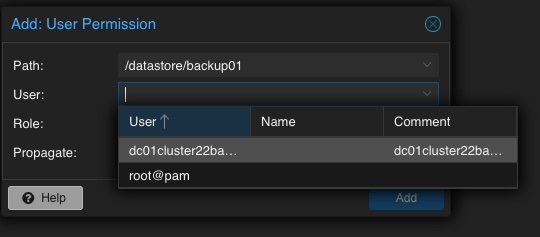
Path: /datastore/backup01
User: dc01cluster22backup01@pbs
Role: DatastoreAdmin
Propagate: True
To provide a short overview of the possible roles, this will be shortly mentioned without any further explanation: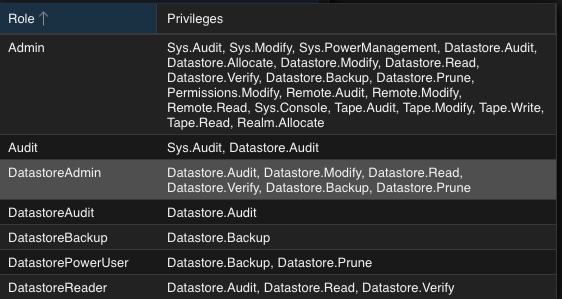
- Admin
- Audit
- DatastoreAdmin
- DatastoreAudit
- DatastoreBackup
- DatastorePowerUser
- DatastoreReader
Administration: Proxmox VE
The integration of the backup datastore will be performed from the Proxmox VE instances via the Datacenter. As a result, the Proxmox VE web frontend will now be used for further administrative actions. The Proxmox VE web frontend runs on tcp/8006, Therefore, all next tasks will be done on https://<IP-PROXMOX-VE-SERVER>:8006.
Adding Storage
 Integrating the Proxmox Backup Server works the same way like managing and adding a shared storage to a Proxmox datacenter.
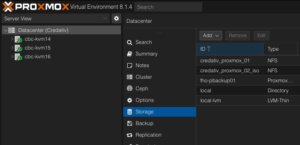
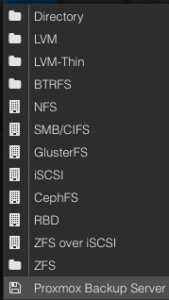
In the left menu we choose the active datacenter and select the Storage options. There, we can find all natively support storage options like (NFS, SMB/CIFS, iSCSI, ZFS, GlusterFS,…) of Proxmox and finally select the Proxmox Backup Server as a dedicated item.
Afterwards, the details for adding this datastore to the datacenter must be inserted. The following options need to be defined:
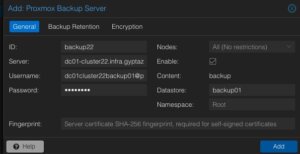 ID: backup22
Server: <FQDN-OR-IP-OF-BACKUP-SERVER>
Username: dc01cluster22backup01@pbs
Password: <THE-PASSWORD-OF-THE-USER>
Enable: True
Datastore: backup01
Fingerprint: <SYSTEM-FINGERPRINT-OF-BACKUP-SERVER>
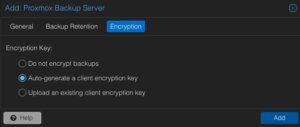 Optionally, also the Backup Retention and Encryption can be configured before adding the new backup datastore. While the backup retention can also be configured on the Proxmox Backup Server (which is recommended), enabling the encryption should be considered. Selecting an d activating the encryption is easily done by simply setting it to Auto-generate a client encryption key. Depending on your previous setup, also an already present key can be uploaded and used.
After adding this backup datastore to the datacenter, this can immediately be used for backup and the integration is finalized.
Conclusion
Proxmox provides with the Proxmox Backup Server an enterprise backup solution, for backing up Linux containers and virtual machines. Supporting features like incremental and fully deduplicated backups by using the benefits of different open-source solutions, in addition with strong encryption and data integrity this solution is a prove that open-source software can compete with closed-source enterprise software. Together with Proxmox VE, enterprise like virtualization environments can be created and managed without missing the typical enterprise feature set. Proxmox VE and the Proxmox Backup Server can also be used in addition to storage appliances from vendors like NetApp, by directly use iSCSI or NFS.
Providing this simple example, there are of course much more complex scenarios which can be created and also should be considered. We are happy to provide you more information and to assist you creating such setups. We also provide help for migrating from other products to Proxmox VE setups. Feel free to contact us at any time for more information.
| Categories: | HowTos Proxmox |
|---|---|
| Tags: | ESX esxi proxmox Virtualization vmware |

About the author
gyptazy
Senior DevOps Consultant
about the person
In my tech repertoire, FreeBSD and federated services stand not just as a personal preference but as a symbol of a commitment to the ethos of open-source. I am a fervent believer in the symbiotic relationship between developers including DevOps, SysOps and the open source community. As I continue to lead teams in the ever-evolving landscape of technology, their dedication to open-source contributions and advocacy for decentralized and federated services echoes not only in the code they write but in the ethos they instill within the teams.