Introduction
In our previous article, we introduced NetApp Storage and NVMe-oF for Breakthrough Performance in Proxmox Virtualization Environments. That article introduced LVM with NVMe-oF via TCP in NetApp storage with Proxmox VE, highlighting its potential to deliver high-performance storage solution that suitable for latency-sensitive applications like virtualized data servers . And it works over Ethernet network without other specialized hardware such as Fibre Channel or InfiniBand, which can be cost-prohibitive for many enterprises.
While NVMe-oF offers significant performance benefits, it is primarily supported on newer and higher-end NetApp ONTAP storage systems, like the AFF series. For organizations with older or hybrid storage systems, iSCSI remains a viable and cost-effective alternative that leverages existing Ethernet infrastructure and provides reliable performance for virtualization environments.
In this blog post, we will delve into using iSCSI (Internet Small Computer Systems Interface) in NetApp Storage with Proxmox VE.
Setup
Hardware and Software Used in This Example
- NetApp Storage System: Provides shared storage capabilities essential for clustering in virtual environments via iSCSI. The example uses ONTAP Release 9.15.1.
- Proxmox VE Cluster: An open source virtualization platform. The example uses the current release 8.2.
- Network Infrastructure: Standard Ethernet network (1GbE or 10GbE).
- iSCSI Initiator: Built into Proxmox VE.
What is iSCSI
iSCSI (Internet Small Computer Systems Interface) is a network protocol that allows for the transport of block-level storage data over IP (Internet Protocol) networks. The protocol allows clients (called initiators) to send SCSI commands over TCP/IP to storage devices (targets) on remote servers. It allows for the connection of storage devices over a standard network infrastructure without requiring specialized hardware and cabling.
It offers a flexible, cost-effective, and scalable storage solution that integrates well with virtualization environments, providing the necessary features and performance to support modern virtualized workloads.
How iSCSI Works
- Initiator and Target: iSCSI communication involves two main components:
- Initiator: The client-side component, typically a server or host, that initiates the connection to the storage device.
- Target: The server-side component, typically a storage array or device, that provides access to the storage resources.
- LUNs (Logical Unit Numbers): Storage resources on the iSCSI target are presented as LUNs. The initiator accesses these LUNs as if they were local disks, allowing the operating system to format, partition, and use them just like any other block storage device.
Configuration
On NetApp Storage
The guide presumes that users have already established the foundational storage setup, including the configuration of Storage Virtual Machines (SVMs). It highlights that the administration of these systems is relatively straightforward, thanks to the intuitive web interface – ONTAP System Manager provided by NetApp storage systems. Users can expect a user-friendly experience when managing their storage solutions, as the web interface is designed to simplify complex tasks. This also includes the whole setup for iSCSI storage, which requires to enabling iSCSI in general on the SVM, setting up the SAN Initiator group and mapping it to LUNs.
Note: All changes can of course also be performed in an automated way by orchestrating the ONTAP API.
Enable iSCSI target on SVM
To enable iSCSI at the SVM level on a NetApp storage system, this can typically be done by following these summarized steps, which can be accessed through the system’s web interface ONTAP System Manager.
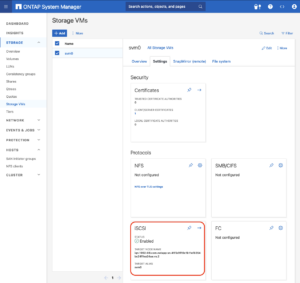
Navigate to the Storage menu. Then, navigate to Storage VMs. Specify the SVM name you wish to configure:
- Configure iSCSI Protocol: Within the SVM settings, look for a section or tab related to proto
cols. Locate the iSCSI option and enable it. This might involve checking a box or switching a toggle to the ‘on’ position. - Save and Apply Changes: After enabling iSCSI, ensure to save the changes. There might be additional prompts or steps to confirm the changes, depending on the specific NetApp system and its version.
Remember to check for any prerequisites or additional configuration settings that might be required for iSCSI operation, such as network settings, licensing, or compatible hardware checks. The exact steps may vary slightly depending on the version of ONTAP or the specific NetApp model you are using. Always refer to the latest official NetApp documentation or support resources for the most accurate guidance.
Create SAN initiator group
Navigate to the HOSTS menu. Then, navigate toSAN initiator groups. Select the specific initiator group name you wish to configure: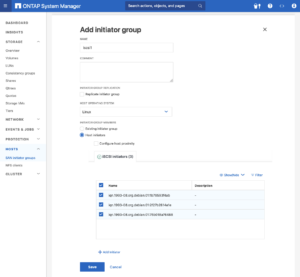
- Configure Host initiators: On each Proxmox VE nodes, look up /etc/iscsi/initiatorname.iscsi file and collect the InitiatorName (iSCSI host IQN). Add the each InitiatorName as host initiators in the initiator group in ONTAP System Manager.
- Save and Apply Changes: After adding all the initiators, ensure to save the changes. There might be additional prompts or steps to confirm the changes, depending on the specific NetApp system and its version.
Create LUNs with initiator group
Navigate to the Storage menu. Then, navigate to LUNS. Select and specific LUN name you wish to configure: 
- Add LUNs: Specify the number of LUNs you want to configure. Set the Host Operating System to Linux. Select the Initiator Group created in the previous step.
- Save and Apply Changes: After adding LUNs, ensure to save the changes. There might be additional prompts or steps to confirm the changes, depending on the specific NetApp system and its version.
Configuring Proxmox VE Node
General
After configuring the NetApp storage appliance for the creation of the iSCSI Target and LUNs, we can now configure Proxmox VE cluster to use and access the iSCSI storage. This can be easily configured by the Proxmox web interface. In general, this process consists of:
- Connecting with the iSCSI Block Storage.
- Creating an LVM (Logical Volume Manager) which is shareable across nodes on Proxmox VE, however, these instructions are likely to work on both older and newer versions, too.
The next steps in this blog post will cover the process in detail and guide you through the necessary steps on the Proxmox VE which can be done on the Proxmox web interface.
Connecting With the iSCSI Block Storage
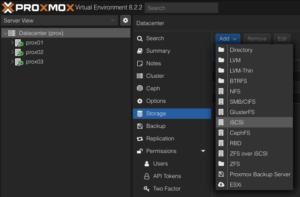
To use this iSCSI block storage on Proxmox VE cluster, follow the steps to log in to the web frontend of the Proxmox VE cluster, and add the storage at the datacenter level:
Navigate to the Storage Configuration: Go to Datacenter -> Storage -> Add -> iSCSI.
Define the New iSCSI Storage Details:
- ID: iscsi1 (this can be any text and is jut an identifier).
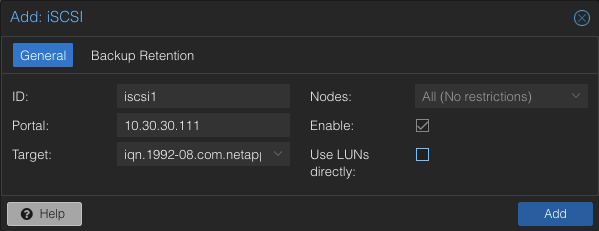
- Portal: Enter the IP address of the iSCSI-enabled SVM.
- Target: This will be detected if you specify the correct IP for the iSCSI-enabled SVM.
- Nodes: <Select all nodes that should use the iSCSI storage>
- Enable: Yes
- Use LUNs directly: No
Create LVM on the iSCSI Block Storage
To use this LVM Volume Group over iSCSI block storage on all Proxmox VE nodes within the cluster, the Volume Group must be added and integrated at the datacenter level. Follow these steps to configure it through the Proxmox VE web interface: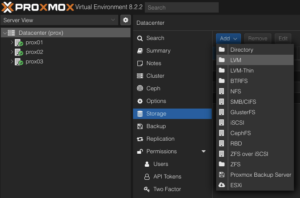
Navigate to the Storage Configuration: Go to Datacenter -> Storage -> Add -> LVM.
Define the New LVM Storage Details:
- ID: shared_iscsi1 (this can be any text and is just an identifier)
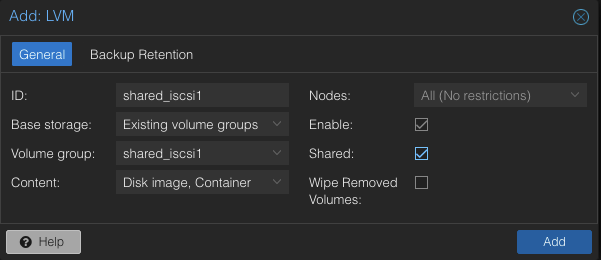
- Base storage: Existing volume groups
- Volume group: shared_iscsi1
- Content: Disk image, Container
- Nodes: <Select all nodes that should use it>
- Enables: Yes
- Shared: Yes
- Wipe Removed Volumes: No
Press Add to attach the new volume to the selected nodes. The LVM storage will then available for use.
Conclusion
The utilization of iSCSI via TCP in addition to Proxmox VE in a virtualization environment presents a compelling solution for organizations looking for cost-effective shared storage architectures. This approach leverages the widespread availability and compatibility of Ethernet-based networks, avoiding the need for specialized hardware such as Fibre Channel, which can be cost-prohibitive for many enterprises.
However, block-level storage with SAN protocols (FC/iSCSI/NVMe-oF) is typically restricted to the VM Disk and Container Image content types supported by Proxmox VE. Additionally, guest VM snapshots and thin provisioning are currently not supported when using LVM/iSCSI storage in Proxmox VE.
There are alternatives that NetApp storage can also serve to meet the more complete needs of Proxmox VE. The NAS protocols, such as NFS, support all content types of Proxmox VE and are typically configured once at the datacenter level. Guest VMs can use disks of type raw, qcow2, or VMDK on NAS protocol storage. Furthermore, guest VM snapshots and thin provisioning are supported with the qcow2 format.
At your convenience, we are available to provide more insights into NetApp storage systems, covering both hardware and software aspects. Our expertise also extends to open-source products, especially in establishing virtualization environments using technologies like Proxmox and OpenShift or in maintaining them with configuration management. We invite you to reach out for any assistance you require.
You might also be interested in learning how to migrate VMs from VMware ESXi to Proxmox VE or how to include the Proxmox Backup Server and NetApp Storage and NVMe-oF for Breakthrough Performance in Proxmox Virtualization Environments into your infrastructure.
This article was initially written by Andrew Lee.
DebConf 2024 from 28. July to 4. Aug 2024 https://debconf24.debconf.org/
Last week the annual Debian Community Conference DebConf happend in Busan, South Korea. Four NetApp employees (Michael, Andrew, Christop and Noël) participated the whole week at the Pukyong National University. The camp takes place before the conference, where the infrastructure is set up and the first collaborations take place. The camp is described in a separate article: https://www.credativ.de/en/blog/credativ-inside/debcamp-bootstrap-for-debconf24/
There was a heat wave with high humidity in Korea at the time but the venue and accommodation at the University are air conditioned so collaboration work, talks and BoF were possible under the circumstances.
Around 400 Debian enthusiasts from all over the world were onsite and additional people attended remotly with the video streaming and the Matrix online chat #debconf:matrix.debian.social
The content team created a schedule with different aspects of Debian; technical, social, political,….
https://debconf24.debconf.org/schedule/
There were two bigger announcements during DebConf24:
- the new distribution eLxr https://elxr.org/ based on Debian initiated by Windriver
https://debconf24.debconf.org/talks/138-a-unified-approach-for-intelligent-deployments-at-the-edge/
Two takeaway points I understood from this talk is Windriver wants to exchange CentOS and preferes a binary distribution. - The Debian package management system will get a new solver https://debconf24.debconf.org/talks/8-the-new-apt-solver/
The list of interesting talks is much longer from a full conference week. Most talks and BoF were streamed live and the recordings can be found in the video archive:
https://meetings-archive.debian.net/pub/debian-meetings/2024/DebConf24/
It is a tradtion to have a Daytrip for socializing and get a more interesting view of the city and the country. https://wiki.debian.org/DebConf/24/DayTrip/ (sorry the details of the three Daytrip are on the website for participants).
For the annual conference group photo we have to go outsite into the heat with high humidity but I hope you will not see us sweeting.
The Debian Conference 2025 will be in July in Brest, France: https://wiki.debian.org/DebConf/25/ and we will be there.:) Maybe it will be a chance for you to join us.
See also Debian News: DebConf24 closes in Busan and DebConf25 dates announced