Veeam & Proxmox VE
Veeam has made a strategic move by integrating the open-source virtualization solution Proxmox VE (Virtual Environment) into its portfolio. Signaling its commitment into the evolving needs of the open-source community and the open-source virtualization market, this integration positions Veeam as a forward-thinking player in the industry, ready to support the rising tide of open-source solutions. The combination of Veeam’s data protection solutions with the flexibility of Proxmox VE’s platform offers enterprises a compelling alternative that promises cost savings and enhanced data security.
With the Proxmox VE, now also one of the most important and often requested open-source solution and hypervisor is being natively supported – and it could definitely make a turn in the virtualization market!
Opportunities for Open-Source Virtualization
In many enterprises, a major hypervisor platform is already in place, accompanied by a robust backup solution – often Veeam. However, until recently, Veeam lacked direct support for Proxmox VE, leaving a gap for those who have embraced or are considering this open-source virtualization platform. The latest version of Veeam changes the game by introducing the capability to create and manage backups and restores directly within Proxmox VE environments, without the need for agents inside the VMs.
This advancement means that entire VMs can now be backed up and restored across any hypervisor, providing unparalleled flexibility. Moreover, enterprises can seamlessly integrate a new Proxmox VE-based cluster into their existing Veeam setup, managing everything from a single, central point. This integration simplifies operations, reduces complexity, and enhances the overall efficiency of data protection strategies in environments that include multiple hypervisors by simply having a one-fits-all solution in place.
Also, an heavily underestimated benefit, offers the possibilities to easily migrate, copy, backup and restore entire VMs even independent of their underlying hypervisor – also known as cross platform recovery. As a result, operators are now able to shift VMs from VMware ESXi nodes / vSphere, or Hyper-V to Proxmox VE nodes. This provides a great solution to introduce and evaluate a new virtualization platform without taking any risks. For organizations looking to unify their virtualization and backup infrastructure, this update offers a significant leap forward.
Integration into Veeam
Integrating a new Proxmox cluster into an existing Veeam setup is a testament to the simplicity and user-centric design of both systems. Those familiar with Veeam will find the process to be intuitive and minimally disruptive, allowing for a seamless extension of their virtualization environment. This ease of integration means that your new Proxmox VE cluster can be swiftly brought under the protective umbrella of Veeam’s robust backup and replication services.
Despite the general ease of the process, it’s important to recognize that unique configurations and specific environments may present their own set of challenges. These corner cases, while not common, are worth noting as they can require special attention to ensure a smooth integration. Rest assured, however, that these are merely nuances in an otherwise straightforward procedure, and with a little extra care, even these can be managed effectively.
Overview
Starting with version 12.2, the Proxmox VE support is enabled and integrated by a plugin which gets installed on the Veeam Backup server. Veeam Backup for Proxmox incorporates a distributed architecture that necessitates the deployment of worker nodes. These nodes function analogously to data movers, facilitating the transfer of virtual machine payloads from the Proxmox VE hosts to the designated Backup Repository. The workers operate on a Linux platform and are seamlessly instantiated via the Veeam Backup Server console. Their role is critical and akin to that of proxy components in analogous systems such as AHV or VMware backup solutions.
Such a worker is needed at least once in a cluster. For improved performance, one worker for each Proxmox VE node might be considered. Each worker requires 6 vCPU, 6 GB memory and 100 GB disk space which should be kept in mind.
Requirements
This blog post assumes that an already present installation of Veeam Backup & Replication in version 12.2 or later is already in place and fully configured for another environment such like VMware. It also assumes that the Proxmox VE cluster is already present and a credential with the needed roles to perform the backup/restore actions is given.
Configuration
The integration and configuration of a Proxmox VE cluster can be fully done within the Veeam Backup & Replication Console application and does not require any additional commands on any cli to be executed. The previously mentioned worker nodes can be installed fully automated.
Adding a Proxmox Server

Virtual Infrastructure -> Add Server
This procedure is consistent with the established protocol for incorporating nodes from other virtualization platforms that are compatible with Veeam.
Afterwards, Veeam shows you a selection of possible and supported Hypervisors:
- VM vSphere
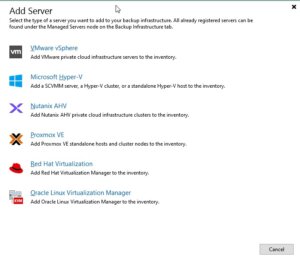

- Microsoft Hyper-V
- Nutanix AHV
- RedHat Virtualization
- Oracle Virtualization Manager
- Proxmox VE

In this case we simply choose Proxmox VE and proceed the setup wizard.
During the next steps in the setup wizard, the authentication details, the hostname or IP address of the target Proxmox VE server and also a snapshot storage of the Proxmox VE server must be defined.
Hint: When it comes to the authentication details, take care to use functional credentials for the SSH service on the Proxmox VE server. If you usually use the root@pam credentials for the web interface, you simply need to prompt root to Veeam. Veeam will initiate a connection to the system over the ssh protocol.

Usage

As a result, this does not only simplify the operator’s work when working with different servers and clusters but also provides finally the opportunity for cross-hypervisor-recoveries.
Creating Backup Jobs
Creating a new backup job for a single VM or even multiple VMs in a Proxmox environment is as simple and exactly the same way, like you already know for other hypervisors. However, let us have a quick summary about the needed tasks:
Open the Veeam Backup & Replication console on your backup server or management workstation. To start creating a backup job, navigate to the Home tab and click on Backup Job, then select Virtual machine from the drop-down menu.
When the New Backup Job wizard opens, you will need to enter a name and a description for the backup job. Click Next to proceed to the next step. Now, you will need to select the VMs that you want to back up. Click Add in the Virtual Machines step and choose the individual VMs or containers like folders, clusters, or entire hosts that you want to include in the backup. Once you have made your selection, click Next.

If you have configured multiple backup proxies, the next step allows you to specify which one to use. If you are not sure or if you prefer, you can let Veeam Backup & Replication automatically select the best proxy for the job. Click Next after making your choice.

Review all the settings on the summary page to ensure they are correct. If everything looks good, click Finish to create the backup job.

If you want to run the backup job immediately for ensuring everything works as expected, you can do so by right-clicking on the job and selecting Start. Alternatively, you can wait for the scheduled time to trigger the job automatically.
Restoring an entire VM
The restore and replication process for a full VM restore remains to the standard procedures. However, it now includes the significant feature of cross-hypervisor restore. This functionality allows for the migration of VMs between different hypervisor types without compatibility issues. For example, when introducing Proxmox VE into a corporate setting, operators can effortlessly migrate VMs from an existing hypervisor to the Proxmox VE cluster. Should any issues arise during the testing phase, the process also supports the reverse migration back to the original hypervisor. Let us have a look at the details.
Open the Veeam Backup & Replication console on your backup server or management workstation. To start creating a backup job, navigate to the Home tab and click on Backup Job, then select Virtual machine from the Disk menu.
Choose the Entire VM restore option, which will launch the wizard for restoring a full virtual machine. The first step in the wizard will ask you to select a backup from which you want to restore. You will see a list of available backups; select the one that contains the VM you wish to restore and proceed to the next step by clicking Next.
Now, you must decide on the restore point. Typically, this will be the most recent backup, but you may choose an earlier point if necessary. After selecting the restore point, continue to the next step.

In the next step, you will have options regarding the power state of the VM after the restoration. You can choose to power on the VM automatically or leave it turned off, depending on your needs.

The restoration process will begin, and its progress can be monitored within the Veeam Backup & Replication console. Depending on the size of the VM and the performance of your backup storage and network, the restoration can take some time.
File-Level-Restore
Open the Veeam Backup & Replication console on your backup server or management workstation. To start creating a backup job, navigate to the Home tab and click on Backup Job, then select Virtual machine from the Disk menu.

Choose the restore point that you want to use for the file-level restore. This is typically the most recent backup, but you can select an earlier one if needed. After picking the restore point, click Next to continue.
At this stage, you may need to choose the operating system of the VM that you are restoring files from. This is particularly important if the backup is of a different OS than the one on the Veeam Backup & Replication server because it will determine the type of helper appliance required for the restore.

Once the helper appliance is ready, you will be able to browse the file system of the backup. Navigate through the backup to locate the files or folders you wish to restore.
After selecting the files or folders for restoration, you will be prompted to choose the destination where you want to restore the data. You can restore to the original location or specify a new location, depending on your requirements.

The file-level restore process will start, and you can monitor the progress within the Veeam Backup & Replication console. The time it takes to complete the restore will depend on the size and number of files being restored, as well as the performance of your backup storage and network.
Conclusion
Summarising all the things, the latest update to Veeam introduces a very important and welcomed integration with Proxmox VE, filling a significant gap for enterprises that have adopted this open-source virtualization platform. By enabling direct backups and restores of entire VMs across different hypervisors without the need for in-VM agents, Veeam now offers unparalleled flexibility and simplicity in managing mixed environments. This advancement not only streamlines operations and enhances data protection strategies but also empowers organizations to easily migrate and evaluate new open-source virtualization platforms like Proxmox VE with minimal risk. It is great to see that more and more companies are putting efforts into supporting open-source solutions which underlines the ongoing importance of open-source based products in enterprises.
Additionally, for those starting fresh with Proxmox, the Proxmox Backup Server remains a viable open-source alternative and you can find our blog post about configuring the Proxmox Backup Server right here. Overall, this update represents a significant step forward in unifying virtualization and backup infrastructures, offering both versatility and ease of integration.
We are always here to help and assist you with further consulting, planning, and integration needs. Whether you are exploring new virtualization platforms, optimizing your current infrastructure, or looking for expert guidance on your backup strategies, our team is dedicated to ensuring your success every step of the way. Do not hesitate to reach out to us for personalized support and tailored solutions to meet your unique requirements in virtualization- or backup environments.
How and when to use Software-Defined Networks in Proxmox VE
What is Software-Defined Networking?
How to configure a SDN
Knowing the basics and possibilities of Software-Defined Networking (SDN) now, it gets interesting to set up such a network within a Proxmox cluster.
Proxmox comes with support for software-defined networking (SDN), allowing users to integrate various types of network configurations to suit their specific networking needs. With Proxmox, you have the flexibility to select from several SDN types, including “Simple”, which is likely aimed at straightforward networking setups without the need for advanced features. For environments requiring network segmentation, VLAN support is available, providing the means to isolate and manage traffic within distinct virtual LANs. More complex scenarios might benefit from QinQ support, which allows multiple VLAN tags on a single interface. Also and very interesting for data centers, Proxmox also includes VxLAN support, which extends layer 2 networking over a layer 3 infrastructure which significantly increases the number of possible VLANs which would else be limited to 4096 VLANs. Lastly to mention is the EVPN support which is also part of Proxmox’s SDN offerings, facilitating advanced layer 2 and layer 3 virtualization and providing a scalable control plane with BGP (Border Gateway Protocol) for multi-tenancy environments.
In this guide, we’ll walk through the process of setting up a streamlined Software-Defined Network (SDN) within a Proxmox Cluster environment. The primary goal is to establish a new network, including its own network configuration that is automatically propagated across all nodes within the cluster. This newly created network will created by its own IP space where virtual machines (VMs) receiving their IP addresses dynamically via DHCP. This setup eliminates the need for manual IP forwarding or Network Address Translation (NAT) on the host machines. An additional advantage of this configuration is the consistency it offers; the gateway for the VMs will always remain constant regardless of the specific host node they are operating on.
Configuration
The configuration of Software-Defined Networking (SDN) got very easy within the latest Proxmox VE versions where the whole process can be done in the Proxmox web UI. Therefore, we just connect to the Proxmox management web interface which typically reachable at:
- https://HOSTNAME:8006

–> Datacenter
—-> SDN
——–> Zones
The menu on the right site offers to add a new zone where the new zone of the type Simple will be selected. A new windows pops up where we directly activate the advanced options at the bottom. Afterwards, further required details will be provided.

ID: devnet01
MTU: Auto
Nodes: All
IPAM: pve
Automatic DHCP: Activate
The ID represents the unique identifier of this zone. It might make sense to give it a recognisable name. Usually, we do not need to adjust the MTU size for this kind of default setups. However, there may always be some corner cases. In the node sections, this zone can be assigned to specific nodes or simply to all ones. There may also be scenarios where zones might only be limited to specific nodes. According to our advanced options, further details like DNS server and also the forward- & reverse zones can be defined. For this basic setup, this will not be used but the automatic DHCP option must be activated.
Now, the next steps will be done in the chapter VNets where the previously created zone will be linked to a virtual network. In the same step we will also provide additional network information like the network range etc.

When creating a new VNet, an identifier or name must be given. It often makes sense to align the virtual network name to the previously generated zone name. In this example, the same names will be used. Optionally, an alias can be defined. The important part is to select the desired zone that should be used (e.g., devnet01). After creating the new VNet, we have the possibility to create a new subnet in the same window by clicking on the Create Subnet button.
Within this dialog, some basic network information will be entered. In general, we need to provide the desired subnet in CIDR notation (e.g., 10.11.12.0/24). Defining the IP address for the gateway is also possible. In this example the gateway will be placed on the IP address 10.11.12.1. Important is to activate the option SNAT. SNAT (Source Network Address Translation) is a technique to modify the source IP address of outgoing network traffic to appear as though it originates from a different IP address, which is usually the IP address of the router or firewall. This method is commonly employed to allow multiple devices on a private network to access external networks.
After creating and linking the zone, VNet and the subnet, the configuration can simply be applied on the web interface by clicking on the apply button. The configuration will now be synced to the desired nodes (in our example all ones).
Usage

When it comes to DevOps and automation, this is also available in the API where virtual machines can be assigned to the new network. Such a task could look like in the following example in Ansible:
 - name: Create Container in Custom Network
 community.general.proxmox:
 vmid: 100
 node: de01-dus01-node03
 api_user: root@pam
 api_password: {{ api_password }}
 api_host: de01-dus01-node01
 password: {{ container_password }}
 hostname: {{ container_fqdn }}
 ostemplate: 'local:vztmpl/debian-12-x86_64.tar.gz'
 netif: '{"net0":"name=eth0,ip=dhcp,ip6=dhcp,bridge=devnet01"}'
Virtual machines assigned to this network will immediately get IP addresses within our previously defined network 10.11.12.0/24 and can access the internet without any further needs. VMs may also moved across nodes in the cluster without any needs to adjust the gateway, even a node get shut down or rebooted for maintenances.
Conclusion
In conclusion, the integration of Software-Defined Networking (SDN) into Proxmox VE represents a huge benefit from a technical, but also from a user perspective where this feature is also usable from the Proxmox’s web ui. This ease of configuration empowers even those with limited networking experience to set up and manage even more complex network setups as well.
Proxmox makes it also easier with simple SDNs to create basic networks that let virtual machines connect to the internet. You don’t have to deal with complicated settings or gateways on the main nodes. This makes it quicker to get virtual setups up and running and lowers the chance of making mistakes that could lead to security problems.
For people just starting out, Proxmox has a user friendly website that makes it easy to set up and control networks. This is really helpful because it means they don’t have to learn a lot of complicated stuff to get started. Instead, they can spend more time working with their virtual computers and not worry too much about how to connect everything.
People who know more about technology will like how Proxmox lets them set up complex networks. This is good for large scaled setups because it can make the network run better, handle more traffic, and keep different parts of the network separate from each other.
Just like other useful integrations (e.g. Ceph), also the SDN integration provides huge benefits to its user base and shows the ongoing integration of useful tooling in Proxmox.
NetApp Storage and NVMe-oF for Breakthrough Performance in Proxmox Virtualization Environments
What is NVMe-oF
NVMe over Fabrics (NVMe-oF) is a cutting-edge protocol that has been developed to bring the impressive performance and low-latency characteristics of NVMe storage devices over network fabrics. This innovation is particularly transformative for data centers, as it facilitates the separation of storage and compute resources, granting administrators the ability to deploy these resources more flexibly and with greater scalability which makes it perfectly fine for virtualization workloads.
NVMe-oF is versatile in its support for multiple transport layers where it can operate over Fibre Channel (FC), Ethernet with the TCP/IP protocol with RDMA capabilities through RoCE or iWARP, and even utilize InfiniBand, each offering unique performance features tailored to different deployment needs.
NVMe-oF via TCP
When NVMe-oF is deployed over Ethernet with TCP, it brings the benefits of NVMe storage to the broadest possible range of environments without the need for specialized network infrastructure like Fibre Channel or InfiniBand. This brings access to high-performance storage by utilizing the common and familiar TCP stack, significantly reducing complexity and cost. The adoption of NVMe-oF with TCP is further facilitated by the widespread availability of Ethernet and expertise, making it a compelling choice for organizations looking to upgrade their storage networks without a complete overhaul.
The protocol’s efficiency is well maintained even over TCP, allowing NVMe commands to be passed with minimal overhead, thus keeping latency at bay, which is critical for latency-sensitive applications like virtualized data servers.
Configuring NetApp Storage
General
The guide presumes that users have already established the foundational storage setup, including the configuration of Storage Virtual Machines (SVMs). It highlights that the administration of these systems is relatively straightforward, thanks to the intuitive web interface provided by NetApp storage systems. Users can expect a user-friendly experience when managing their storage solutions, as the web interface is designed to simplify complex tasks. This also includes the whole setup for NVMe-oF storage, which requires to enable NVMe in general on the SVM, setting up the NVMe namespace and the NVMe subsystem.
Note: All changes can of course also be performed in an automated way by orchestrating the OnTap API.
Enable NVMe on SVM

- Configure NVMe Protocol: Within the SVM settings, look for a section or tab related to protocols. Locate the NVMe option and enable it. This might involve checking a box or switching a toggle to the ‘on’ position.
- Save and Apply Changes: After enabling NVMe, ensure to save the changes. There might be additional prompts or steps to confirm the changes, depending on the specific NetApp system and its version.
Remember to check for any prerequisites or additional configuration settings that might be required for NVMe operation, such as network settings, licensing, or compatible hardware checks. The exact steps may vary slightly depending on the version of ONTAP or the specific NetApp model you are using. Always refer to the latest official NetApp documentation or support resources for the most accurate guidance.
Creating the NVMe Subsystem
Afterwards, a new NVMe subsystem can be created on the NetApp storage system. This can be done by selecting the Hosts section, and choosing NVMe Subsystem to start the process of adding a new subsystem. A new wizard opens up which requires additional information regarding the newly to be created subsystem:

Storage VM: <The previously adjusted SVM>
Host Operating System: Linux (important for the block size)
Host NQN: <NQN of the Proxmox VE node>
It’s essential to ensure that all information, especially the Hosts NQN, is correctly entered to avoid connectivity issues. Additionally, consult the official NetApp documentation for any version-specific instructions or additional configuration steps that may be required.
Creating the NVMe Namespace

Note: Also take an important note about the Performance Service Level which might be switched to a custom profile to avoid any limitations.
Once you have entered all the necessary information, you will typically proceed to choose the performance characteristics, like the service level or tiering policy, depending on your performance needs and the capabilities of your NetApp system.
After configuring these settings, you need to review your choices and save the new namespace configuration to make it available for use. It is important to ensure that the namespace is properly configured to match the requirements of your environment for optimal performance and compatibility. Always check for any additional steps or prerequisites by consulting the NetApp documentation relevant to your ONTAP version or storage model.
The configuration on the storage part is now complete. The next steps will be performed on the Proxmox VE node(s).
Configuring Proxmox Node
General
After configuring the NetApp storage appliance, all Proxmox VE nodes within the cluster must be configured to use and access the NVMe-oF storage. Unfortunately, Proxmox VE does not support this type of storage out of the box. Therefore, this cannot be easily configured by the Proxmox web interface. Luckily, Proxmox VE is based on Debian Linux from where all needed dependencies and configurations can be obtained but it requires us to do everything on the command line (CLI). Depending on the amount of nodes within the cluster, further config management tools like Ansible may boost up the initial setup process and make it repeatable for new potential nodes in the future. We may also assist you by setting up custom config management environments fitting your needs.
In general, this process consists of:
- Installing needed packages.
- Enabling the Kernel modules.
- Discovery of the storage.
- Connecting with the storage.
- Creating a LVM Volume Group.
- Assigning the storage in the Proxmox web interface.
The next steps in this blog post will cover the process in detail and guide you through the needed steps on the Proxmox VE nodes which must be done on the command line.
Installing Needed Packages
Using and accessing NVMe-oF requires the related user land tools (nvme-cli) to be present on the Proxmox VE node. Debian Linux already provides those tools within the Debian repository. As a result, the overall installation process is very easy. The package can simply be installed by the following command:
apt-get install nvme-cli
This package also already provides the required Kernel module which can simply be loaded by running:
modprobe nvme_tcp
Afterwards, the module should be added to be loaded at boot time:
echo "nvme_tcp" > /etc/modules-load.d/20-nvme_tcp.conf
After these steps, a connection with the storage can be initialized.
Connecting With the Storage
Interacting with the NetApp storage and its NVMe-oF functionality is a multi-step process and requires us to exchange the NVMe Qualified Name (NQN) address of each Proxmox VE node accessing the NVMe storage. The NQN address of a Proxmox VE node can be obtained by running the command:
cat /etc/nvme/hostnqn

Add the host NQN address on your NetApp export to allow the nodes accessing it. An example output is given in the screenshot.
Discovery & Connecting
In the next step, the NVMe’s will be discovered and connected to the Proxmox VE node. The discovery and connect process is simply done by running the following commands:
nvme discover -t tcp -a 192.168.164.100 -s 4420
 nvme connect -t tcp -n na01-nqn01 -a 192.168.164.100 -s 4420
To make this configuration persistent to system reboots, the commands will also be added to the nvme discovery file. The nvmf-autoconnect systemd unit file ensures to load this. Therefore, this systemd unit file must also be enabled.
echo "discover -t tcp -a 192.168.164.100 -s 4420" >> etc/nvme/discovery.conf
 systemctl enable nvmf-autoconnect.service
Volume Group
The last steps will partially be done on the command line and on the Proxmox web interface to add the new storage to the cluster.
Important:
This steps must only be done on a single Proxmox VE host node and not on all ones. The integration happens on cluster level and implies all Proxmox VE nodes once this has been done.
The last command on the command line results in creating a new LVM Volume Group (VG) on the new NVMe device which can simply be done by executing the command:
vgcreate shared_nvme01 /dev/nvme0n1
The newly created LVM Volume Group (VG) can be validated by running the command:
vgdisplay shared_nvme01
An output like in the given screenshot should be returned, including all further details of this VG. After validating the information, all tasks are completed on the command line.
To finally use this LVM Volume Group on all Proxmox VE nodes within the cluster, this Volume Group must be added and integrated on cluster level. Therefore, we need to login to the web frontend of the cluster and add this under:
- Datacenter
- Storage
- Add
- LVM
In the new window some more details for the new LVM storage have to be defined:
- ID: shared_nvme01 (this can be any text and is jut an identifier)
- Base storage: Existing volume groups
- Volume group: shared_nvme01
- Content: Disk image, Container (may vary)
- Nodes: <Select all nodes that should use it>
- Enables: Yes
- Shared: Yes
- Wipe Removed Volumes: No

By pressing on Add this will be attached to the selected nodes as a new volume and can directly be used.
Conclusion
The utilization of NVMe over Fabrics (NVMe-oF) via TCP in addition with Proxmox VE in a virtualization environment presents a compelling solution for organizations looking at cost-effective yet high-performance storage architectures. This approach leverages the widespread availability and compatibility of Ethernet-based networks, avoiding the need for specialized hardware such as Fibre Channel or InfiniBand, which can be cost-prohibitive for many enterprises.
By integrating NVMe-oF with Proxmox, a popular open-source virtualization platform, users can benefit from significantly improved data transfer speeds and lower latency compared to traditional storage solutions. NVMe-oF may not only be used with Proxmox VE but also on other operating systems like FreeBSD and hypervisors like bhyve. This provides a great benefit for latency-sensitive workloads, such as virtualized database servers, where rapid access to data is critical for performance. The NVMe protocol is designed to exploit the full potential of solid-state storage technologies. When used over a network fabric using TCP, it can deliver near-local NVMe performance by being very cost-effective.
At your convenience, we’re available to provide more insights into NetApp storage systems, covering both hardware and software aspects. Our expertise also extends to open-source products, especially in establishing virtualization environments using technologies like Proxmox and OpenShift or in maintaining them with config management. We invite you to reach out for any assistance you require.
You might also be interested in learning how to migrate VMs from VMware ESXi to Proxmox VE or how to include the Proxmox Backup Server into your infrastructure.
Migrating VMs from VMware ESXi to Proxmox
In response to Broadcom’s recent alterations in VMware’s subscription model, an increasing number of enterprises are reevaluating their virtualization strategies. With heightened concerns over licensing costs and accessibility to features, businesses are turning towards open source solutions for greater flexibility and cost-effectiveness. Proxmox, in particular, has garnered significant attention as a viable alternative. Renowned for its robust feature set and open architecture, Proxmox offers a compelling platform for organizations seeking to mitigate the impact of proprietary licensing models while retaining comprehensive virtualization capabilities. This trend underscores a broader industry shift towards embracing open-source technologies as viable alternatives in the virtualization landscape. Just to mention, Proxmox is widely known as a viable alternative to VMware ESXi but there are also other options available, such as bhyve which we also covered in one of our blog posts.
Benefits of Opensource Solutions
In the dynamic landscape of modern business, the choice to adopt open source solutions for virtualization presents a strategic advantage for enterprises. With platforms like KVM, Xen and even LXC containers, organizations can capitalize on the absence of license fees, unlocking significant cost savings and redirecting resources towards innovation and growth. This financial flexibility empowers companies to make strategic investments in their IT infrastructure without the burden of proprietary licensing costs. Moreover, open source virtualization promotes collaboration and transparency, allowing businesses to tailor their environments to suit their unique needs and seamlessly integrate with existing systems. Through community-driven development and robust support networks, enterprises gain access to a wealth of expertise and resources, ensuring the reliability, security, and scalability of their virtualized infrastructure. Embracing open source virtualization not only delivers tangible financial benefits but also equips organizations with the agility and adaptability needed to thrive in an ever-evolving digital landscape.
Migrating a VM
Prerequisites
To ensure a smooth migration process from VMware ESXi to Proxmox, several key steps must be taken. First, SSH access must be enabled on both the VMware ESXi host and the Proxmox host, allowing for remote management and administration. Additionally, it’s crucial to have access to both systems, facilitating the migration process. Furthermore, establishing SSH connectivity between VMware ESXi and Proxmox is essential for seamless communication between the two platforms. This ensures efficient data transfer and management during migration. Moreover, it’s imperative to configure the Proxmox system or cluster in a manner similar to the ESXi setup, especially concerning networking configurations. This includes ensuring compatibility with VLANs or VXLANs for more complex setups. Additionally, both systems should either run on local storage or have access to shared storage, such as NFS, to facilitate the transfer of virtual machine data. Lastly, before initiating the migration, it’s essential to verify that the Proxmox system has sufficient available space to accommodate the imported virtual machine, ensuring a successful transition without storage constraints.
Activate SSH on ESXi
The SSH server must be activated in order to copy the content from the ESXi system to the new location on the Proxmox server. The virtual machine will later be copied from the Proxmox server. Therefore, it is necessary that the Proxmox system can establish an SSH connection on tcp/22 to the ESXi system:
- Log in to the VMware ESXi host.
- Navigate to Configuration > Security Profile.
- Enable SSH under Services.
Find Source Information about VM on ESXi

One of the challenging matters in finding the location of the virtual machine holding the virtual machine disk. The path can be found within the web UI of the ESXi system:
- Locate the ESXi node that runs the Virtual Machine that should be migrated
- Identify the virtual machine to be migrated (e.g., pgsql07.gyptazy.ch).
- Obtain the location of the virtual disk (VMDK) associated with the VM from the configuration panel.
- The VM location path should be shown (e.g., /vmfs/volumes/137b4261-68e88bae-0000-000000000000/pgsql07.gyptazy.ch).
- Stop and shutdown the VM.
Create a New Empty VM on Proxmox
- Create a new empty VM in Proxmox.
- Assign the same resources like in the ESXi setup.
- Set the network type to VMware vmxnet3.
- Ensure the needed network resources (e.g., VLAN, VXLAN) are properly configured.
- Set the SCSCI controller for the disk to VMware PVSCSI.
- Do not create a new disk (this will be imported later from the ESXi source).
- Each VM gets an ID assigned by Proxmox (note it down, it will be needed later).
Copy VM from ESXi to Proxmox
The content of the virtual machine (VM) will be transferred from the ESXi to the Proxmox system using the open source tool rsync for efficient synchronization and copying. Therefore, the following commands need to be executed from the Proxmox system, where we create a temporary directory to store the VM’s content:
mkdir /tmp/migration_pgsql07.gyptazy.ch
cd /tmp/migration_pgsql07.gyptazy.ch
rsync -avP root@esx02-test.gyptazy.ch:/vmfs/volumes/137b4261-68e88bae-0000-000000000000/pgsq07.gyptazy.ch/* .
Depending on the file size of them virtual machine and the network connectivity this process may take some time.
Import VM in Proxmox

qm disk import 119 pgsql07.gyptazy.ch.vmdk local-lvm
Depending on the creation format of the VM or the exporting format there may be multiple disk files which may also be suffixed by _flat. This procedure needs to be repeated by all available disks.
Starting the VM
In the final step, all settings, resources, definitions and customizations of the system should be thoroughly reviewed. One validated, the VM can be launched, ensuring that all components are correctly configured for operation within the Proxmox environment.
Conclusion
This article only covers one of many possible methods for migrations in simple, standalone setups. In more complex environments involving multiple host nodes and different storage systems like fibre channel or network storage, there are significant differences and additional considerations. Additionally, there may be specific requirements regarding availability and Service Level Agreements (SLAs) to be concern. This may be very specific for each environment. Feel free to contact us for personalized guidance on your specific migration needs at any time. We are also pleased to offer our support in related areas in open source such as virtualization (e.g., OpenStack, VirtualBox) and topics pertaining to cloud migrations.
Addendum
On the 27th of March, Proxmox released their new import wizard (pve-esxi-import-tools) which makes migrations from VMware ESXi instances to a Proxmox environment much easier. Within an upcoming blog post we will provide more information about the new tooling and cases where this might be more useful but also covering the corner cases where the new import wizard cannot be used.