What is PegaProx?
![]()
PegaProx is becoming a central platform for modern Proxmox VE-based virtualization, offering a free and open source approach to managing virtualization at scale. It is increasingly seen as a powerful multi cluster solution designed for more demanding enterprise setups. Where traditional tools start to fall short and even the native Proxmox Datacenter Manager does not yet cover many key requirements, PegaProx fills that gap by providing a consistent and clearly structured way to manage complex infrastructures.
As a central control unit, PegaProx unifies all aspects of cluster management (including multi-cluster management and Proxmox Backup Server) in a single interface, creating a consistent view of all resources, workloads, and systems. Administrators no longer need to switch between individual clusters, nodes, or isolated monitoring solutions; instead, they gain a fully integrated environment that significantly increases transparency, control, and efficiency. Especially in growing infrastructures with multiple clusters, this approach becomes a decisive advantage. In daily operations, virtualization managers repeatedly face the same challenges. Resources must be monitored across clusters, bottlenecks identified early, and maintenance work coordinated without jeopardizing availability. At the same time, increasing complexity raises the risk of misconfigurations, inconsistent states, and unplanned outages. Other features familiar from other well-known enterprise virtualization solutions also play a central role in PegaProx. PegaProx addresses these problems with a consistently centralized architecture, real-time metrics, and intelligent automation that simplifies operational processes and implements previously missing functionalities.
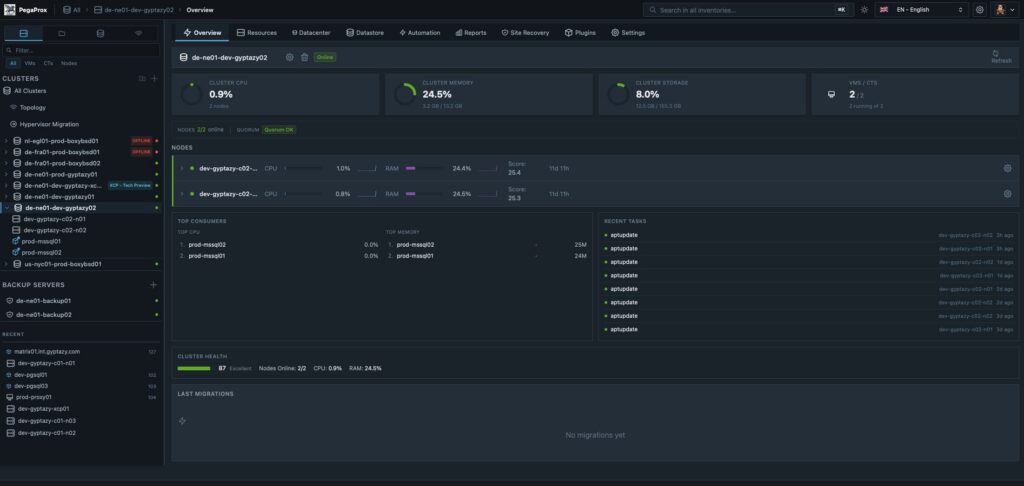
PegaProx for Proxmox: Cluster Overview
Developed by a small, focused team with strong practical relevance, which includes our colleague Florian Paul Azim Hoberg (also known as gyptazy) as a core contributor, PegaProx places particular emphasis on real requirements from the enterprise environment. Functions such as managing multiple clusters as a logical unit, a global overview of snapshots including a clean-up function, or the dynamic distribution of workloads based on current resource data (ProxLB) are not theoretical concepts, but specifically developed solutions for productive use. The result is a platform that elevates Proxmox VE to a new level and offers companies a powerful, scalable, and understandable solution for their virtualization strategy.
What does PegaProx offer?
PegaProx combines a variety of functions specifically developed for the professional operation of Proxmox VE-based infrastructures. The focus is clearly on central control, automation, and transparency across multiple clusters. Instead of fragmented tools, an integrated platform emerges that simplifies daily operations and reliably maps complex enterprise requirements.
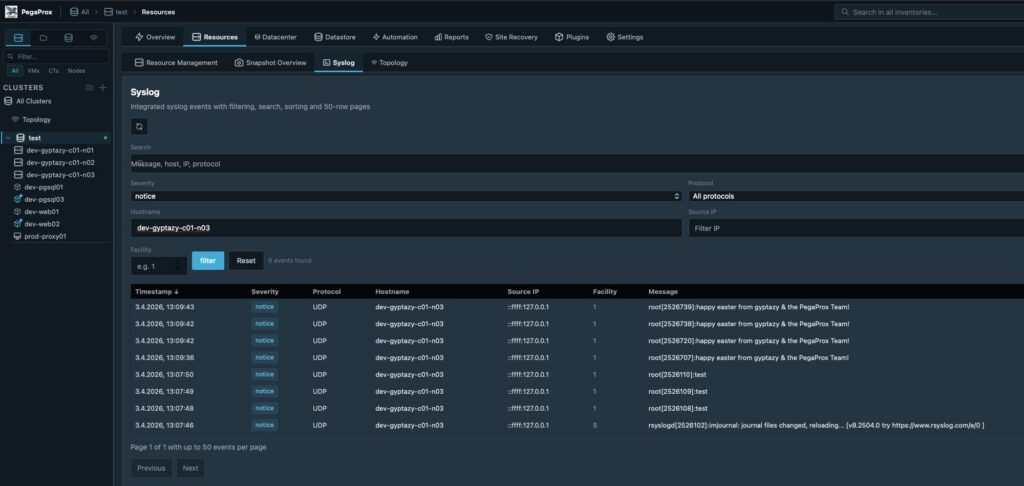
PegaProx with central, aggregated logging overview
To align this with the ProxTools Collection, created by @gyptazy, such as ProxLB, ProxCLMC, ProxPatch, ProxSnap, and ProxLog, have also been integrated and now offer a way to administer them via PegaProx’s graphical interface for easy usability. Key functions include:
- Multi-Cluster Management
- Unified Dashboard
- Multi-Tenancy & End-User Self-Service Portal
- Live Metrics
- Cross-Cluster Load Balancing
- Live Migration
- Cross-Cluster Live Migration
- High Availability and Automatic Failover
- Snapshots and Snapshot Replication
- Centralized Snapshot Overview
- Backup Management including Verification
- Role-Based Access Control and Multi-Tenancy
- Integration of External Authentication Systems
- Automation and Scheduled Tasks
- Rolling Updates / Patch Management for Cluster Nodes
- Integrated Syslog Server
- Ceph Management
- Audit Logging and Monitoring Alerts
- and much more
This represents only some of the capabilities PegaProx already offers today. Many other functions and continuous developments constantly expand the platform, closely aligning with the real requirements of modern virtualization environments. A complete overview of all features, technical details, and current developments can be found on the official PegaProx GitHub page, where all functions are transparently documented and continuously updated.
Installation & Configuration of PegaProx
The installation of PegaProx is deliberately designed to be flexible, covering a wide range of environments and requirements. Whether for quick evaluation, integration into existing infrastructures, or productive enterprise use, PegaProx can be deployed in several ways and seamlessly integrated into existing Proxmox VE landscapes. All installation methods pursue the same goal: the simplest, most reproducible, and transparent deployment possible without unnecessary complexity.
The following options are available for installation:
- Bash Script
A quick and easy way to get started using an automated installation script (however, we strongly advise against this method, even though it is becoming increasingly popular again):curl -sSL https://raw.githubusercontent.com/PegaProx/project-pegaprox/refs/heads/main/deploy.sh | sudo bash - Docker Container Image
Deployment as a container for maximum portability and easy integration into existing container environments - LXC Appliance
Prebuilt LXC template for direct use in Proxmox VE with minimal setup effort - VM Appliance
Fully preconfigured virtual machine for fast and isolated commissioning - Debian Package
Native installation via a Debian package for systems that are intentionally to be operated without containers - Debian Repository
Central package source for easy updates, versioning, and integration into existing package management processes
Regardless of the chosen method, the basic configuration is quickly completed, so PegaProx is available as a central management platform for multiple Proxmox VE clusters within a very short time.
Conclusion
PegaProx is rapidly developing into one of the most exciting solutions in the field of Proxmox VE-based virtualization and is already generating great enthusiasm in the community. Many companies already see PegaProx as the central platform they have been missing in the Proxmox ecosystem, especially when it comes to multi-cluster management, automation, and a consistent overall overview.
The clear structure, practical range of functions, and consistent focus on real requirements in the enterprise environment clearly demonstrate the platform’s potential. PegaProx not only closes existing gaps but also defines a new standard in many areas for managing complex virtualization landscapes.
Despite this positive development, it should be noted that PegaProx is currently still in its beta phase. Even though much already functions stably and thoughtfully, problems or unexpected behavior can occur at any time. For productive environments, its use should therefore be carefully considered and, if necessary, first implemented in test or staging scenarios.
Errors, wishes, or suggestions for improvement can be reported at any time via the project on GitHub. Additionally, the developers are available directly via the gyptazy projects Discord server for exchange and support.
Review of the Dutch Proxmox Day 2025
On September 25, 2025, we attended the Dutch Proxmox Day 2025 in Ede (Netherlands) – and I must say: the event was a complete success. Organized by Tuxis B.V. at the Hotel Belmont in the Veluwe region, the day offered an excellent mix of expert presentations and valuable exchange.
Thanks to the Hosts
A heartfelt thank you to the Tuxis team: For the invitation as a speaker, for the trust placed in us, and for the perfect organization. Yes — this blog article is coming a bit late, but as they say: better late than never.

My Perspective as a Speaker
As a speaker, I had the pleasure of being part of an exciting program. At the same time, I was a participant: both at the same time – that’s what makes such days special. I would like to highlight a few presentations:
- Aaron Lauterer (Linux Software Developer at Proxmox Server Solutions) – “Let’s get technical with a Proxmox developer”: A look at upcoming features of Proxmox VE. The upcoming integration of OCI containers (aka Docker) is particularly exciting.
- Rob Turk (Senior Presales Systems Engineer at Veeam) – “Save the data”: Clearly shows that Proxmox has now arrived in the enterprise world.
- Mark Schouten (CTO at Tuxis) – “Cool stuff you can do with Proxmox”: Proxmox Backup Server in interaction with ZFS, how to make the whole thing more performant and what unexpected problems with SCSI and Western Digital have occurred, Mark Schouten told us about it
- Alexander Wirt – “Balancing workloads in Proxmox”: My own contribution with a focus on the project ProxLB of my esteemed colleague Florian Hoberg, which distributes virtual machines evenly across nodes, again shows the advantages and OSS and open interfaces. These make it easy to add missing functionality and thus compete with the industry giants.
- Robbe Van Herck (Support & Maintenance Engineer at International Polar Foundation) – “Proxmox on Antarctica”: Proxmox in extreme use – at the other end of the world and very far from everyday data center life. Robbe was able to show well that Proxmox also works in the most remote corners of the earth, the other challenges are more exciting here – such as hardware that is overwhelmed by the low temperatures.
- Han Wessels (Operations System Engineer at ESA) – “Challenged to run Proxmox out of this world”: Why Proxmox can also be operated on the ISS or in space – technology meets vision. Han vividly described the challenges that arise, such as the vibration during the launch of the carrier rocket or the radiation that significantly shortens the lifespan of storage.
I was able to take away many impulses – both technically and ideally. And I had good conversations that will certainly pay off further.
Networking & Exchange
The informal part was just as valuable as the program: during the breaks, at lunch or at the get-together in the afternoon, we made new contacts, gained interesting insights and met old acquaintances. It is precisely these moments that make a conference come alive.
Outlook
We are already looking forward to next year. When the Tuxis team calls again, we will be happy to be there again. Many thanks again to all those involved, all speakers and all participants – see you again. In between, this December there will be the first Open Source Virtualization Gathering at our company.
NetApp Storage and NVMe-oF for Breakthrough Performance in Proxmox Virtualization Environments
What is NVMe-oF
NVMe over Fabrics (NVMe-oF) is a cutting-edge protocol that has been developed to bring the impressive performance and low-latency characteristics of NVMe storage devices over network fabrics. This innovation is particularly transformative for data centers, as it facilitates the separation of storage and compute resources, granting administrators the ability to deploy these resources more flexibly and with greater scalability which makes it perfectly fine for virtualization workloads.
NVMe-oF is versatile in its support for multiple transport layers where it can operate over Fibre Channel (FC), Ethernet with the TCP/IP protocol with RDMA capabilities through RoCE or iWARP, and even utilize InfiniBand, each offering unique performance features tailored to different deployment needs.
NVMe-oF via TCP
When NVMe-oF is deployed over Ethernet with TCP, it brings the benefits of NVMe storage to the broadest possible range of environments without the need for specialized network infrastructure like Fibre Channel or InfiniBand. This brings access to high-performance storage by utilizing the common and familiar TCP stack, significantly reducing complexity and cost. The adoption of NVMe-oF with TCP is further facilitated by the widespread availability of Ethernet and expertise, making it a compelling choice for organizations looking to upgrade their storage networks without a complete overhaul.
The protocol’s efficiency is well maintained even over TCP, allowing NVMe commands to be passed with minimal overhead, thus keeping latency at bay, which is critical for latency-sensitive applications like virtualized data servers.
Configuring NetApp Storage
General
The guide presumes that users have already established the foundational storage setup, including the configuration of Storage Virtual Machines (SVMs). It highlights that the administration of these systems is relatively straightforward, thanks to the intuitive web interface provided by NetApp storage systems. Users can expect a user-friendly experience when managing their storage solutions, as the web interface is designed to simplify complex tasks. This also includes the whole setup for NVMe-oF storage, which requires to enable NVMe in general on the SVM, setting up the NVMe namespace and the NVMe subsystem.
Note: All changes can of course also be performed in an automated way by orchestrating the OnTap API.
Enable NVMe on SVM
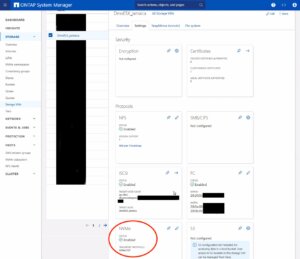 To enable NVMe at the SVM level on a NetApp storage system, this can typically be done by following these summarized steps, which can be accessed through the system’s web interface. Simply navigate to the Storage menu, then to Storage VMs, and finally selecting the specific SVM name you wish to configure:
- Configure NVMe Protocol: Within the SVM settings, look for a section or tab related to protocols. Locate the NVMe option and enable it. This might involve checking a box or switching a toggle to the ‘on’ position.
- Save and Apply Changes: After enabling NVMe, ensure to save the changes. There might be additional prompts or steps to confirm the changes, depending on the specific NetApp system and its version.
Remember to check for any prerequisites or additional configuration settings that might be required for NVMe operation, such as network settings, licensing, or compatible hardware checks. The exact steps may vary slightly depending on the version of ONTAP or the specific NetApp model you are using. Always refer to the latest official NetApp documentation or support resources for the most accurate guidance.
Creating the NVMe Subsystem
Afterwards, a new NVMe subsystem can be created on the NetApp storage system. This can be done by selecting the Hosts section, and choosing NVMe Subsystem to start the process of adding a new subsystem. A new wizard opens up which requires additional information regarding the newly to be created subsystem:
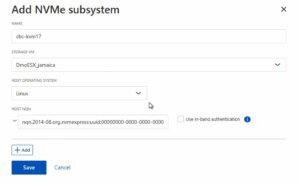 Name: <An identifier of the NVMe subsystem>
Storage VM: <The previously adjusted SVM>
Host Operating System: Linux (important for the block size)
Host NQN: <NQN of the Proxmox VE node>
It’s essential to ensure that all information, especially the Hosts NQN, is correctly entered to avoid connectivity issues. Additionally, consult the official NetApp documentation for any version-specific instructions or additional configuration steps that may be required.
Creating the NVMe Namespace
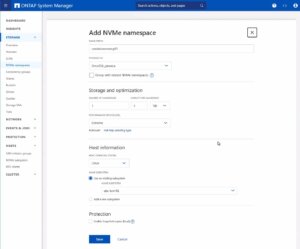 As a last step the NVMe namespace must be created. To add an NVMe namespace on a NetApp storage system, you would begin by logging into the web interface and navigating to the Storage section, followed by selecting NVMe Namespaces. In this area, you initiate the process of creating a new namespace. You will be prompted to provide specific details for the namespace, such as its name, size, and the associated SVM that will manage it.
Note: Also take an important note about the Performance Service Level which might be switched to a custom profile to avoid any limitations.
Once you have entered all the necessary information, you will typically proceed to choose the performance characteristics, like the service level or tiering policy, depending on your performance needs and the capabilities of your NetApp system.
After configuring these settings, you need to review your choices and save the new namespace configuration to make it available for use. It is important to ensure that the namespace is properly configured to match the requirements of your environment for optimal performance and compatibility. Always check for any additional steps or prerequisites by consulting the NetApp documentation relevant to your ONTAP version or storage model.
The configuration on the storage part is now complete. The next steps will be performed on the Proxmox VE node(s).
Configuring Proxmox Node
General
After configuring the NetApp storage appliance, all Proxmox VE nodes within the cluster must be configured to use and access the NVMe-oF storage. Unfortunately, Proxmox VE does not support this type of storage out of the box. Therefore, this cannot be easily configured by the Proxmox web interface. Luckily, Proxmox VE is based on Debian Linux from where all needed dependencies and configurations can be obtained but it requires us to do everything on the command line (CLI). Depending on the amount of nodes within the cluster, further config management tools like Ansible may boost up the initial setup process and make it repeatable for new potential nodes in the future. We may also assist you by setting up custom config management environments fitting your needs.
In general, this process consists of:
- Installing needed packages.
- Enabling the Kernel modules.
- Discovery of the storage.
- Connecting with the storage.
- Creating a LVM Volume Group.
- Assigning the storage in the Proxmox web interface.
The next steps in this blog post will cover the process in detail and guide you through the needed steps on the Proxmox VE nodes which must be done on the command line.
Installing Needed Packages
Using and accessing NVMe-oF requires the related user land tools (nvme-cli) to be present on the Proxmox VE node. Debian Linux already provides those tools within the Debian repository. As a result, the overall installation process is very easy. The package can simply be installed by the following command:
apt-get install nvme-cli
This package also already provides the required Kernel module which can simply be loaded by running:
modprobe nvme_tcp
Afterwards, the module should be added to be loaded at boot time:
echo "nvme_tcp" > /etc/modules-load.d/20-nvme_tcp.conf
After these steps, a connection with the storage can be initialized.
Connecting With the Storage
Interacting with the NetApp storage and its NVMe-oF functionality is a multi-step process and requires us to exchange the NVMe Qualified Name (NQN) address of each Proxmox VE node accessing the NVMe storage. The NQN address of a Proxmox VE node can be obtained by running the command:
cat /etc/nvme/hostnqn
![]()
Add the host NQN address on your NetApp export to allow the nodes accessing it. An example output is given in the screenshot.
Discovery & Connecting
In the next step, the NVMe’s will be discovered and connected to the Proxmox VE node. The discovery and connect process is simply done by running the following commands:
nvme discover -t tcp -a 192.168.164.100 -s 4420
 nvme connect -t tcp -n na01-nqn01 -a 192.168.164.100 -s 4420
To make this configuration persistent to system reboots, the commands will also be added to the nvme discovery file. The nvmf-autoconnect systemd unit file ensures to load this. Therefore, this systemd unit file must also be enabled.
echo "discover -t tcp -a 192.168.164.100 -s 4420" >> etc/nvme/discovery.conf
 systemctl enable nvmf-autoconnect.service
Volume Group
The last steps will partially be done on the command line and on the Proxmox web interface to add the new storage to the cluster.
Important:
This steps must only be done on a single Proxmox VE host node and not on all ones. The integration happens on cluster level and implies all Proxmox VE nodes once this has been done.
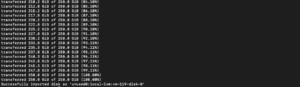
The last command on the command line results in creating a new LVM Volume Group (VG) on the new NVMe device which can simply be done by executing the command:
vgcreate shared_nvme01 /dev/nvme0n1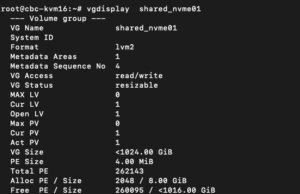
The newly created LVM Volume Group (VG) can be validated by running the command:
vgdisplay shared_nvme01
An output like in the given screenshot should be returned, including all further details of this VG. After validating the information, all tasks are completed on the command line.
To finally use this LVM Volume Group on all Proxmox VE nodes within the cluster, this Volume Group must be added and integrated on cluster level. Therefore, we need to login to the web frontend of the cluster and add this under:
- Datacenter
- Storage
- Add
- LVM
In the new window some more details for the new LVM storage have to be defined:
- ID: shared_nvme01 (this can be any text and is jut an identifier)
- Base storage: Existing volume groups
- Volume group: shared_nvme01
- Content: Disk image, Container (may vary)
- Nodes: <Select all nodes that should use it>
- Enables: Yes
- Shared: Yes
- Wipe Removed Volumes: No

By pressing on Add this will be attached to the selected nodes as a new volume and can directly be used.
Conclusion
The utilization of NVMe over Fabrics (NVMe-oF) via TCP in addition with Proxmox VE in a virtualization environment presents a compelling solution for organizations looking at cost-effective yet high-performance storage architectures. This approach leverages the widespread availability and compatibility of Ethernet-based networks, avoiding the need for specialized hardware such as Fibre Channel or InfiniBand, which can be cost-prohibitive for many enterprises.
By integrating NVMe-oF with Proxmox, a popular open-source virtualization platform, users can benefit from significantly improved data transfer speeds and lower latency compared to traditional storage solutions. NVMe-oF may not only be used with Proxmox VE but also on other operating systems like FreeBSD and hypervisors like bhyve. This provides a great benefit for latency-sensitive workloads, such as virtualized database servers, where rapid access to data is critical for performance. The NVMe protocol is designed to exploit the full potential of solid-state storage technologies. When used over a network fabric using TCP, it can deliver near-local NVMe performance by being very cost-effective.
At your convenience, we’re available to provide more insights into NetApp storage systems, covering both hardware and software aspects. Our expertise also extends to open-source products, especially in establishing virtualization environments using technologies like Proxmox and OpenShift or in maintaining them with config management. We invite you to reach out for any assistance you require.
You might also be interested in learning how to migrate VMs from VMware ESXi to Proxmox VE or how to include the Proxmox Backup Server into your infrastructure.
Integrating Proxmox Backup Server into Proxmox Clusters
Proxmox Backup Server
In today’s digital landscape, where data reigns supreme, ensuring its security and integrity is paramount for businesses of all sizes. Enter Proxmox Backup Server, a robust solution poised to revolutionize data protection strategies with its unparalleled features and open-source nature.
At its core, Proxmox Backup Server is a comprehensive backup solution designed to safeguard critical data and applications effortlessly in virtualized environments based on Proxmox VE. Unlike traditional backup methods, Proxmox Backup Server offers a streamlined approach, simplifying the complexities associated with data backup and recovery.
One of the standout features of Proxmox Backup Server is its seamless integration with Proxmox Virtual Environment (PVE), creating a cohesive ecosystem for managing virtualized environments. This integration allows for efficient backup and restoration of Linux containers and virtual machines, ensuring minimal downtime and maximum productivity. Without the need of any backup clients on each container or virtual machine, this solution still offers the back up and restore the entire system but also single files directly from the filesystem.
Proxmox Backup Server provides a user friendly interface, making it accessible to both seasoned IT professionals and newcomers alike. With its intuitive design, users can easily configure backup tasks, monitor progress, and retrieve data with just a few clicks, eliminating the need for extensive training or technical expertise.
Data security is a top priority for businesses across industries and Proxmox Backup Server delivers on this front. Bundled with solutions like ZFS it also brings in all the enterprise filesystem features like encryption at rest, encryption at transition, checksums, snapshots, deduplication and compression but also integrating iSCSI or NFS storage from enterprise storage solutions like from NetApp can be used.
Another notable aspect of Proxmox Backup Server is its cost effectiveness. As an open-source solution, it eliminates the financial barriers (also in addition with the Proxmox VE solutions) associated with proprietary backup software.
Integrating Proxmox Backup Server into Proxmox Clusters
General
This guide expects you to have already at least one Proxmox VE system up and running and also a system where a basic installation of Proxmox Backup Server has been performed. Within this example, the Proxmox Backup Server is installed on a single disk, where the datastore gets attached to an additional block device holding the backups. Proxmox VE and Proxmox Backup Server instances must not be in the same network but must be reachable for each other. The integration requires administrative access to the datacenter of the Proxmox VE instance(s) and the Backup Server.
Prerequisites
- Proxmox VE (including the datacenter).
- Proxmox Backup Server (basic installation).
- Administrative access to all systems.
- Network reachability.
- Storage device holding the backups (in this case a dedicated block storage device).
Administration: Proxmox Backup Server
Like the Proxmox VE environment, the Proxmox Backup Server comes along with a very intuitive web frontend. Unlike the web frontend of Proxmox VE, which runs on tcp/8006, the Proxmox Backup Server can be reached on tcp/8007. Therefore, all next tasks will be done on https://<IP-PROXMOX-BACKUP-SERVER>:8007.
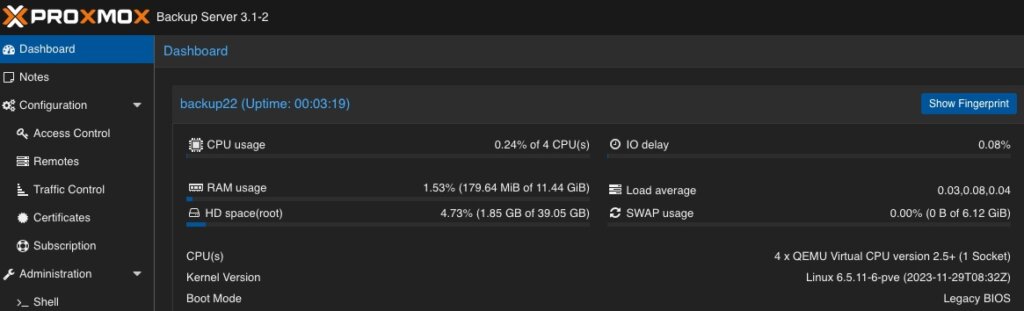
After logging in to the web frontend, the dashboard overview welcomes the user.

Adding Datastore / Managing Storage
The initial and major tasks relies in managing the storage and adding a usable datastore for the virtualization environment holding the backup data. Therefore, we switch to the Administration chapter and click on Storage / Disks. This provides an overview of the available Devices on the Proxmox Backup Server. 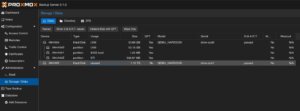 As already being said, this example uses a dedicated block storage device which will be used with ZFS to benefit from checksums, deduplication, compression which of course can also be used in addition with multiple disks (so called raidz-levels) or with other solutions like folder or NFS shares. Coming back to our example, we can see the empty /dev/sdb device which will be used to store all backup files.
By clicking on ZFS in the top menu bar, a ZFS trunk can be created as a datastore. Within this survey, a name, the raid level, compression and the devices to use must be defined. 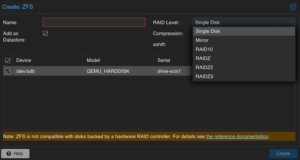 As already mentioned, we can attach multiple disks and define a desired raid level. The given example only consists of a single disk, which will be defined here. Compression is optional, but using LZ4 as a compression is recommended. As a lossless data compression algorithm, LZ4 aims to provide a good trade off between speed and compression ratio which is very transparent on today’s system.
Ensure to check Add as Datastore option (default) will create the given name directly as a usable datastore. In our example this will be backup01.
Keep in mind, that this part is not needed when using a NFS share. Also do not use this in addition with hardware RAID controllers.
Adding User for Backup
In a next step, a dedicated user will be created that will be used for the datastore permissions and for the Proxmox VE instances for authentication and authorization. This allows even complex setups with different datastores, different users including different access levels (e.g., reading, writing, auditing,…) on different clusters and instances. To keep it simple for demonstrations, just a single user for everything will be used.
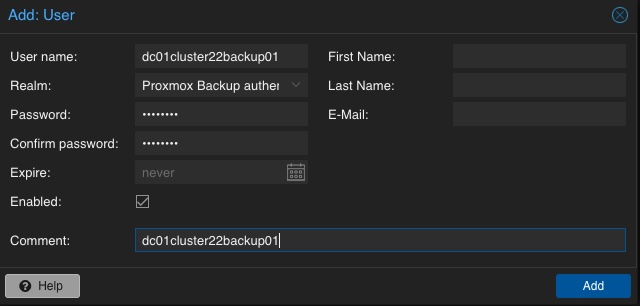 A new user is configured by selecting Configuration, Access Control and User Management in the left menu. There, a new user can be created by simply defining a name and a password. The default realm should stay on the default for the Proxmox Backup authentication provider. Depending on the complexity of the used name schema, you may also create reasonable users. In the given example, the user is called dc01cluster22backup01.
Adding Permission of User for Datastore
Mentioning already the possibility to create complex setups regarding authentication and authorization, the datastore must be linked to at least a single user that can access it. Therefore, we go back to the Datastore and select the previously created backup01 datastore. In the top menu bar, the permissions can be created and adjusted in the Permissions chapter. Initially, a new one will be created now. Within the following survey the datastore or path, the user and the role must be defined:
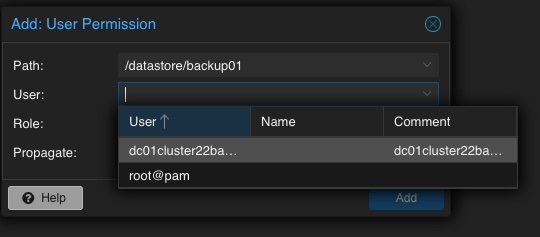
Path: /datastore/backup01
User: dc01cluster22backup01@pbs
Role: DatastoreAdmin
Propagate: True
To provide a short overview of the possible roles, this will be shortly mentioned without any further explanation: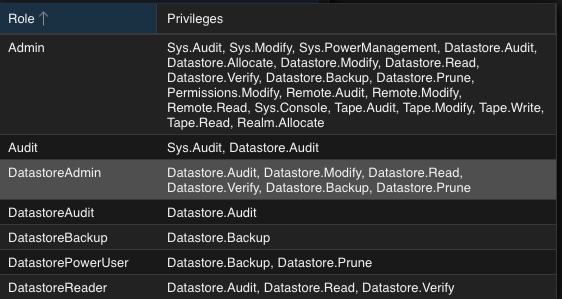
- Admin
- Audit
- DatastoreAdmin
- DatastoreAudit
- DatastoreBackup
- DatastorePowerUser
- DatastoreReader
Administration: Proxmox VE
The integration of the backup datastore will be performed from the Proxmox VE instances via the Datacenter. As a result, the Proxmox VE web frontend will now be used for further administrative actions. The Proxmox VE web frontend runs on tcp/8006, Therefore, all next tasks will be done on https://<IP-PROXMOX-VE-SERVER>:8006.
Adding Storage
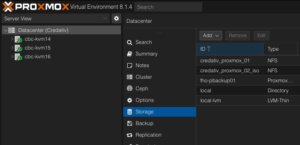
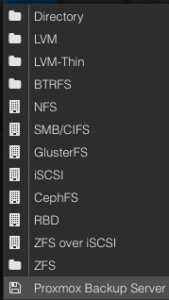 Integrating the Proxmox Backup Server works the same way like managing and adding a shared storage to a Proxmox datacenter.
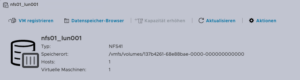
In the left menu we choose the active datacenter and select the Storage options. There, we can find all natively support storage options like (NFS, SMB/CIFS, iSCSI, ZFS, GlusterFS,…) of Proxmox and finally select the Proxmox Backup Server as a dedicated item.
Afterwards, the details for adding this datastore to the datacenter must be inserted. The following options need to be defined:
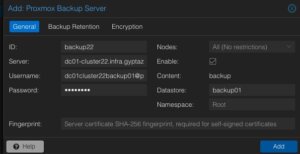 ID: backup22
Server: <FQDN-OR-IP-OF-BACKUP-SERVER>
Username: dc01cluster22backup01@pbs
Password: <THE-PASSWORD-OF-THE-USER>
Enable: True
Datastore: backup01
Fingerprint: <SYSTEM-FINGERPRINT-OF-BACKUP-SERVER>
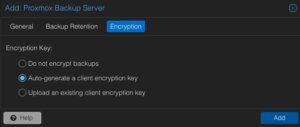 Optionally, also the Backup Retention and Encryption can be configured before adding the new backup datastore. While the backup retention can also be configured on the Proxmox Backup Server (which is recommended), enabling the encryption should be considered. Selecting an d activating the encryption is easily done by simply setting it to Auto-generate a client encryption key. Depending on your previous setup, also an already present key can be uploaded and used.
After adding this backup datastore to the datacenter, this can immediately be used for backup and the integration is finalized.
Conclusion
Proxmox provides with the Proxmox Backup Server an enterprise backup solution, for backing up Linux containers and virtual machines. Supporting features like incremental and fully deduplicated backups by using the benefits of different open-source solutions, in addition with strong encryption and data integrity this solution is a prove that open-source software can compete with closed-source enterprise software. Together with Proxmox VE, enterprise like virtualization environments can be created and managed without missing the typical enterprise feature set. Proxmox VE and the Proxmox Backup Server can also be used in addition to storage appliances from vendors like NetApp, by directly use iSCSI or NFS.
Providing this simple example, there are of course much more complex scenarios which can be created and also should be considered. We are happy to provide you more information and to assist you creating such setups. We also provide help for migrating from other products to Proxmox VE setups. Feel free to contact us at any time for more information.
Migrating VMs from VMware ESXi to Proxmox
In response to Broadcom’s recent alterations in VMware’s subscription model, an increasing number of enterprises are reevaluating their virtualization strategies. With heightened concerns over licensing costs and accessibility to features, businesses are turning towards open source solutions for greater flexibility and cost-effectiveness. Proxmox VE, in particular, has garnered significant attention as a viable alternative. Renowned for its robust feature set and open architecture, Proxmox offers a compelling platform for organizations seeking to mitigate the impact of proprietary licensing models while retaining comprehensive virtualization capabilities. This trend underscores a broader industry shift towards embracing open-source technologies as viable alternatives in the virtualization landscape. Just to mention, Proxmox is widely known as a viable alternative to VMware ESXi but there are also other options available, such as bhyve which we also covered in one of our blog posts.
Benefits of Opensource Solutions
In the dynamic landscape of modern business, the choice to adopt open source solutions for virtualization presents a strategic advantage for enterprises. With platforms like KVM, Xen and even LXC containers, organizations can capitalize on the absence of license fees, unlocking significant cost savings and redirecting resources towards innovation and growth. This financial flexibility empowers companies to make strategic investments in their IT infrastructure without the burden of proprietary licensing costs. Moreover, open source virtualization promotes collaboration and transparency, allowing businesses to tailor their environments to suit their unique needs and seamlessly integrate with existing systems. Through community-driven development and robust support networks, enterprises gain access to a wealth of expertise and resources, ensuring the reliability, security, and scalability of their virtualized infrastructure. Embracing open source virtualization not only delivers tangible financial benefits but also equips organizations with the agility and adaptability needed to thrive in an ever-evolving digital landscape.
Migrating a VM
Prerequisites
To ensure a smooth migration process from VMware ESXi to Proxmox, several key steps must be taken. First, SSH access must be enabled on both the VMware ESXi host and the Proxmox host, allowing for remote management and administration. Additionally, it’s crucial to have access to both systems, facilitating the migration process. Furthermore, establishing SSH connectivity between VMware ESXi and Proxmox is essential for seamless communication between the two platforms. This ensures efficient data transfer and management during migration. Moreover, it’s imperative to configure the Proxmox VE system or cluster in a manner similar to the ESXi setup, especially concerning networking configurations. This includes ensuring compatibility with VLANs or VXLANs for more complex setups. Additionally, both systems should either run on local storage or have access to shared storage, such as NFS, to facilitate the transfer of virtual machine data. Lastly, before initiating the migration, it’s essential to verify that the Proxmox system has sufficient available space to accommodate the imported virtual machine, ensuring a successful transition without storage constraints.
Activate SSH on ESXi
The SSH server must be activated in order to copy the content from the ESXi system to the new location on the Proxmox server. The virtual machine will later be copied from the Proxmox server. Therefore, it is necessary that the Proxmox system can establish an SSH connection on tcp/22 to the ESXi system:
- Log in to the VMware ESXi host.
- Navigate to Configuration > Security Profile.
- Enable SSH under Services.
Find Source Information about VM on ESXi
One of the challenging matters in finding the location of the virtual machine holding the virtual machine disk. The path can be found within the web UI of the ESXi system:
- Locate the ESXi node that runs the Virtual Machine that should be migrated
- Identify the virtual machine to be migrated (e.g., pgsql07.gyptazy.ch).
- Obtain the location of the virtual disk (VMDK) associated with the VM from the configuration panel.
- The VM location path should be shown (e.g., /vmfs/volumes/137b4261-68e88bae-0000-000000000000/pgsql07.gyptazy.ch).
- Stop and shutdown the VM.
Create a New Empty VM on Proxmox
- Create a new empty VM in Proxmox.
- Assign the same resources like in the ESXi setup.
- Set the network type to VMware vmxnet3.
- Ensure the needed network resources (e.g., VLAN, VXLAN) are properly configured.
- Set the SCSCI controller for the disk to VMware PVSCSI.
- Do not create a new disk (this will be imported later from the ESXi source).
- Each VM gets an ID assigned by Proxmox (note it down, it will be needed later).
Copy VM from ESXi to Proxmox
The content of the virtual machine (VM) will be transferred from the ESXi to the Proxmox system using the open source tool rsync for efficient synchronization and copying. Therefore, the following commands need to be executed from the Proxmox system, where we create a temporary directory to store the VM’s content:
mkdir /tmp/migration_pgsql07.gyptazy.ch
cd /tmp/migration_pgsql07.gyptazy.ch
rsync -avP root@esx02-test.gyptazy.ch:/vmfs/volumes/137b4261-68e88bae-0000-000000000000/pgsq07.gyptazy.ch/* .
Depending on the file size of them virtual machine and the network connectivity this process may take some time.
Import VM in Proxmox
 Afterwards, the disk is imported using the qm utility, defining the VM ID (which got created during the VM creation process), along with specifying the disk name (which has been copied over) and the destination data storage on the Proxmox system where the VM disk should be stored:
qm disk import 119 pgsql07.gyptazy.ch.vmdk local-lvm
Depending on the creation format of the VM or the exporting format there may be multiple disk files which may also be suffixed by _flat. This procedure needs to be repeated by all available disks.
Starting the VM
In the final step, all settings, resources, definitions and customizations of the system should be thoroughly reviewed. One validated, the VM can be launched, ensuring that all components are correctly configured for operation within the Proxmox environment.
Conclusion
This article only covers one of many possible methods for migrations in simple, standalone setups. In more complex environments involving multiple host nodes and different storage systems like fibre channel or network storage, there are significant differences and additional considerations. Additionally, there may be specific requirements regarding availability and Service Level Agreements (SLAs) to be concern. This may be very specific for each environment. Feel free to contact us for personalized guidance on your specific migration needs at any time. We are also pleased to offer our support in related areas in open source such as virtualization (e.g., OpenStack, VirtualBox) and topics pertaining to cloud migrations.
Addendum
On the 27th of March, Proxmox released their new import wizard (pve-esxi-import-tools) which makes migrations from VMware ESXi instances to a Proxmox environment much easier. Within an upcoming blog post we will provide more information about the new tooling and cases where this might be more useful but also covering the corner cases where the new import wizard cannot be used.
VXLAN stands for “Virtual eXtensible Local Area Network”. Standardized in RFC 7348 in August 2014, VXLAN is also available today as a virtual network interface in current Linux kernels. But what is VXLAN?
What is VXLAN?
When one reads the keywords “Virtual” and “LAN”, most rightly think of VLAN. Here, a large physical network is logically divided into smaller networks. For this purpose, the corresponding connections are marked with VLAN tags. This can be done either at the sending host (tagged VLAN) or, for example, by the switch (port-based VLAN). These markings are already made at Layer 2, the Data Link Layer in the OSI model. This allows them to be effectively evaluated at a very low network level, thereby suppressing unwanted communication in the network. The IEEE 802.1Q standard defines a 12-bit width for the VLAN tag, thus fundamentally resulting in 4096 possible VLAN networks on an Ethernet installation.
VXLAN was developed to circumvent this limitation. With VXLAN, a transmission technology based on OSI Layer 3 or Layer 4 is introduced, which creates virtual Layer 2 environments. With VXLAN logic, approximately 16 million (2 to the power of 24) VXLAN Layer 2 networks are possible, which in turn can map 4096 VLAN network segments. This should initially be sufficient even for very large Ethernet installations.
How can one set up such a VXLAN?
A VXLAN interface can then be set up, for example, with
ip link add vxlan0 type vxlan id 42 group 239.1.1.1 dev eth0
available. This command creates the device “vxlan0” as a VXLAN with ID 42 on the physical interface “eth0”. Multiple VXLANs are distinguished based on their ID. The instruction “group
Using the command line
ip addr add 10.0.0.1/24 dev vxlan0
one assigns a fixed IP address to the newly created VXLAN network interface, here in the example 10.0.0.1
The command
ip link set up dev vxlan0
activates the newly created network interface “vxlan0”. This creates a virtual network based on IP multicast on the physical interface “eth0”.
The interface “vxlan0” now behaves in principle exactly like an Ethernet interface. All other computers that select VXLAN ID 42 and multicast group 239.1.1.1 will thus become part of this virtual Ethernet. On this, one could now again set up various VLANs, for example, with
ip link add link vxlan0 name vlan1 type vlan id 1
set up a new VLAN on the VXLAN interface. In this case, one would not need to assign an IP address to the VXLAN interface.
What are its practical applications?
Fundamentally, VXLAN is suitable for use cases in very large Ethernets, such as in cloud environments, to overcome the 4096 VLAN limit.
Use as a Test Environment for Network Services
Alternatively, VXLAN can be very effectively used in test environments or virtualized environments where full control over the Layer 2 network to be used is required. If one wishes to test network infrastructure components or their configuration, such a completely isolated network is ideal. This also allows one to bypass control structures introduced by virtualization environments, which are particularly obstructive for such tests. My first practical experience with VXLAN was during the testing of a more complex DHCP setup on several virtual machines in OpenStack. On the network interfaces provided by OpenStack, the test was impossible for me, as I had only limited access to the network configurations on the virtualization host side, and OpenStack filters out DHCP packets from the network stream. This problem could be elegantly circumvented by setting up the test network on VXLAN. At the same time, this ensured that the DHCP test had no impact on other parts of the OpenStack network. Furthermore, the Ethernet connection provided by OpenStack remained permanently usable for maintenance and monitoring purposes.
For example, in unicast operation, scenarios are also conceivable where a Layer 2 network spanned over VXLAN is transported across multiple locations. There are switches or routers that support VXLAN and can serve as VTEPs (VXLAN Tunnel Endpoints). These can be used, for example, to connect two multicast VXLAN networks via unicast between the VTEPs, thereby transparently spanning a large VXLAN.
Is VXLAN secure?
VXLAN adds another Layer 2 infrastructure on top of an existing Ethernet infrastructure. This operates with UDP packets in unicast or multicast. Encryption at the VXLAN level is not provided and would need to be handled by higher protocol layers if required. IPSec solutions or, for example, TLS are options here. Fundamentally, VXLAN is at a comparable security level to most other Layer 2 network protocols.
Possible Issues?
With VXLAN, users may encounter a “familiar acquaintance” in the form of MTU issues. A standard Ethernet frame has a length of 1,518 bytes. After deducting the Ethernet header, 1,500 bytes remain for payload. VXLAN extends the Ethernet header by 50 bytes, which reduces the available payload to 1,450 bytes. This should be considered when setting the MTU. So-called Jumbo Frames are affected accordingly. Here, the additional 50 bytes must also be taken into account.
What does credativ offer?
We are pleased to support and advise you on the design and operation of your network environment. Among other things, we work in the areas of DevOps, network infrastructure, and network design. credativ GmbH has employees with expertise in highly complex network setups for data centers on real hardware as well as in virtual environments. Our focus is on implementation with open-source software.