Introduction and Project History
Nowadays, cloud storage is included with every second account for various services. Whether it is a Google account with Drive or a Dropbox account created to collaborate with other project participants. Unfortunately, these are unencrypted, and it is often unclearly communicated how the service provider handles the stored data and what it might be used for. This means, however, that it cannot be used securely.
Cryptomator is an open-source encryption tool developed in 2015 by the German company Skymatic GmbH to enable the secure storage of data in cloud storage solutions. The project arose from the realization that while many cloud providers offer convenience, they do not guarantee sufficient control over the confidentiality of stored data. It addresses this problem through client-side, transparent encryption that works independently of the respective provider. This is implemented by creating encrypted vaults (“Vaults”) in any cloud storage, with all encryption operations performed locally on the end device. As a result, control over the data remains entirely with the user.
Since its release, Cryptomator has evolved into one of the most well-known open-source solutions for cloud encryption. In 2016, the project was even honored with the CeBIT Innovation Award in the “Usable Security and Privacy” category. Development continues actively, with a focus on stability, compatibility, and cryptographic robustness.
Licensing
The project itself is available under a dual licensing structure. The desktop version is licensed as an open-source project under the GNU General Public License v3.0 (GPLv3). This means that the source code is freely viewable, modifiable, and redistributable, as long as the terms of the license are met. The source code is publicly accessible on GitHub: https://github.com/cryptomator/cryptomator.
For companies wishing to integrate Cryptomator into commercial products (e.g., as a white-label solution), the manufacturer offers a proprietary licensing option. The desktop software remains free to use, while development is primarily funded through donations and revenue from the mobile apps.
The mobile applications for Android and iOS are available in their respective app stores. While the basic functions are free, full functionality requires in-app purchases which, as mentioned, fund the project.
Architecture and Functionality
Cryptomator is based on the principle of transparent, client-side encryption. It creates encrypted directories—so-called vaults—within any folder managed by a cloud synchronization service. The software mounts these vaults as a virtual drive, making them behave like a normal folder in the file system for the user. This also works in local folders and does not necessarily have to be located in a synchronized folder.
All file operations (reading, writing, renaming) are transparently intercepted and encrypted or decrypted by Cryptomator before they are stored on the hard drive and/or synchronized to the cloud. The actual synchronization is handled by the respective cloud client—Cryptomator itself does not perform any network communication.
Cryptomator generates many small files from the data (e.g., dXXX for data blocks). It is important that the cloud client synchronizes these reliably to avoid data corruption. However, this also ensures that no conclusions can be drawn from the number and size of the files.
The architecture is designed so that no central servers are required. There is no registration, no accounts, and no transmission of metadata. The system operates strictly according to the zero-knowledge principle: only the user possesses the key for decryption.
However, this also means that if the “vault key” is lost, there is no longer any way to access the data. There is, however, the option to have an additional recovery key created when a vault is set up. This should then be kept in a suitably secure location, such as in a KeePass database or another password manager of your choice.
Since the file masterkey.cryptomator is also critical for decryption, it must be ensured that it is not deleted. In case of doubt, it can simply be backed up externally, just like the password and the recovery key.
If a vault is unlocked, it can be selected directly via the GUI client and opened in the file manager using a button.
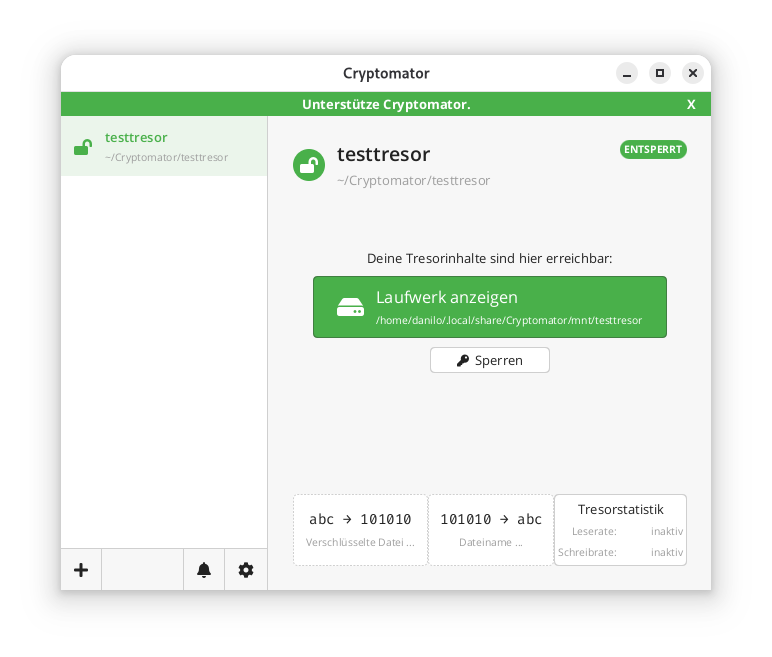
In the locally mounted and decrypted vault, currently only the initial file can be found:
$ ls -l ~/.local/share/Cryptomator/mnt/testtresor
 total 0
 -rw-rw-r-- 1 danilo danilo 471 10. Feb 11:07 WELCOME.rtf
In the actual file system where the vault was created in encrypted form, it looks like this instead:
$ tree ~/Cryptomator/testtresor/
 /home/danilo/Cryptomator/testtresor/
 ├── c
 ├── d
 │   └── KY
 │   └── FEV7TA6N4UV5I3PFT6P7D7DCTNGLDU
 │   ├── dirid.c9r
 │   └── feotyFJDU3AD_3wyOp7Tbd83QUgUGcB46vYT.c9r
 ├── IMPORTANT.rtf
 ├── masterkey.cryptomator
 ├── masterkey.cryptomator.57A62350.bkup
 ├── vault.cryptomator
 └── vault.cryptomator.2BB16E73.bkup
 5 directories, 7 files
The IMPORTANT.rtf file created here only contains a note indicating that it is a Cryptomator vault and a link to the documentation.
Cryptographic Procedures
Cryptomator’s security is based on established, standard-compliant cryptographic procedures:
– Encryption of file contents: AES-256 in SIV-CTR-MAC or GCM mode, depending on the version. This ensures both confidentiality and integrity.
– Encryption of file and folder names: AES-SIV to enable deterministic encryption without opening security vulnerabilities.
– Password derivation: The master key is derived from the user password using **scrypt**, a memory-intensive key derivation algorithm that makes brute-force attacks more difficult.
– Key management: Each vault has a 256-bit encryption and MAC master key. This is encrypted with the Key Encryption Key (KEK) derived from the password and stored in the `masterkey.cryptomator` file.
Further details on the cryptographic architecture are described in the official documentation.
Integration of Third-Party Services
Cryptomator distinguishes between desktop and mobile clients regarding cloud integration.
On desktop systems (Windows, macOS, Linux), integration works via the local synchronization folder of the respective cloud provider. Since Cryptomator only encrypts a folder and does not perform direct network communication, compatibility is very high. Any provider that provides a local folder (e.g., Dropbox, Google Drive, OneDrive, Nextcloud) can be used. Aside from this, an official [CLI client](https://github.com/cryptomator/cli) is also available. However, this appears to be less actively developed than the GUI client; at least the last commit and release are already more than six months old.
On mobile devices (Android, iOS), integration takes place either via native APIs or via the WebDAV protocol. Supported providers such as Dropbox, Google Drive, or OneDrive are offered directly in the app. For other services that support WebDAV (e.g., Nextcloud, ownCloud, MagentaCLOUD, GMX, WEB.DE), a connection can be established manually via the WebDAV interface.
A current list of supported services is available here.
Important Notes on Integration
– WebDAV and Two-Factor Authentication (2FA): For providers with 2FA, an app-specific password is often required, as the main password cannot be used for WebDAV.
– pCloud: WebDAV is disabled when 2FA is activated, which makes use via Cryptomator impossible.
– Multi-Vault Support: Multiple vaults can also be managed in parallel in the client.
External Security Validation of the Project
In 2017, Cryptomator underwent a comprehensive security audit by the recognized security company Cure53. The test covered the project’s core cryptographic libraries, including cryptolib, cryptofs, siv-mode, and cryptomator-objc-cryptor. The audit was predominantly positive: the architecture was rated as robust and the attack surface as very small.
One critical finding concerned unintentional public access to the private GPG signing key, which has since been resolved. Another less critical note referred to the use of AES/ECB as the default mode in an internal class, which, however, was not used in the main encryption path.
The full audit report in PDF format is publicly available.
This is the only publicly available audit of the project that the author could find. However, since audits are generally expensive and time-consuming, the project should be credited for having it conducted and made publicly available.
All other known security issues are also listed on the project’s GitHub page and are visible to everyone.
Conclusion
Cryptomator represents a technically sophisticated, transparent, and cross-platform solution for encrypting data in cloud storage or local data. Through the consistent implementation of the zero-knowledge principle and the use of established cryptographic procedures, it offers high security combined with good user-friendliness.
The separation between encryption and synchronization enables broad compatibility with existing cloud services without them having to change their infrastructure. The open-source nature of the software allows for audits and fosters trust in its security.
Even for less technically savvy users who want to maintain control over their data, Cryptomator is one of the best options available thanks to the GUI client. The specific notes regarding the peculiarities of mobile integration and the fact that both the master key and the password must be strictly protected are, of course, still essential.
Securing PostgreSQL databases correctly requires a multi-layered approach with robust authentication procedures, regular backups, and continuous monitoring. Effective security combines transport- and storage-level encryption with strict access controls and proactive monitoring. This comprehensive guide answers the most important questions regarding PostgreSQL security for enterprises.
What are the greatest security risks for PostgreSQL databases?
The greatest security risks for PostgreSQL databases include weak authentication, unencrypted data transmission, poorly configured access rights, and missing security updates. Additionally, SQL injection attacks, unsecured network connections, and insufficient monitoring pose serious threats.
Unzureichende Authentifizierung entsteht häufig durch schwache Passwort-Richtlinien oder die Verwendung von Standard-Anmeldedaten. Viele Installationen verwenden noch immer einfache Passwörter oder lassen Benutzerkonten ohne angemessene Berechtigung zu. This gives attackers direct access to sensitive company data. PostgreSQL 18 already offers modern and secure options for user authentication with OAuth2.
A lack of encryption during data transmission allows attackers to intercept communication between applications and the database, as login credentials and business data are transmitted in plain text without SSL/TLS encryption. Today, unencrypted data transmission is a clear no-go in the vast majority of scenarios, even in-house. When working in a cloud environment in the broadest sense—including the use of hosting or service providers—strong transport layer encryption is an absolute must-have. At the same time, unencrypted data storage jeopardizes security in the event of physical access to servers.
Missing or incorrect adjustments to the pg_hba.conf file lead to unintended or more extensive access than intended. This is less about permissions for data within the database and more about the ability to connect to the database at all. Additionally, permissions for the actual data within the database are often configured more broadly than necessary, partly due to convenience or historical reasons. These potential problems are further exacerbated by outdated PostgreSQL versions without current security patches.
How to set up secure authentication and access control?
Unfortunately, a common pattern in applications today is still the fact that the software uses only one generic database user, which often receives more rights in the database than it actually needs. Especially with pre-installed systems, this user is configured with publicly known default passwords. This has nothing to do with security.
Note: In practice, the database user is often set up universally to avoid running into connection limits and/or to benefit from connection pooling and similar techniques.
Fundamentally, permissions (authorization) should be handled as little as possible within the application and instead by the database. This allows the application to save a lot of code and only react to denied access. The opposite is "common" today, which undermines effective data protection.
Secure PostgreSQL authentication is based on strong password policies, role-based access controls, and the principle of least privilege. Configure the pg_hba.conf file restrictively and implement multi-factor authentication for administrative access. Every user should only receive the minimum necessary rights.
Start by creating specific database roles for different application areas. Use CREATE ROLE commands to define function-specific roles. For example, reporting applications only require read access, while backup processes require special system rights. Avoid using the superuser account for routine operations.
The pg_hba.conf file controls client authentication and connection methods. Configure this file to allow only specific IP addresses and subnets. Use scram-sha-256 instead of md5 and forbid trust for production environments. Restrict local connections to necessary system users.
Implement strong password policies with extensions such as passwordcheck to enforce complex passwords. Regular auditing and the deactivation of unused roles further increase security.
In contrast, password rotations have been proven not to help with passwords that a human must enter. Here, the BSI and also the NIST have spoken out against regular rotation in current guidelines. It is clearly recommended to rely on other systems such as passkeys via OAuth2, two-factor authentication, or cryptographically secure passwords and passphrases.
For automatically generated, short-lived access to connect automations, for example, it is also possible to create temporary users with associated passwords via Hashicorp Vault and the "PostgreSQL database secrets engine". In this case, the permissions and availability of the accounts are defined in the Vault and are only created as needed and automatically removed again. This technique is often seen particularly in Kubernetes environments. Our Cloud Infra Team will be happy to advise you on this.
Which backup strategies guarantee full data recovery?
Full PostgreSQL data recovery requires at least logical, but ideally physical backups with continuous archiving of Write-Ahead Logs (WAL). Implement automated daily full backups, supplemented by continuous WAL archiving for Point-in-Time Recovery. Test recovery procedures regularly in isolated environments.
When backing up PostgreSQL databases, the 3-2-1 rule generally applies as always. This means that you create 3 copies on 2 different media, with 1 of them being an offsite backup. It is a fatal error if the backup and the database are on the same medium. Such a setup would be a feast for a ransomware attack. Fundamentally, backup media should either not be permanently available on the network or so-called "immutable" backup media should be used—storage media that can only be written to once. This does not necessarily mean optical storage; organizational locks such as an S3 Object Lock are also a viable solution. There are good approaches to solving this through open-source software, but manufacturers of high-quality storage solutions like NetApp also have corresponding offerings.
Backups should also not be performed without integration into monitoring. At the very least, it should be monitored that backups can be carried out as configured. However, a backup that runs "successfully" but afterwards contains only 0 to less than 100 bytes is worthless. Regular restore tests then confirm this status through spot checks.
Backup Methods
Logical backups with pg_dump are excellent for simple data backup and recovery as well as cross-platform compatibility. This method creates SQL commands to reconstruct database structures and content. For large databases, pg_dump offers parallel processing via the --jobs parameter, which can significantly reduce backup times depending on the database structure. It also makes it easy to back up an entire instance, individual databases, only schema data, or only content. However, it also applies that the restore is performed by executing the individual SQL commands. This can take a lot of time, again depending on the structure and size of the database.
Physical backups via pg_basebackup copy the entire database cluster structure at the file system level. This method allows for faster recovery of large databases and supports continuous archiving. However, there is no option to select which data should be backed up. The entire instance, including index data and other binary data in the data directory, is always included.
Combine base backups with WAL archiving for the option of Point-in-Time Recovery, which enables restores accurate to the second. Base backups can also check the integrity of the backed-up data using checksums. However, this only works if the respective instance has been initialized accordingly.
Continuous archiving of WAL files ensures minimal data loss in the event of system failures. Configure archive_mode and archive_command in the postgresql.conf for automatic WAL transfer to secure storage locations. Monitor archiving processes continuously and implement alerts for errors or delays. If you still have a recovery.conf file described in your environment's documentation, it may be worth having the installation and documentation checked by experts. This file was part of PostgreSQL up to and including PostgreSQL 11 and was merged into the postgresql.conf with PostgreSQL 12.
Another method would be the use of pgBackRest. This is a mature backup and restore framework for PostgreSQL that excels over built-in tools, especially with large clusters. This system can also implement compliance with RPO/RTO requirements. It supports full, differential, and incremental backups, parallelization, block-level delta, WAL archiving, encryption, compression (zstd/lz4), integrity checks, and remote/cloud repositories (e.g., S3, Azure Blob, GCS).
In Kubernetes environments, operators such as CloudNativePG or the Zalando Postgres Operator are often used today. These also use tools like Wal-E or Barman Cloud for backup and recovery and already provide high levels of integration and monitoring.
How to encrypt PostgreSQL data correctly?
PostgreSQL data encryption occurs on three levels: transport encryption with SSL/TLS for network connections, encryption of data at rest at the storage level, and field-based encryption for particularly sensitive information. Configure SSL certificates for secure client-server communication and use file system or partition encryption, such as LUKS, for database files.
SSL/TLS transport encryption protects data during transmission between clients and servers. Enable SSL by setting ssl = on in the postgresql.conf and configure the corresponding certificate files. Use self-signed certificates for development environments and CA-signed certificates for production systems. The pg_hba.conf should mandate hostssl connections for critical applications.
Encryption of data at rest typically occurs at the file system or storage level using tools like LUKS on Linux, BitLocker on Windows, or cloud provider encryption. PostgreSQL itself does not offer integrated encryption for database files without add-ons; therefore, implement encryption below the database layer. This protects against physical access to storage media and data theft in the event of server compromise.
Feldbasierte Verschlüsselung für hochsensible Daten bietet z.B. die PostgreSQL-Erweiterungen pgcrypto. Diese Extension bietet Funktionen für symmetrische und asymmetrische Verschlüsselung einzelner Datenbankfelder. Use these for payment data, personal identifiers, or trade secrets, keeping in mind the impact on performance during search and sort operations. pgcrypto also provides support for various other cryptographic operations such as hashing or salting.
Which monitoring tools detect security incidents early?
Effective PostgreSQL security monitoring combines integrated logging functions with specialized monitoring tools for anomaly detection. Enable detailed logging in the postgresql.conf and use tools like pgAudit for comprehensive audit logging. Implement automated alerting systems for suspicious activities and performance anomalies.
PostgreSQL's integrated logging functions offer comprehensive monitoring capabilities by configuring the log_* parameters. Enable log_connections, log_disconnections, and log_statement for detailed connection and query logging. The log_line_prefix configuration should include timestamps, users, databases, and process IDs to enable effective forensic analysis.
Specialized tools like pgAudit extend standard logging functions with granular audit trails for compliance requirements. This extension logs database access at the object and role level and allows for the tracking of data modifications. Combine pgAudit with log_statement_stats for performance monitoring and the detection of resource-intensive attacks.
Automated monitoring systems such as Prometheus with PostgreSQL Exporter or specialized database monitoring tools detect anomalies in real time. Monitor metrics such as connection count, query performance, memory consumption, and unusual access patterns. Implement threshold-based alerts for critical events such as failed authentication attempts or unexpected database access outside of business hours.
Please note, however, that with every expansion of logging, the requirements for storage in terms of performance and especially space requirements also increase. Therefore, check very carefully which configurations are essential for you in production and which only offer added value in the development environment, for example. We are happy to support and advise you here.
How to perform regular security updates and maintenance?
Regular PostgreSQL security maintenance includes systematic update cycles, continuous vulnerability assessments, and proactive configuration reviews. Establish monthly minor updates for patches and plan major updates annually after thorough testing. PostgreSQL also has a relatively stable and well-documented release cycle, which makes the work easy to plan even months in advance.
Security patches for PostgreSQL are released regularly and address critical vulnerabilities. Subscribe to the PostgreSQL Announce mailing list for timely notifications about available minor updates and check the updates of the repositories you use for the corresponding packages. Test patches first in development and staging environments before implementing them in production systems. Use maintenance windows for planned updates and have rollback strategies ready.
Continuous configuration reviews identify security gaps caused by changing requirements or configuration drift. If possible, use automation such as Ansible or similar systems to ensure the desired state and to detect local deviations. Alternatively, at the very least, configuration files should be maintained and monitored with version control. Tools for optimizing configuration in terms of performance and security are available but should be used with appropriate caution, as most systems have individual requirements.
Comprehensive security audits should include quarterly external penetration tests, vulnerability scans, and compliance reviews. Professional PostgreSQL support can help meet complex security requirements and optimally protect critical systems. Conduct regular disaster recovery tests and update incident response plans based on new threat situations and business requirements.
How credativ helps with PostgreSQL security
credativ offers comprehensive PostgreSQL security solutions that cover all critical aspects of database protection. Our experts support you in implementing robust security strategies and ensure the optimal protection of your corporate data:
• Security audits and penetration tests: Comprehensive analysis of your PostgreSQL infrastructure to identify vulnerabilities and compliance gaps
• Backup and recovery strategies: Development and implementation of tailored backup concepts with automated monitoring and regular recovery tests
• Encryption implementation: Configuration of SSL/TLS, file system encryption, and column-based encryption according to industry standards
• Monitoring and alerting: Setup of professional monitoring systems with 24/7 support for critical security incidents
• Compliance support: Consulting on meeting GDPR, ISO 27001, and industry-specific security requirements
Secure your PostgreSQL databases with professional expertise. Contact us for an initial consultation and find out how we can optimally protect your database infrastructure.
Securing PostgreSQL databases requires a systematic approach with multiple layers of protection. By implementing robust authentication, comprehensive backup strategies, and continuous monitoring, you create a solid foundation for protecting your corporate data. Regular maintenance and proactive security measures ensure secure and reliable database operations in the long term.
PostgreSQL is an important building block for digital sovereignty. But even this building block requires a little effort and attention to be used effectively. We are happy to support you in the implementation as well as in the training of your IT team.
We are also happy to advise you on other topics related to Linux hardening, for example using AppArmor.
As described in the previous post, access control on Unix-like systems is traditionally based on the principle of Discretionary Access Control (DAC). Applications and services run under a specific user and group ID and are granted the corresponding access rights to files and folders.
AppArmor implements a Mandatory Access Control for Linux, based on the Linux Security Modules: an access control strategy that allows specific rights to be granted or denied to individual programs. This security layer exists in addition to the traditional DAC.
Since Debian 10 buster, AppArmor has been included and activated in the kernel by default. The packages apparmor and apparmor-utils provide tools for creating and maintaining AppArmor profiles.
Included Profiles
The two packages mentioned do not come with ready-made profiles, but only the Abstractions mentioned in the previous article: collections of rules that can be included in multiple profiles.
Some programs include their profiles in their own packages, while others contain profiles if corresponding modules are installed later – for example, mod_apparmor for the Apache web server.
The packages apparmor-profiles and apparmor-profiles-extra contain AppArmor profiles that can be found after installation in the directories /etc/apparmor.d (for tested profiles) and /usr/share/apparmor/extra-profiles (for experimental profiles), respectively. These profiles can be used as a basis for custom profiles.
Create Profiles Yourself
While at least experimental profiles are available for most common server services, such as the Apache web server, nothing can be found for the nginx web server. However, this is not a major issue, as a new AppArmor profile can be quickly created with the help of apparmor-utils.
Nginx Example
The following assumes a simple base installation of nginx that only serves HTML files under /var/www/html via HTTP. The focus here is primarily on the general approach, so repetitive steps will be skipped.
The described approach can be applied to any other program. To find out about the paths and files used by a program, dpkg can be used with the -L option, which lists all paths of a package. It should be noted that several packages may need to be queried for this; for nginx, the package of the same name provides hardly any useful information; this is only obtained with the nginx-common package:
# dpkg -L nginx-common
For the following steps, it is recommended to have two terminals open with root privileges.
Before the web server process can be observed for profile creation, all its running processes must be terminated:
# systemctl stop nginx
Once all processes are stopped, aa-genprof is called in the second terminal with the path of the web server’s program file:
# aa-genprof /usr/sbin/nginx
Some information about the current call of aa-genprof appears, including the hint Profiling: /usr/sbin/nginx, followed by Please start the application to be profiled in another window and exercise its functionality now.
To comply with this, the web server process is restarted in the first terminal window:
# systemctl start nginx
Before calling the S option in the second window to search the log files for AppArmor events, the web server should run for a few moments, and it should also be accessed from a browser so that as many typical activities of the process as possible are recorded.
Once this is done, the log files can be searched for events by pressing the S key:
[(S)can system log for AppArmor events] / (F)inish
Reading log entries from /var/log/syslog.
Updating AppArmor profiles in /etc/apparmor.d.
Complain-mode changes:
If an event is found, the affected profile and the action recorded by AppArmor are displayed:
Profile: /usr/sbin/nginx
Capability: dac_override
Severity: 9

 [1 - capability dac_override,]
(A)llow / [(D)eny] / (I)gnore / Audi(t) / Abo(r)t / (F)inish
Here, the program /usr/sbin/nginx requests the Capability dac_override, which was already described in the last article. It is indispensable for the operation of the web server and is allowed by pressing A. Alternatively, the request can be denied with D or ignored with I. With the Audit option, this request would continue to be recorded in the log file during operation.
Profile: /usr/sbin/nginx Capability: net_bind_service Severity: 8 [1 - #include] 2 - capability net_bind_service,
The next event shows that the process requests the Capability net_bind_service, which is needed to open a port with a port number less than 1024.
Unlike the first query, there are two ways to allow access in the future: the first option involves integrating Abstractions for NIS, the Network Information Service. In this Abstraction, which can be found under /etc/apparmor.d/abstractions/nis, in addition to a rule that allows access to rule sets for NIS, the Capability net_bind_service is also listed.
However, since the HTTP server does not include NIS functionality, it is sufficient to only allow the Capability. By pressing 2 and A, this is adopted into the profile.
The same applies to the Abstractions proposed in the following steps for dovecot and postfix: here it is sufficient to only allow the Capabilities setgid and setuid.
Sometimes the designation of the Abstractions can be somewhat misleading: for example, the Abstraction nameservice contains, in addition to rules that allow read access to common nameservice files like passwd or hosts, also rules that permit network access. It is therefore always worthwhile to take a look at the respective file under /etc/apparmor.d/abstractions/ to see if including the Abstraction is beneficial.
After the web server process has received all necessary Capabilities, it apparently tries to open its error log file /var/log/nginx/log with write permissions. It is noticeable here that, in addition to the usual Allow, Deny, and Ignore, the options Glob and Glob with Extension have been added.
Profile: /usr/sbin/nginx
Path: /var/log/nginx/error.log
New Mode: w
Severity: 8

 [1 - /var/log/nginx/error.log w,]
(A)llow / [(D)eny] / (I)gnore / (G)lob / Glob with (E)xtension / (N)ew / Audi(t) / Abo(r)t / (F)inish
Entering E adds another suggestion to the list:
 1 - /var/log/nginx/error.log w,
 [2 - /var/log/nginx/*.log w,]
The filename error.log has been replaced by a wildcard and the extension .log. This rule would grant write permissions to the file /var/log/nginx/error.log as well as, for example, to the file /var/log/nginx/access.log – these are (at least) two rules combined into a single one.
These rules would already be sufficient for this example, but it might also be necessary to allow files that do not have the .log file extension to be written in the /var/log directory. By entering G, another suggestion is added to the list:
  1 - /var/log/nginx/error.log w,
 2 - /var/log/nginx/*.log w,
 [3 - /var/log/nginx/* w,]
The filename has now been replaced by a single wildcard, meaning the process would be allowed to open any files in /var/log/nginx with write permissions.
As already mentioned, the proposed rules only grant write permissions, but no read permissions, even if the file’s access rights would allow more. However, for a web server’s log file, write permissions are entirely sufficient.
Subsequently, nginx requests read access to various configuration files, for example /etc/nginx/nginx.conf. This file is located in the nginx web server’s configuration directory, which contains other files that should also be readable.
Profile: /usr/sbin/nginx
Path: /etc/nginx/nginx.conf
New Mode: owner r
Severity: unknown

 [1 - owner /etc/nginx/nginx.conf r,]
Here too, with G, the rule can be extended to all files in the /etc/nginx directory.
 1 - owner /etc/nginx/nginx.conf r,
 [2 - owner /etc/nginx/* r,]
The same applies to the subdirectories of the configuration directory; these can be covered by globbing as /etc/nginx/*/.
A special case for globbing is the files contained in those subdirectories:
Profile: /usr/sbin/nginx
Path: /etc/nginx/sites-available/default
New Mode: owner r
Severity: unknown

 [1 - owner /etc/nginx/sites-available/default r,]
After entering G twice, the wildcard ** is suggested after the wildcard * known from above, which, as described in the previous article, covers all files located in subdirectories (and their subdirectories).
 1 - owner /etc/nginx/sites-available/default r,
 2 - owner /etc/nginx/sites-available/* r,
 [3 - owner /etc/nginx/** r,]
The last steps also all contained the attribute owner: this ensures that a rule only applies if the accessing process is also the owner of the file. If the file exists but belongs to someone else, access is denied.
There are still some other paths and files such as /usr/share/nginx/modules-available/, /run/nginx.pid, and /proc/sys/kernel/random/boot_id, which nginx also requires for proper operation. However, the procedure remains unchanged.
Once all events have been processed, the program concludes with the message:
= Changed Local Profiles =

The following local profiles were changed. Would you like to save them?

 [1 - /usr/sbin/nginx]
(S)ave Changes / Save Selec(t)ed Profile / [(V)iew Changes] / View Changes b/w (C)lean profiles / Abo(r)t
The options are clear: S saves changes, while V allows them to be viewed as a Diff beforehand. The following listing shows the profile generated in the run above.
include <tunables/global>

profile nginx /usr/sbin/nginx {
 include <abstractions/base>
 include <abstractions/nameservice>

 capability dac_override,
 capability dac_read_search,
 capability setgid,
 capability setuid,

 /usr/sbin/nginx mr,

 /var/log/nginx/*.log w,

 /var/www/html/** r,

 owner /etc/nginx/* r,
 owner /etc/nginx/** r,

 owner /run/nginx.pid rw,

 owner /usr/share/GeoIP/*.mmdb r,
 owner /usr/share/nginx/modules-available/*.conf r,

 owner /var/cache/nginx/** rw,
 owner /var/lib/nginx/** rw,
}
After saving the changes, aa-genprof returns to its start screen. Here, one could search for events in log files again or exit the program with F.
The program ends with the message:
Setting /usr/sbin/nginx to enforce mode.

Reloaded AppArmor profiles in enforce mode.
The profile just created has therefore been loaded and put into enforce mode. This means that the program can only access what is allowed in the profile; all other access attempts are blocked by AppArmor and recorded in the Syslog.
For simple programs, the creation of a profile is thus complete, and AppArmor can perform its work; more complex programs, however, will show previously unknown behavior later on, which would be prevented by the profile created so far. In such cases, it helps to switch the profile to complain mode using aa-complain.
# aa-complain nginx
Accesses that go beyond the known profile are generally allowed in complain mode but are recorded in the Syslog.
Feb 18 15:25:50 web01 kernel: [ 9908.611408] audit: type=1400 audit(1645197950.338:100): apparmor="ALLOWED" operation="open" profile="nginx" name="/srv/www/index.html" pid=4490 comm="nginx" requested_mask="r" denied_mask="r" fsuid=33 ouid=0
In the excerpt from the Syslog above, the webroot directory on host web01 was changed to /srv/www, but the previously created AppArmor profile was not adjusted. Since the profile is now in complain mode, access was still allowed: apparmor="ALLOWED"; in enforce mode, it would say DENIED and access would be denied.
The remaining information clearly shows what happened: the process with process ID (pid) 4190 tried to open the file /srv/www/index.html (name) for reading (requested_mask), which would, however, be forbidden (denied_mask) due to the profile (profile) nginx.
So, if software secured with AppArmor doesn’t work as expected, the first place to look is the Syslog!
After some time, there will be several entries there that should then be incorporated into the AppArmor profile. For this, the program aa-logprof is used: it searches the Syslog for entries and, in the manner of aa-genprof, asks if and how entries should be created in the profile. This process can be repeated as often as necessary.
If no further entries are found in the Syslog, the profile has been sufficiently adjusted and can be switched back to enforce mode with aa-enforce:
# aa-enforce nginx
This completes the basic creation of a simple AppArmor profile, and the nginx processes are controlled and monitored according to the rules defined within it.
We are Happy to Support You
Whether AppArmor, Debian, or PostgreSQL: with over 22+ years of development and service experience in the open-source sector, credativ GmbH can professionally support you with unparalleled and individually configurable support and assist you fully with all questions regarding your open-source infrastructure.
Do you have questions about our article or would you like credativ’s specialists to look at another software of your choice?
Then visit us and contact us via our contact form or write us an email at info@credativ.de.
About Credativ
credativ GmbH is a vendor-independent consulting and service company based in Mönchengladbach.
Fundamentally, access control under Linux is a simple matter:
Files specify their access rights (execute, write, read) separately for their owner, their group, and finally, other users. Every process (whether a user’s shell or a system service) running on the system operates under a user ID and group ID, which are used for access control.
A web server running with the permissions of user www-data and group www-data can thus be granted access to its configuration file in the directory /etc, its log file under /log, and the files to be delivered under /var/www. The web server should not require more access rights for its operation.
Nevertheless, whether due to misconfiguration or a security vulnerability, it could also access and deliver files belonging to other users and groups, as long as these are readable by everyone, as is technically the case, for example, with /etc/passwd. Unfortunately, this cannot be prevented with traditional Discretionary Access Control (DAC), as used in Linux and other Unix-like systems.
However, since December 2003, the Linux kernel has offered a framework with the Linux Security Modules (LSM), which allows for the implementation of Mandatory Access Control (MAC), where rules can precisely specify which resources a process may access. AppArmor implements such a MAC and has been included in the Linux kernel since 2010. While it was originally only used in SuSE and later Ubuntu, it has also been enabled by default in Debian since Buster (2019).
AppArmor
AppArmor checks and monitors, based on a profile, which permissions a program or script has on a system. A profile typically contains the rule set for a single program. For example, it defines how (read, write) files and directories may be accessed, whether a network socket may be created, or whether and to what extent other applications may be executed. All other actions not defined in the profile are denied.
Profile Structure
The following listing (line numbers are not part of the file and serve only for orientation) shows the profile for a simple web server, whose program file is located under /usr/sbin/httpd is located.
By default, AppArmor profiles are located in the directory /etc/apparmor.d and are conventionally named after the path of the program file. The first slash is omitted, and all subsequent slashes are replaced by dots. The web server’s profile is therefore located in the file /etc/apparmor.d/usr.sbin.httpd.
 1 include <tunables/global>
  2
 3 @{WEBROOT}=/var/www/html
  4
 5 profile httpd /usr/sbin/httpd {
 6 include <abstractions/base>
 7 include <abstractions/nameservice>
  8
 9 capability dac_override,
10 capability dac_read_search,
11 capability setgid,
12 capability setuid,
13
14 /usr/sbin/httpd mr,
15
16 /etc/httpd/httpd.conf r,
17 /run/httpd.pid rw,
18
19 @{WEBROOT}/** r,
20
21 /var/log/httpd/*.log w,
22 }
Preamble
The instruction include in line 1 inserts the content of other files in place, similar to the C preprocessor directive of the same name. If the filename is enclosed in angle brackets, as here, the specified path refers to the folder /etc/apparmor.d; with quotation marks, the path is relative to the profile file.
Occasionally, though now outdated, the notation #include can still be found. However, since comments in AppArmor profiles begin with a # and the rest of the line is ignored, the old notation leads to a contradiction: a supposedly commented-out #include instruction would indeed be executed! Therefore, to comment out a include instruction, a space after the # is recommended.
The files in the subfolder tunables typically contain variable and alias definitions that are used by multiple profiles and are defined in only one place, according to the Don’t Repeat Yourself principle (DRY).
In line 2, the variable @{WEBROOT} is created with WEBROOT and assigned the value /var/www/html. If other profiles, in addition to the current one, were to define rules for the webroot directory, it could instead be defined in its own file tunables and included in the respective profiles.
Profile Section
The profile section begins in line 5 with the keyword profile. It is followed by the profile name, here httpd, the path to the executable file, /usr/sbin/httpd, and optionally flags that influence the profile’s behavior. The individual rules of the profile then follow, enclosed in curly braces.
As before, in lines 6 and 7, include also inserts the content of the specified file in place. In the subfolder abstractions, according to the DRY principle, there are files with rule sets that appear repeatedly in the same form, as they cover both fundamental and specific functionalities.
For example, in the file base, access to various file systems such as /dev, /proc, and /sys, as well as to runtime libraries or some system-wide configuration files, is regulated. The file
Starting with line 9, rules with the keyword capability grant a program special privileges, known as capabilities. Among these, setuid and setgid are certainly among the more well-known: they allow the program to change its own uid and gid; for example, a web server can start as root, open the privileged port 80, and then drop its root privileges. dac_override and dac_read_search allow bypassing the checking of read, write, and execute permissions. Without this capability, even a program running under uid root would not be able to access files regardless of their attributes, unlike what one is used to from the shell.
From line 14 onwards, there are rules that determine access permissions for paths (i.e., folders and files). The structure is quite simple: first, the path is specified, followed by a space and the abbreviations for the granted permissions.
Aside: Permissions
The following table provides a brief overview of the most common permissions:
| Abbreviation | Meaning | Description |
|---|---|---|
r | read | read access |
w | write | write access |
a | append | appending data |
x | execute | execute |
m | memory map executable | mapping and executing the file’s content in memory |
k | lock | setting a lock |
l | link | creating a link |
Aside: Globbing
Paths can either be fully written out individually or multiple paths can be combined into one path using wildcards. This process, called globbing, is also used by most shells today, so this notation should not cause any difficulties.
| Expression | Description |
|---|---|
/dir/file | refers to exactly one file |
/dir/* | includes all files within /dir/ |
/dir/** | includes all files within /dir/, including subdirectories |
? | represents exactly one character |
{} | Curly braces allow for alternations |
[] | Square brackets can be used for character classes |
Examples:
| Expression | Description |
|---|---|
/dir/??? | thus refers to all files in /dir whose filename is exactly 3 characters long |
/dir/*.{png,jpg} | refers to all image files in /dir whose file extension is png or jpg |
/dir/[abc]* | refers to all files in /dir whose name begins with the letters a, b, or c |
For access to the program file /usr/sbin/httpd, the web server receives the permissions mr in line 14. The abbreviation r stands for read and means that the content of the file may be read; m stands for memory map executable and allows the content of the file to be loaded into memory and executed.
Anyone who dares to look into the file
/etc/apparmor.d/abstractions/basewill see that the permissionmis also necessary for loading libraries, among other things.
During startup, the web server will attempt to read its configuration from the file /etc/httpd.conf. Since the path has r permission for reading, AppArmor will allow this. Subsequently, httpd writes its PID to the file /run/httpd.pid. The abbreviation w naturally stands for write and allows write operations on the path. (Lines 16, 17)
The web server is intended to deliver files below the WEBROOT directory. To avoid having to list all files and subdirectories individually, the wildcard ** can be used. The expression r.
As usual, all access to the web server is logged in the log files access.log and error.log in the directory /var/log/httpd/. These are only written by the web server, so it is sufficient to set only write permission for the path /var/log/httpd/* with w in line 21.
With this, the profile is complete and ready for use. In addition to those shown here, there are a variety of other rule types with which the allowed behavior of a process can be precisely defined.
Further information on profile structure can be found in the man page for apparmor.d and in the Wiki article on the AppArmor Quick Profile Language; a detailed description of all rules can be found in the AppArmor Core Policy Reference.
Creating a Profile
Some applications and packages already come with ready-made AppArmor profiles, while others still need to be adapted to specific circumstances. Still other packages do not come with any profiles at all – these must be created by the administrator themselves.
To create a new AppArmor profile for an application, a very basic profile is usually created first, and AppArmor is instructed to treat it in the so-called complain mode. Here, accesses that are not yet defined in the profile are recorded in the system’s log files.
Based on these log entries, the profile can then be refined after some time, and if no more entries appear in the logs, AppArmor can be instructed to switch the profile to enforce mode, enforce the rules listed therein, and block undefined accesses.
Even though it is easily possible to create and adapt an AppArmor profile manually in a text editor, the package apparmor-utils contains various helper programs that can facilitate the work: for example, aa-genprof helps create a new profile, aa-complain switches it to complain mode, aa-logprof helps search log files and add corresponding new rules to the profile, and aa-enforce finally switches the profile to enforce mode.
In the next article of this series, we will create our own profile for the web server nginx based on the foundations established here.
We are Happy to Support You
Whether AppArmor, Debian, or PostgreSQL: with over 22+ years of development and service experience in the open source sector, credativ GmbH can professionally support you with unparalleled and individually configurable support, fully assisting you with all questions regarding your open source infrastructure.
Do you have questions about our article or would you like credativ’s specialists to take a look at other software of your choice? Then feel free to visit us and contact us via our contact form or send us an email at info@credativ.de.
About Credativ
credativ GmbH is a vendor-independent consulting and service company based in Mönchengladbach. Since the successful merger with Instaclustr in 2021, credativ GmbH has been the European headquarters of the Instaclustr Group.
The Instaclustr Group helps companies realize their own large-scale applications thanks to managed platform solutions for open source technologies such as Apache Cassandra®, Apache Kafka®, Apache Spark™, Redis™, OpenSearch™, Apache ZooKeeper™, PostgreSQL®, and Cadence. Instaclustr combines a complete data infrastructure environment with practical expertise, support, and consulting to ensure continuous performance and optimization. By eliminating infrastructure complexity, companies are enabled to focus their internal development and operational resources on building innovative, customer-centric applications at lower costs. Instaclustr’s clients include some of the largest and most innovative Fortune 500 companies.
PostgreSQL® is an extremely robust database, to which most of our clients also entrust their data. However, if errors do occur, they are usually due to the storage system, where individual bits or bytes flip, or entire blocks become corrupted. We demonstrate how to recover data from corrupt tables.
In case of an error, the user is confronted with messages that originate from the storage layer or other PostgreSQL® subsystems:
postgres=# select * from t;
ERROR:  missing chunk number 0 for toast value 192436 in pg_toast_192430

postgres=# select * from a;
ERROR:  invalid memory alloc request size 18446744073709551613
If only individual tuples are corrupt, one can partially help by reading them out individually, e.g., according to id, which often does not help further:
select * from t where id = 1;
It is more promising to address the tuples directly by their internal tuple ID, called in PostgreSQL® ctid:
select * from t where ctid = '(0,1)';
To read out all tuples, we use a loop in plpgsql:
for page in 0 .. pages-1 loop
  for item in 1 .. ??? loop
     select * from t where ctid = '('||page||','||item||')' into r;
     return next r;
  end loop;
end loop;
We still need the number of pages in the table, which we get from pg_relation_size(), and the number of tuples on the page, for which we utilize the pageinspect extension.
select pg_relation_size(relname) / current_setting('block_size')::int into pages;

for page in 0 .. pages-1 loop
  for item in select t_ctid from heap_page_items(get_raw_page(relname::text, page)) loop
    SELECT * FROM t WHERE ctid=item into r;
    if r is not null then
      return next r;
    end if;
  end loop;
end loop;
Now comes the most important part: Accessing the damaged tuples or pages causes errors that we must catch with a begin..exception..end block. We pass the error messages to the user as
create extension pageinspect;

create or replace function read_table(relname regclass)
returns setof record
as $$
declare
  pages int;
  page int;
  ctid tid;
  r record;
  sql_state text;
  error text;
begin
  select pg_relation_size(relname) / current_setting('block_size')::int into pages;

  for page in 0 .. pages-1 loop

    begin

      for ctid in select t_ctid from heap_page_items(get_raw_page(relname::text, page)) loop
        begin
          execute format('SELECT * FROM %s WHERE ctid=%L', relname, ctid) into r;
          if r is not null then
            return next r;
          end if;
        exception -- bad tuple
          when others then
            get stacked diagnostics sql_state := RETURNED_SQLSTATE;
            get stacked diagnostics error := MESSAGE_TEXT;
            raise notice 'Skipping ctid %: %: %', ctid, sql_state, error;
        end;
      end loop;

    exception -- bad page
      when others then
        get stacked diagnostics sql_state := RETURNED_SQLSTATE;
        get stacked diagnostics error := MESSAGE_TEXT;
        raise notice 'Skipping page %: %: %', page, sql_state, error;
    end;

  end loop;
end;
$$ language plpgsql;
Since the function returns “record”, the table signature must be provided during the call:
postgres =# select * from read_table('t') as t(t text);
NOTICE:  Skipping ctid (0,1): XX000: missing chunk number 0 for toast value 192436 in pg_toast_192430
       t
───────────────
 one
 two
 three
...
An alternative variant writes the read data directly into a new table:
postgres =# select rescue_table('t');
NOTICE:  t: page 0 of 1
NOTICE:  Skipping ctid (0,1): XX000: missing chunk number 0 for toast value 192436 in pg_toast_192430
                                    rescue_table
─────────────────────────────────────────────────────────────────────────────────────
 rescue_table t into t_rescue: 0 of 1 pages are bad, 1 bad tuples, 100 tuples copied
(1 row)
The table t_rescue was created automatically.
create extension pageinspect;

create or replace function rescue_table(relname regclass, savename name default null, "create" boolean default true)
returns text
as $$
declare
  pages int;
  page int;
  ctid tid;
  row_count bigint;
  good_tuples bigint := 0;
  bad_pages bigint := 0;
  bad_tuples bigint := 0;
  sql_state text;
  error text;
begin
  if savename is null then
    savename := relname || '_rescue';
  end if;
  if rescue_table.create then
    execute format('CREATE TABLE %s (LIKE %s)', savename, relname);
  end if;

  select pg_relation_size(relname) / current_setting('block_size')::int into pages;

  for page in 0 .. pages-1 loop
    if page % 10000 = 0 then
      raise notice '%: page % of %', relname, page, pages;
    end if;

    begin

      for ctid in select t_ctid from heap_page_items(get_raw_page(relname::text, page)) loop
        begin
          execute format('INSERT INTO %s SELECT * FROM %s WHERE ctid=%L', savename, relname, ctid);
          get diagnostics row_count = ROW_COUNT;
          good_tuples := good_tuples + row_count;
        exception -- bad tuple
          when others then
            get stacked diagnostics sql_state := RETURNED_SQLSTATE;
            get stacked diagnostics error := MESSAGE_TEXT;
            raise notice 'Skipping ctid %: %: %', ctid, sql_state, error;
            bad_tuples := bad_tuples + 1;
        end;
      end loop;

    exception -- bad page
      when others then
        get stacked diagnostics sql_state := RETURNED_SQLSTATE;
        get stacked diagnostics error := MESSAGE_TEXT;
        raise notice 'Skipping page %: %: %', page, sql_state, error;
        bad_pages := bad_pages + 1;
    end;

  end loop;

  error := format('rescue_table %s into %s: %s of %s pages are bad, %s bad tuples, %s tuples copied',
    relname, savename, bad_pages, pages, bad_tuples, good_tuples);
  raise log '%', error;
  return error;
end;
$$ language plpgsql;
The SQL scripts are also available in the pg_dirtyread git repository.
Support
Should you require assistance with data recovery or the general use of PostgreSQL®, our PostgreSQL® Competence Center is at your disposal – 24 hours a day, 365 days a year, if desired.
We look forward to hearing from you.
This article was originally written by Christoph Berg.
One would think that microcode updates are basically unproblematic on modern Linux distributions. This is fundamentally correct. Nevertheless, there are always edge cases in which distribution developers may have missed something.
Using the example of Ubuntu 18.04 LTS “Bionic Beaver” in connection with the XEN Hypervisor this becomes obvious when it comes to processors microcode updates.
Ubuntu delivers updated microcode packages for both AMD and Intel. However, these are apparently not applied to the processor.
XEN Microkernel
The reason for this is not to obvious. In XEN, the host system is already paravirtualized and cannot directly influence the CPU for security reasons. Accordingly, manual attempts to change the current microcode fail.
Therefore, the XEN microkernel has to take care of the microcode patching. Instructed correctyl, it will do so at boot time.
Customize command line in Grub
For the XEN kernel to patch the microcode of the CPU, it must have access to the microcode code files at boot time and on the other hand, he must also have the order to apply them. We can achieve the latter by Grub boot loader configuration. To do so, we setup a parameter in the kernel command line.
In the case of Ubuntu 18.04 LTS, the grub configuration file can be found at /etc/default/grub.
There you should find the file xen.cfg. This is of course only the case if the XEN Hypervisor package is installed. Open the config file in your editor and look for the location of the variable GRUB_CMDLINE_XEN_DEFAULT. Add the parameter ucode=scan. In the default state, the line of the xen.cfg then should look like this:
GRUB_CMDLINE_XEN_DEFAULT="ucode=scan"
Customize Initramfs
In addition to the instruction, the microkernel of the XEN hypervisor also needs access to the respective microcode files as well as the ‘Intel Microcode Tool’, if applicable.
While the microcode packages are usually already installed correctly, the the Intel tool may had to be made accessible via sudo apt-get install iucode tool. Care must also be taken to ensure that the microcode files also get into the initial ramdisk. For this purpose, Ubuntu already has matching scripts available.
In the default state, the system tries to select the applicable microcodes for the CPU in the InitramFS. Unfortunately, this does not succeed always, so you might have to help here.
With the command sudo lsinitrd /boot/initrd.img-4.15.0-46-generic you can, for example, check which contents are stored in the InitramFS with the name initrd.img-4.15.0-46-generic. If on an Intel system there is something from AMD but not Intel shown, the automatic processor detection went wrong when creating the initramdisk.
To get this right, you need to look at the files amd64-microcode and intel-microcode in the directory /etc/default. Each of these two config files has a INITRAMFS variable AMD64UCODE_INITRAMFS or IUCODE_TOOL_INITRAMFS. The valid values to configure are “no,” “auto,” or “early”. Default is “auto”. With “auto” the system tries the auto discovery mentioned above. If it doesn’t work, you should set the value to early in the file matching the manufacturer of your CPU, and the other setup file to no. If the manufacturer is Intel, you can use the file intel-microcode to set the following additional variable:
IUCODE_TOOL_SCANCPUS=yes
This causes the script set to perform advanced CPU detection based on the Intel CPU, so that only the microcode files are included in the InitramFS that match the CPU. This helps avoiding an oversized initial ramdisk.
Finalize changes
Both the changes to the grub config and the adjustments to the InitramFS must also be finalized. This is done via
sudo update-initramfs -u
sudo update-grub
A subsequent restart of the hypervisor will then let the XEN microkernel integrate the microcode patches provided in the InitramFS to the CPU.
Is it worth the effort?
Adjustments to the microcode of the processors are important. CPU manufacturers troubleshoot the “hardware” they sell. This fixes can be very important to maintain the integrity oder security of your server system – as we saw last year when the Spectre and Meltdown bugs got undisclosed. Of course, microcode updates can also be seen as negative, since the fixes for “Spectre” as well as “Meltdown” impose performance losses. Here it is necessary to consider whether one should integrate the microcode updates or not. This depends on risk vs. reward. Here there are quite different views, which are to be considered in the context of the system application.
A virtualization host, which runs third party virtual machines has whole other security requirements than a hypervisor who is deeply digged into the internal infrastructure and only runs trusted VMs. Between these two extremes, there are, of course, a few shades to deal with.
The open-source SSH client PuTTY, popular among Windows administrators, was released in a new version last Saturday. This update closes several critical security vulnerabilities. The last version of PuTTY was released around 20 months ago.
Users should update urgently
The newly released version 0.71 was made available for download last Saturday, March 16, 2019.
PuTTY is available as a 32- and 64-bit MSI installer package as well as a source archive. As is customary with PuTTY, all components of the package can also be downloaded individually as executables.
Based on the security vulnerabilities listed and fixed in the changelog, we can only strongly recommend updating all PuTTY clients.
As with any security-relevant software, the digital fingerprints (hashes) should be verified. Alternatively, the author team also provides GPG signatures to verify the authenticity of the archives. Furthermore, you should not download this tool from third-party, unknown sources. Security-relevant open-source software in particular is often used by unverified third-party sources to introduce modified and sometimes malicious software into systems.
You can find more information on the official project homepage.
EU funding program for the security of open-source software
With the EU-FOSSA funding program, in which the European Commission offered rewards for submitted bugs in a selection of open-source software, PuTTY was also included in the latest round. For the period from January 16, 2019 to December 15, 2019, a total reward of €90,000 was offered for PuTTY for reported security vulnerabilities.
As a result of this program, the PuTTY authors are closing five security vulnerabilities with the current release that were submitted to EU-FOSSA:
- Before host key verification, memory can be overwritten remotely during the RSA key exchange
- Possible reuse of random numbers for encryption
- On Windows, an attacker can manipulate a help file and thus gain control of PuTTY
- On Unix systems, a remotely triggered buffer overflow can be triggered
- Various denial-of-service attacks by writing to the terminal
More information about the bug bounty program is available here.
Further bug fixes by the author team
In addition to the bugs reported via EU-FOSSA, the team is fixing further issues and delivering improvements in the areas of security and usability.
Overall, the EU program suggests that further fixes can be expected over the course of 2019, after PuTTY development had become quieter.
PuTTY is embedded in many programs
It should also not be forgotten that PuTTY, as open-source software, is indeed used directly or indirectly in other products. For example, there is the Multi-PuTTY-Manager, which uses an existing PuTTY installation. Here, too, it is important to remember to update the PuTTY installation to close the security vulnerabilities. The same naturally applies to AutoPutty and similar tools.
Also important is software that integrates PuTTY or parts of it permanently or invisibly for the user. One example is WinSCP, which uses the PuTTY package component PageAnt. In this case, it may be necessary to wait for a new release of the software.
The PuTTY authors maintain a list of software that includes PuTTY.