Proxmox Installation: Step-by-Step Guide 2026
| Categories: | credativ® Inside Proxmox |
|---|---|
| Tags: | proxmox Proxmox VE |
Proxmox® installation is a crucial step for companies looking to implement a professional virtualization solution. This comprehensive guide will walk you through the entire Proxmox VE installation process and help you set up a stable hypervisor environment. You will need basic Linux® knowledge and approximately 2–3 hours for the complete installation and basic configuration. For this Proxmox guide, you will need a dedicated server with at least 4 GB RAM, an 8 GB USB stick, and access to the target computer’s BIOS. After completing these steps, you will have a fully functional Proxmox VE system for your server virtualization. Please note, however, that this hardware configuration is far too limited for a production system. For initial steps, however, it is suitable.
Why Proxmox VE is a professional virtualization solution
Proxmox Virtual Environment (VE) offers companies a cost-effective virtualization platform. As an open-source solution, Proxmox VE enables flexible subscription models. There is no license fee, as the software is released under the AGPL. You can find current prices for the manufacturer’s subscriptions at https://www.proxmox.com/de/produkte/proxmox-virtual-environment/preise. Alternatively, you can also sign service and support contracts for Proxmox VE with other providers, such as credativ GmbH. In principle, anyone can run Proxmox VE even without a subscription.
The integrated backup functions enable automated backup strategies without additional software. Proxmox VE supports both KVM virtualization for complete operating systems and LXC containers for resource-efficient applications.
Enterprise features such as High Availability, Live Migration, and Clustering are available by default. The web-based management interface significantly simplifies administration and allows access from any workstation.
Proxmox VE stands out due to its flexibility and direct access to the source code. Typical application areas include development environments, test labs, and productive server infrastructures, especially in medium-sized companies.
Check System Requirements and Hardware Preparation
Before installing Proxmox, verify your system’s hardware compatibility. Minimum requirements include a 64-bit processor with virtualization support (Intel® VT-x or AMD®-V).
Minimum Hardware Requirements
- CPU: 64-bit processor with virtualization capabilities
- RAM: 4 GB (recommended: 8 GB or more)
- Storage: 32 GB available hard disk space
- Network: Gigabit Ethernet adapter
Recommended configuration for a minimal server
- CPU: Multi-core processor with at least 4 cores
- RAM: 32 GB or more for production environments
- Storage: SSD or NVMe with at least 500 GB for better performance
- Network: Redundant network connections
Enable virtualization functions in the BIOS. Look for settings like “Intel VT-x”, “AMD-V”, or “Virtualization Technology” and set them to “Enabled”. Disable Secure Boot, as this can cause issues during installation. For virtualization clusters, additional requirements should be taken into account. Action is needed here, especially for network connections.
Download Proxmox VE ISO and Create Installation Medium
Download the current Proxmox VE ISO file from the official website. Visit proxmox.com and navigate to the download section.
Select the latest stable version of the Proxmox VE ISO. The file is approximately 1 GB in size and contains all necessary components for installation.
Verify the checksum of the downloaded ISO file. Use tools like sha256sum on Linux or corresponding programs on Windows®. This ensures that the file is complete and unaltered.
Create Bootable USB Stick
- Connect a USB stick with at least 8 GB to your computer.
- Use tools like Rufus (Windows) or
dd(Linux) for creation. - Select the downloaded Proxmox ISO file as the source.
- Start the writing process and wait for completion.
Alternatively, you can burn the ISO file to a DVD if your target system has an optical drive. However, USB sticks enable faster installation.
Perform Proxmox Installation and Basic Configuration
Boot the target computer from the created installation medium. Configure the boot order in the BIOS so that USB or DVD takes precedence over the hard drive. After booting, the Proxmox VE boot menu will appear. Select “Install Proxmox VE” for a standard installation.
Since version 8.1, Proxmox VE also supports Secure Boot and ships with a signed kernel. This means Secure Boot can now be used, and you no longer need to disable this feature in the BIOS.
For advanced users, an official Proxmox Automated Installer has been available for some time. This provides a built-in approach to automating the installation. However, for such setups we recommend professional consulting, as the topic is complex and the resulting infrastructure should be optimally tailored to your environment. Unfortunately, that isn’t possible in an introductory article like this one.
Considerations for storage and file systems
The Proxmox installer will ask for partitioning and the desired file systems. Fundamentally, you have to decide early on which direction the setup should take. There are various scenarios for file systems under Proxmox.
Single-Host
With a single-host, you have the choice between LVM-based storage with ext4 as the file system or ZFS. We have already written a separate article on this. ZFS offers several advantages, such as protection against so-called bit rot, RAID arrays, and more. However, ZFS also requires more memory for operation than LVM with ext4.
Cluster
Proxmox VE also offers the possibility to create Ceph as software-defined storage. However, Ceph as hyperconverged storage only makes sense within a Proxmox VE cluster. In addition to Ceph and local storage, you can of course also integrate network storage via NFS or block storage via iSCSI or Fibre Channel. These block storage options currently result in an LVM, and a thin-provisioning configuration is unfortunately not possible here. In another article, I compared various common solutions such as ZFS, Ceph, NFS, and iSCSI.
Perform Installation Steps
- Accept the license terms by clicking “I agree”.
- Select the target hard drive for the installation.
- Configure the partitioning (see above; default settings are fine for small systems). Warning: This will erase the computer’s local hard drive.
- Enter and confirm a secure root password.
- Enter a valid email address for system notifications.
For network configuration, assign a static IP address to your Proxmox system. Avoid DHCP in production environments, as the IP address could change.
Important note: If you use DHCP in your network, please note that the Proxmox installer may use the address obtained via DHCP, but—unless you adjust it—will enter it as a static IP in the configuration. If your DHCP server later assigns the address differently, problems are guaranteed. Running Proxmox server(s) with DHCP is not recommended.
Write down the IP address and the root password. You will need these details for the first access to the web interface. The network interface specified as the uplink is configured internally as a bridge, which the virtual machines will later use to communicate unless configured otherwise.
The installation process takes approximately 10–15 minutes. After completion, remove the installation medium and restart the system.
Optimize First Steps After Installation
After restarting, Proxmox VE is accessible via the web interface. Open a browser and navigate to https://ihre-proxmox-ip:8006.
Log in with the username “root” and the password set during installation. Initially, ignore the browser’s SSL certificate warning. To do so, you may need to click “Advanced” and then “Proceed anyway” or “Load unsafe scripts” in your browser.
Adjust Repository Configuration
Open the shell via the web interface and perform the following optimizations:
- Update package lists with
apt update. - Install available updates with
apt upgrade. - Configure community repositories for free updates.
- Remove the enterprise repository warning, if desired.
Community repositories
Community repositories are your alternative if you don’t want to or can’t use a subscription from Proxmox Server Solutions. You must add them manually on the host or hosts in the cluster. You can do this via the web interface under Updates -> Repositories for the respective server. 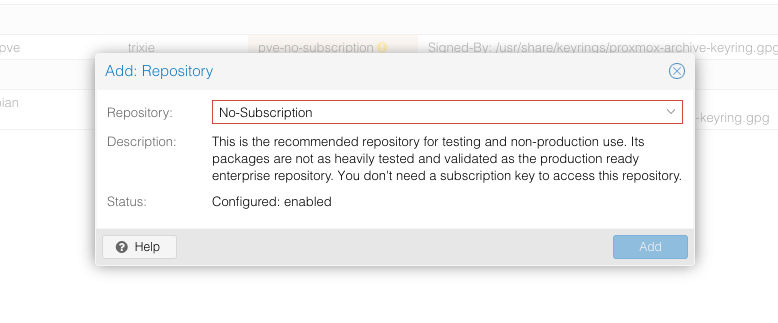
Alternatively, you can add this via the CLI. To do so, you must disable the Enterprise repositories under /etc/apt/sources.list.d/pve-enterprise.list. For these, you need at least an active Community Subscription from Proxmox Server Solutions GmbH. You can also obtain this directly via Proxmox partners such as credativ GmbH. Instead of the Enterprise repositories, add the Community repositories by creating a file proxmox.sources under /etc/apt/sources.list.d/ and inserting the following content:
Types: deb
URIs: http://download.proxmox.com/debian/pve
Suites: trixie
Components: pve-no-subscription
Signed-By: /usr/share/keyrings/proxmox-archive-keyring.gpg
More information at https://pve.proxmox.com/wiki/Package_Repositories
Firewall basic configuration and next steps
- A basic firewall configuration should be the next step. Activate the Proxmox firewall and configure rules for SSH access and the web interface.
- Create additional user accounts for daily administration. Avoid permanent use of the root account and assign specific permissions according to the area of responsibility.
- Configure a valid SSL certificate for the web interface. This increases security and eliminates browser warnings for future access. Here, Proxmox VE already offers the option to configure Let’s Encrypt under the ACME menu item.
- Install
intel-microcodeoramd-64-microcode. This will keep your CPUs up to date at all times. - Set up external storage if needed. Also read: Efficient storage automation in Proxmox with the proxmox_storage module
- Have a plan B: set up a Proxmox Backup Server
Common Installation Problems and Solutions
Various technical problems can occur during the Proxmox installation. This troubleshooting guide helps you to quickly overcome the most common installation hurdles and save time during problem-solving.
System Does Not Boot from USB Stick
Symptom: The computer starts normally into the existing operating system, even though the USB stick is connected.
Solution:
- Check the boot order in the BIOS/UEFI and set USB to the first position
- Switch between UEFI and Legacy boot mode in the BIOS
- Recreate the USB stick using a different tool (e.g., Ventoy instead of Rufus)
- Test a different USB port, preferably USB 2.0 ports
- Use a different USB stick if the current one is defective
Hard Drive Not Recognized
Symptom: The Proxmox installer shows no available hard drives for installation.
Solution:
- Enable AHCI mode for SATA drives in the BIOS (instead of IDE mode)
- Check the cable connections for internal hard drives
- Test the hard drive on a different SATA port
- For NVMe SSDs: Ensure that the M.2 slot is enabled in the BIOS
- Use the command
lsblkin the installer shell to display available drives
Network Interface Not Available
Symptom: No network adapter is recognized during installation, or the network configuration fails.
Solution:
- Check the network cable connection and try a different cable as a test
- Check which interfaces are recognized using
ip link showin the installer shell - For newer network chips: Use a more recent Proxmox version with newer drivers
- Temporarily disable Wake-on-LAN and other network features in the BIOS
- For USB network adapters: Use an integrated Ethernet port for the installation
Installation Hangs at 85% or Freezes
Symptom: The installation progress stops at a certain percentage or the system stops responding.
Solution:
- Test the RAM modules individually to identify defective memory sticks
- Run a Memtest86+ before starting the installation
- Reduce the RAM speed in the BIOS to JEDEC standard
- Disable CPU overclocking and set to standard clocking
- Check system temperatures and ensure adequate cooling
- Use the debug installation via the boot menu for more detailed error messages
UEFI Secure Boot Problems
Symptom: Installation does not start or aborts with Secure Boot errors.
Solution:
- Secure Boot has been officially supported since Proxmox VE 8.1 – use a current version
- Ensure that you are using the UEFI version of the ISO
- Check whether all Secure Boot keys are correctly configured in the BIOS
- If problems persist: Temporarily disable Secure Boot for the installation
Partitioning Errors During Installation
Symptom: Error messages during hard drive partitioning or ZFS configuration.
Solution:
- Delete all existing partitions with
wipefs -a /dev/sdX(replace X with the correct drive letter) - For ZFS problems: Ensure that at least 8 GB of RAM is available
- Check the hard drive for errors with
smartctl -t short /dev/sdX - If problems occur, initially use LVM with ext4 instead of ZFS
Web Interface Not Reachable After Installation
Symptom: After successful installation, the Proxmox web interface is not accessible via port 8006.
Solution:
- Check the network configuration with
ip addr show - Test reachability with
pingfrom another computer - Check if the Proxmox service is running:
systemctl status pveproxy - Check the firewall settings:
iptables -L - Restart the Proxmox services:
systemctl restart pveproxy pvedaemon - Check your network data! The installer does indeed use DHCPv4, but then enters the received IPv4 as a static IP in the configuration, which your DHCP server obviously doesn’t know.
- Check the network configuration with
Important Note: If these approaches do not help, document the exact error messages and hardware details. For persistent problems, we recommend consulting a Proxmox specialist for a professional analysis.
How credativ supports Proxmox implementations
credativ offers comprehensive Proxmox virtualization from planning through to productive operation. Our experienced team will guide you through all phases of your virtualization initiative.
Our Proxmox services include:
- Professional installation consulting and hardware dimensioning for optimal performance
- 24/7 premium support with direct access to open-source specialists
- Monitoring and maintenance of your Proxmox infrastructure
- Backup strategies and disaster recovery concepts
- Training and workshops for your IT teams
- Migration services from existing virtualization platforms
We develop customized solutions that precisely match your requirements. You benefit from our many years of expertise in the open-source sector and direct collaboration with Proxmox developers.
Arrange a non-binding consultation today and find out how we can make your Proxmox implementation a success. Contact us for an individual analysis of your virtualization requirements.
Transparency notice
Proxmox® is a registered trademark of Proxmox Server Solutions GmbH. credativ® is an authorized reseller of Proxmox®. Linux® is a registered trademark of Linus Torvalds. Intel® is a registered trademark of Intel Corporation. AMD® is a registered trademark of Advanced Micro Devices Inc. Windows® is a registered trademark of Microsoft Corporation. The mention of trademarks is solely for the factual description of migration scenarios and services provided by credativ®. With the exception of Proxmox Server Solutions GmbH, there is no business relationship with the other trademark owners mentioned in relation to the products referenced.
| Categories: | credativ® Inside Proxmox |
|---|---|
| Tags: | proxmox Proxmox VE |

About the author
Peter Dreuw
Head of Sales & Marketing
about the person
Peter Dreuw has been working for credativ GmbH since 2016 and has been a team lead since 2017. Since 2021, he has been part of Instaclustr’s management team as VP Services. Following the acquisition by NetApp, his new role became “Senior Manager Open Source Professional Services”. As part of the spin-off, he became a member of the executive management as an authorized signatory. His responsibilities include leading sales and marketing. He has been a Linux user from the very beginning and has been running Linux systems since kernel 0.97. Despite extensive experience in operations, he is a passionate software developer and is also well versed in hardware-near systems.