If you had the choice, would you rather take Salsa or Guacamole? Let me explain, why you should choose Guacamole over Salsa.
In this blog article, we want to take a look at one of the smaller Apache projects out there called Apache Guacamole. Apache Guacamole allows administrators to run a web based client tool for accessing remote applications and servers. This can include remote desktop systems, applications or terminal sessions. Users can simply access them by using their web browsers. No special client or other tools are required. From there, they can login and access all pre-configured remote connections that have been specified by an administrator.
Thereby, Guacamole supports a wide variety of protocols like VNC, RDP, and SSH. This way, users can basically access anything from remote terminal sessions to full fledged Graphical User Interfaces provided by operation systems like Debian, Ubuntu, Windows and many more.
Convert every window application to a web application
If we spin this idea further, technically every window application that isn’t designed to run as an web application can be transformed to a web application by using Apache Guacamole. We helped a customer to bring its legacy application to Kubernetes, so that other users could use their web browsers to run it. Sure, implementing the application from ground up, so that it follows the Cloud Native principles, is the preferred solution. As always though, efforts, experience and costs may exceed the available time and budget and in that cases, Apache Guacamole can provide a relatively easy way for realizing such projects.
In this blog article, I want to show you, how easy it is to run a legacy window application as a web app on Kubernetes. For this, we will use a Kubernetes cluster created by kind and create a Kubernetes Deployment to make kate – a KDE based text editor – our own web application. It’s just an example, so there might be better application to transform but this one should be fine to show you the concepts behind Apache Guacamole.
So, without further ado, let’s create our kate web application.
Preparation of Kubernetes
Before we can start, we must make sure that we have a Kubernetes cluster, that we can test on. If you already have a cluster, simply skip this section. If not, let’s spin one up by using kind.
kind is a lightweight implementation of Kubernetes that can be run on every machine. It’s written in Go and can be installed like this:
# For AMD64 / x86_64
[ $(uname -m) = x86_64 ] && curl -Lo ./kind https://kind.sigs.k8s.io/dl/v0.22.0/kind-linux-amd64
# For ARM64
[ $(uname -m) = aarch64 ] && curl -Lo ./kind https://kind.sigs.k8s.io/dl/v0.22.0/kind-linux-arm64
chmod +x ./kind
sudo mv ./kind /usr/local/bin/kind
Next, we need to install some dependencies for our cluster. This includes for example docker and kubectl.
$ sudo apt install docker.io kubernetes-client
By creating our Kubernetes Cluster with kind, we need docker because the Kubernetes cluster is running within Docker containers on your host machine. Installing kubectl allows us to access the Kubernetes after creating it.
Once we installed those packages, we can start to create our cluster now. First, we must define a cluster configuration. It defines which ports are accessible from our host machine, so that we can access our Guacamole application. Remember, the cluster itself is operated within Docker containers, so we must ensure that we can access it from our machine. For this, we define the following configuration which we save in a file called cluster.yaml:
kind: Cluster
apiVersion: kind.x-k8s.io/v1alpha4
nodes:
- role: control-plane
  extraPortMappings:
  - containerPort: 30000
    hostPort: 30000
    listenAddress: "127.0.0.1"
    protocol: TCP
Hereby, we basically map the container’s port 30000 to our local machine’s port 30000, so that we can easily access it later on. Keep this in mind because it will be the port that we will use with our web browser to access our kate instance.
Ultimately, this configuration is consumed by kind . With it, you can also adjust multiple other parameters of your cluster besides of just modifying the port configuration which are not mentioned here. It’s worth to take a look kate’s documentation for this.
As soon as you saved the configuration to cluster.yaml, we can now start to create our cluster:
$ sudo kind create cluster --name guacamole --config cluster.yaml
Creating cluster "guacamole" ...
 ✓ Ensuring node image (kindest/node:v1.29.2) 🖼
 ✓ Preparing nodes 📦
 ✓ Writing configuration 📜
 ✓ Starting control-plane 🕹️
 ✓ Installing CNI 🔌
 ✓ Installing StorageClass 💾
Set kubectl context to "kind-guacamole"
You can now use your cluster with:

kubectl cluster-info --context kind-guacamole

Have a question, bug, or feature request? Let us know! https://kind.sigs.k8s.io/#community 🙂
Since we don’t want to run everything in root context, let’s export the kubeconfig, so that we can use it with kubectl by using our unpriviledged user:
$ sudo kind export kubeconfig \
    --name guacamole \
    --kubeconfig $PWD/config

$ export KUBECONFIG=$PWD/config
$ sudo chown $(logname): $KUBECONFIG
By doing so, we are ready and can access our Kubernetes cluster using kubectl now. This is our baseline to start migrating our application.
Creation of the Guacamole Deployment
In order to run our application on Kubernetes, we need some sort of workload resource. Typically, you could create a Pod, Deployment, Statefulset or Daemonset to run workloads on a cluster.
Let’s create the Kubernetes Deployment for our own application. The example shown below shows the deployment’s general structure. Each container definition will have their dedicated examples afterwards to explain them in more detail.
apiVersion: apps/v1
kind: Deployment
metadata:
  labels:
    app: web-based-kate
  name: web-based-kate
spec:
  replicas: 1
  selector:
    matchLabels:
      app: web-based-kate
  template:
    metadata:
      labels:
        app: web-based-kate
    spec:
      containers:
      # The guacamole server component that each
      # user will connect to via their browser
      - name: guacamole-server
        image: docker.io/guacamole/guacamole:1.5.4
        ...
      # The daemon that opens the connection to the
      # remote entity
      - name: guacamole-guacd
        image: docker.io/guacamole/guacd:1.5.4
        ...
      # Our own self written application that we
      # want to make accessible via the web.
      - name: web-based-kate
        image: registry.example.com/own-app/web-based-kate:0.0.1
        ...
      volumes:
        - name: guacamole-config
          secret:
            secretName: guacamole-config
        - name: guacamole-server
          emptyDir: {}
        - name: web-based-kate-home
          emptyDir: {}
        - name: web-based-kate-tmp
          emptyDir: {}
As you can see, we need three containers and some volumes for our application. The first two containers are dedicated to Apache Guacamole itself. First, it’s the server component which is the external endpoint for clients to access our web application. It serves the web server as well as the user management and configuration to run Apache Guacamole.
Next to this, there is the guacd daemon. This is the core component of Guacamole which creates the remote connections to the application based on the configuration done to the server. This daemon forwards the remote connection to the clients by making it accessible to the Guacamole server which then forwards the connection to the end user.
Finally, we have our own application. It will offer a connection endpoint to the guacd daemon using one of Guacamole’s supported protocols and provide the Graphical User Interface (GUI).
Guacamole Server
Now, let’s deep dive into each container specification. We are starting with the Guacamole server instance. This one handles the session and user management and contains the configuration which defines what remote connections are available and what are not.
- name: guacamole-server
  image: docker.io/guacamole/guacamole:1.5.4
  env:
    - name: GUACD_HOSTNAME
      value: "localhost"
    - name: GUACD_PORT
      value: "4822"
    - name: GUACAMOLE_HOME
      value: "/data/guacamole/settings"
    - name: HOME
      value: "/data/guacamole"
    - name: WEBAPP_CONTEXT
      value: ROOT
  volumeMounts:
    - name: guacamole-config
      mountPath: /data/guacamole/settings
    - name: guacamole-server
      mountPath: /data/guacamole
  ports:
    - name: http
      containerPort: 8080
  securityContext:
    allowPrivilegeEscalation: false
    privileged: false
    readOnlyRootFilesystem: true
    capabilities:
      drop: ["all"]
  resources:
    limits:
      cpu: "250m"
      memory: "256Mi"
    requests:
      cpu: "250m"
      memory: "256Mi"
Since it needs to connect to the guacd daemon, we have to provide the connection information for guacd by passing them into the container using environment variables like GUACD_HOSTNAME or GUACD_PORT. In addition, Guacamole would usually be accessible via http://<your domain>/guacamole.
This behavior however can be adjusted by modifying the WEBAPP_CONTEXT environment variable. In our case for example, we don’t want a user to type in /guacamole to access it but simply using it like this http://<your domain>/
Guacamole Guacd
Then, there is the guacd daemon.
- name: guacamole-guacd
  image: docker.io/guacamole/guacd:1.5.4
  args:
    - /bin/sh
    - -c
    - /opt/guacamole/sbin/guacd -b 127.0.0.1 -L $GUACD_LOG_LEVEL -f
  securityContext:
    allowPrivilegeEscalation: true
    privileged: false
    readOnlyRootFileSystem: true
    capabilities:
      drop: ["all"]
  resources:
    limits:
      cpu: "250m"
      memory: "512Mi"
    requests:
      cpu: "250m"
      memory: "512Mi"
It’s worth mentioning that you should modify the arguments used to start the guacd container. In the example above, we want guacd to only listen to localhost for security reasons. All containers within the same pod share the same network namespace. As a a result, they can access each other via localhost. This said, there is no need to make this service accessible to over services running outside of this pod, so we can limit it to localhost only. To achieve this, you would need to set the -b 127.0.0.1 parameter which sets the corresponding listen address. Since you need to overwrite the whole command, don’t forget to also specify the -L and -f parameter. The first parameter sets the log level and the second one set the process in the foreground.
Web Based Kate
To finish everything off, we have the kate application which we want to transform to a web application.
- name: web-based-kate
  image: registry.example.com/own-app/web-based-kate:0.0.1
  env:
    - name: VNC_SERVER_PORT
      value: "5900"
    - name: VNC_RESOLUTION_WIDTH
      value: "1280"
    - name: VNC_RESOLUTION_HEIGHT
      value: "720"
  securityContext:
    allowPrivilegeEscalation: true
    privileged: false
    readOnlyRootFileSystem: true
    capabilities:
      drop: ["all"]
  volumeMounts:
    - name: web-based-kate-home
      mountPath: /home/kate
    - name: web-based-kate-tmp
      mountPath: /tmp
Configuration of our Guacamole setup
After having the deployment in place, we need to prepare the configuration for our Guacamole setup. In order to know, what users exist and which connections should be offered, we need to provide a mapping configuration to Guacamole.
In this example, a simple user mapping is shown for demonstration purposes. It uses a static mapping defined in a XML file that is handed over to the Guacamole server. Typically, you would use other authentication methods instead like a database or LDAP.
This said however, let’s continue with our static one. For this, we simply define a Kubernetes Secret which is mounted into the Guacamole server. Hereby, it defines two configuration files. One is the so called guacamole.properties. This is Guacamole’s main configuration file. Next to this, we also define the user-mapping.xml which contains all available users and their connections.
apiVersion: v1
kind: Secret
metadata:
  name: guacamole-config
stringData:
  guacamole.properties: |
    enable-environment-properties: true
  user-mapping.xml: |
    <user-mapping>
      <authorize username="admin" password="PASSWORD" encoding="sha256">
        <connection name="web-based-kate">
          <protocol>vnc</protocol>
          <param name="hostname">localhost</param>
          <param name="port">5900</param>
        </connection>
      </authorize>
    </user-mapping>
As you can see, we only defined on specific user called admin which can use a connection called web-based-kate. In order to access the kate instance, Guacamole would use VNC as the configured protocol. To make this happen, our web application must offer a VNC Server port on the other side, so that the guacd daemon can then access it to forward the remote session to clients. Keep in mind that you need to replace the string PASSWORD to a proper sha256 sum which contains the password. The sha256 sum could look like this for example:
$ echo -n "test" | sha256sum
9f86d081884c7d659a2feaa0c55ad015a3bf4f1b2b0b822cd15d6c15b0f00a08  -
Next, the hostname parameter is referencing the corresponding VNC server of our kate container. Since we are starting our container alongside with our Guacamole containers within the same pod, the Guacamole Server as well as the guacd daemon can access this application via localhost. There is no need to set up a Kubernetes Service in front of it since only guacd will access the VNC server and forward the remote session via HTTP to clients accessing Guacamole via their web browsers. Finally, we also need to specify the VNC server port which is typically 5900 but this could be adjusted if needed.
The corresponding guacamole.properties is quite short. By enabling the enabling-environment-properties configuration parameter, we make sure that every Guacamole configuration parameter can also be set via environment variables. This way, we don’t need to modify this configuration file each and every time when we want to adjust the configuration but we only need to provide updated environment variables to the Guacamole server container.
Make Guacamole accessible
Last but not least, we must make the Guacamole server accessible for clients. Although each provided service can access each other via localhost, the same does not apply to clients trying to access Guacamole. Therefore, we must make Guacamole’s server port 8080 available to the outside world. This can be achieved by creating a Kubernetes Service of type NodePort. This service is forwarding each request from a local node port to the corresponding container that is offering the configured target port. In our case, this would be the Guacamole server container which is offering port 8080.
apiVersion: v1
kind: Service
metadata:
  name: web-based-kate
spec:
  type: NodePort
  selector:
    app: web-based-kate
  ports:
    - name: http
      protocol: TCP
      port: 8080
      targetPort: 8080
      nodePort: 30000
This specific port is then mapped to the Node’s 30000 port for which we also configured the kind cluster in such a way that it forwards its node port 30000 to the host system’s port 30000. This port is the one that we would need to use to access Guacamole with our web browsers.
Prepartion of the Application container
Before we can start to deploy our application, we need to prepare our kate container. For this, we simply create a Debian container that is running kate. Keep in mind that you would typically use lightweight base images like alpine to run applications like this. For this demonstration however, we use the Debian images since it is easier to spin it up but in general you only need a small friction of the functionality that is provided by this base image. Moreover – from an security point of view – you want to keep your images small to minimize the attack surface and make sure it is easier to maintain. For now however, we will continue with the Debian image.
In the example below, you can see a Dockerfile for the kate container.
FROM debian:12

# Install all required packages
RUN apt update && \
    apt install -y x11vnc xvfb kate

# Add user for kate
RUN adduser kate --system --home /home/kate -uid 999

# Copy our entrypoint in the container
COPY entrypoint.sh /opt

USER 999
ENTRYPOINT [ "/opt/entrypoint.sh" ]
Here you see that we create a dedicated user called kate (User ID 999) for which we also create a home directory. This home directory is used for all files that kate is creating during runtime. Since we set the readOnlyRootFilesystem to true, we must make sure that we mount some sort of writable volume (e.g EmptyDir) to kate’s home directory. Otherwise, kate wouldn’t be able to write any runtime data then.
Moreover, we have to install the following three packages:
- x11vnc
- xvfb
- kate
These are the only packages we need for our container. In addition, we also need to create an entrypoint script to start the application and prepare the container accordingly. This entrypoint script creates the configuration for kate, starts it in a virtual display by using xvfb-run and provides this virtual display to end users by using the VNC server via x11vnc. In the meantime, xdrrinfo is used to check if the virtual display came up successfully after starting kate. If it takes to long, the entrypoint script will fail by returning the exit code 1.
By doing this, we ensure that the container is not stuck in an infinite loop during a failure and let Kubernetes restart the container whenever it couldn’t start the application successfully. Furthermore, it is important to check if the virtual display came up prior of handing it over to the VNC server because the VNC server would crash if the virtual display is not up and running since it needs something to share. On the other hand though, our container will be killed whenever kate is terminated because it would also terminate the virtual display and in the end it would then also terminate the VNC server which let’s the container exit, too. This way, we don’t need take care of it by our own.
#!/bin/bash

set -e

# If no resolution is provided
if [ -z $VNC_RESOLUTION_WIDTH ]; then
  VNC_RESOLUTION_WIDTH=1920
fi

if [ -z $VNC_RESOLUTION_HEIGHT ]; then
  VNC_RESOLUTION_HEIGHT=1080
fi

# If no server port is provided
if [ -z $VNC_SERVER_PORT ]; then
  VNC_SERVER_PORT=5900
fi

# Prepare configuration for kate
mkdir -p $HOME/.local/share/kate
echo "[MainWindow0]
"$VNC_RESOLUTION_WIDTH"x"$VNC_RESOLUTION_HEIGHT" screen: Height=$VNC_RESOLUTION_HEIGHT
"$VNC_RESOLUTION_WIDTH"x"$VNC_RESOLUTION_HEIGHT" screen: Width=$VNC_RESOLUTION_WIDTH
"$VNC_RESOLUTION_WIDTH"x"$VNC_RESOLUTION_HEIGHT" screen: XPosition=0
"$VNC_RESOLUTION_WIDTH"x"$VNC_RESOLUTION_HEIGHT" screen: YPosition=0
Active ViewSpace=0
Kate-MDI-Sidebar-Visible=false" > $HOME/.local/share/kate/anonymous.katesession

# We need to define an XAuthority file
export XAUTHORITY=$HOME/.Xauthority

# Define execution command
APPLICATION_CMD="kate"

# Let's start our application in a virtual display
xvfb-run \
  -n 99 \
  -s ':99 -screen 0 '$VNC_RESOLUTION_WIDTH'x'$VNC_RESOLUTION_HEIGHT'x16' \
  -f $XAUTHORITY \
  $APPLICATION_CMD &

# Let's wait until the virtual display is initalize before
# we proceed. But don't wait infinitely.
TIMEOUT=10
while ! (xdriinfo -display :99 nscreens); do
  sleep 1
  let TIMEOUT-=1
done

# Now, let's make the virtual display accessible by
# exposing it via the VNC Server that is listening on
# localhost and the specified port (e.g. 5900)
x11vnc \
  -display :99 \
  -nopw \
  -localhost \
  -rfbport $VNC_SERVER_PORT \
  -forever
After preparing those files, we can now create our image and import it to our Kubernetes cluster by using the following commands:
# Do not forget to give your entrypoint script
# the proper permissions do be executed
$ chmod +x entrypoint.sh

# Next, build the image and import it into kind,
# so that it can be used from within the clusters.
$ sudo docker build -t registry.example.com/own-app/web-based-kate:0.0.1 .
$ sudo kind load -n guacamole docker-image registry.example.com/own-app/web-based-kate:0.0.1
The image will be imported to kind, so that every workload resource operated in our kind cluster can access it. If you use some other Kubernetes cluster, you would need to upload this to a registry that your cluster can pull images from.
Finally, we can also apply our previously created Kubernetes manifests to the cluster. Let’s say we saved everything to one file called kuberentes.yaml. Then, you can simply apply it like this:
$ kubectl apply -f kubernetes.yaml
deployment.apps/web-based-kate configured
secret/guacamole-config configured
service/web-based-kate unchanged
This way, a Kubernetes Deployment, Secret and Service is created which ultimately creates a Kubernetes Pod which we can access afterwards.
$ kubectl get pod
NAME                              READY   STATUS    RESTARTS   AGE
web-based-kate-7894778fb6-qwp4z   3/3     Running   0          10m
Verification of our Deployment
Now, it’s money time! After preparing everything, we should be able to access our web based kate application by using our web browser. As mentioned earlier, we configured kind in such a way that we can access our application by using our local port 30000. Every request to this port is forwarded to the kind control plane node from where it is picked up by the Kubernetes Service of type NodePort. This one is then forwarding all requests to our designated Guacamole server container which is offering the web server for accessing remote application’s via Guacamole.
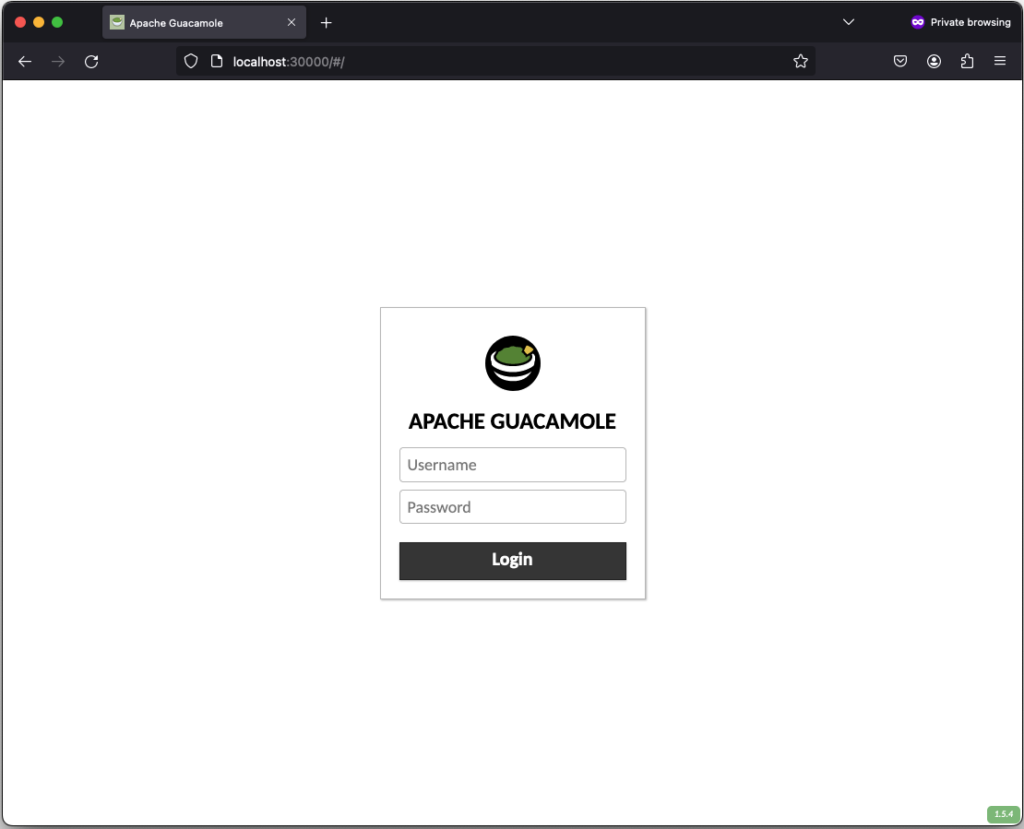
If everything works out, you should be able to see the the following login screen:
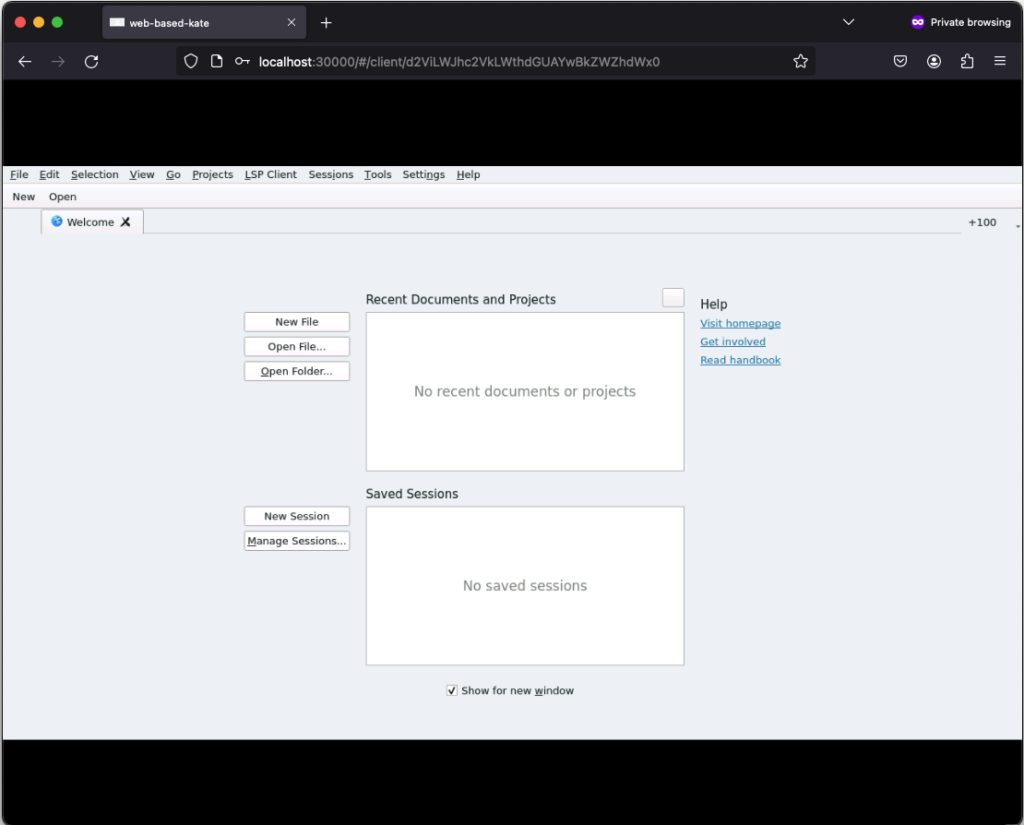
After successfully login in, the remote connection is established and you should be able to see the welcome screen from kate:
If you click on New, you can create a new text file:
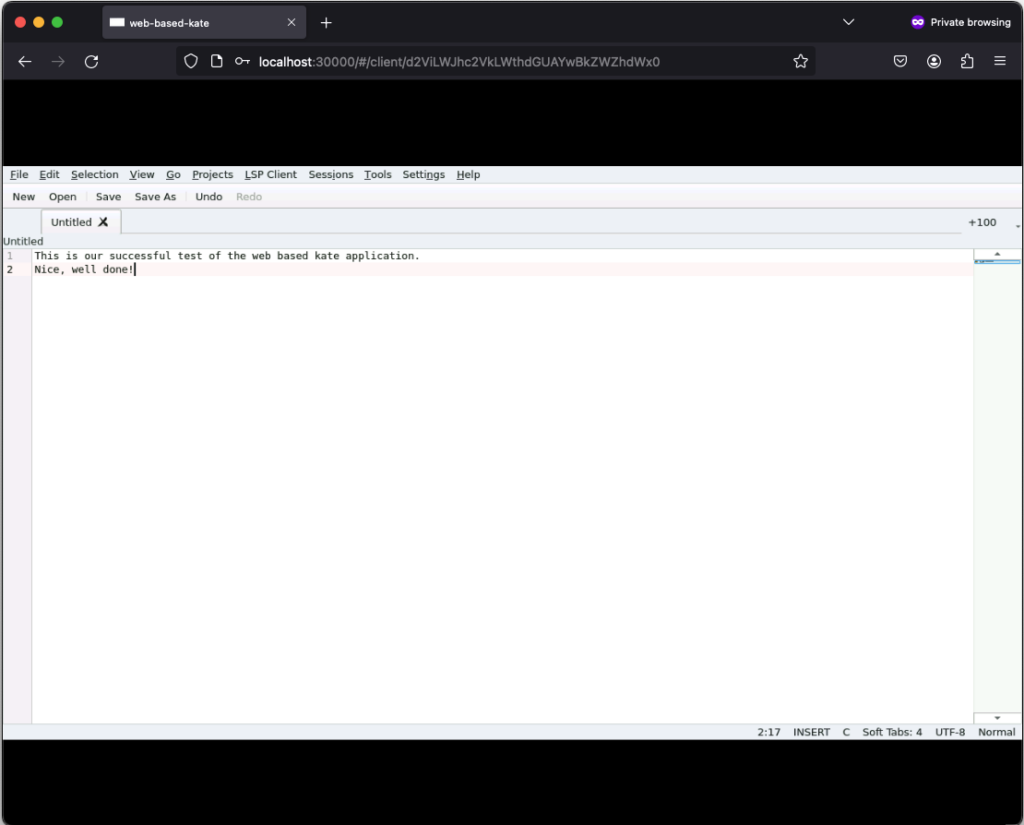
Those text files can even be saved but keep in mind that they will only exist as long as our Kubernetes Pod exists. Once it gets deleted, the corresponding EmptyDir, that we mounted into our kate container, gets deleted as well and all files in it are lost. Moreover, the container is set to read-only meaning that a user can only write files to the volumes (e.g. EmptyDir) that we mounted to our container.
Conclusion
After seeing that it’s relatively easy to convert every application to a web based one by using Apache Guacamole, there is only one major question left…
What do you prefer the most. Salsa or Guacamole?