Pulumi mit AWS-Infrastruktur und Amazon FSx for NetApp meistern
Cloud-Infrastruktur mit Pulumi meistern: Einführung
In der sich schnell verändernden Landschaft des Cloud Computing ist die Verwaltung von Infrastruktur als Code (IaC) für Entwickler und IT-Experten unerlässlich geworden. Pulumi, ein Open-Source-IaC-Tool, bringt eine neue Perspektive ein, indem es die Infrastrukturverwaltung mit gängigen Programmiersprachen wie JavaScript, TypeScript, Python, Go und C# ermöglicht. Dieser Ansatz bietet eine einzigartige Mischung aus Flexibilität und Leistung, die es Entwicklern ermöglicht, ihre vorhandenen Programmierkenntnisse zu nutzen, um Cloud-Infrastruktur zu erstellen, bereitzustellen und zu verwalten. In diesem Beitrag werden wir die Welt von Pulumi erkunden und sehen, wie es mit Amazon FSx for NetApp ONTAP zusammenarbeitet – einer robusten Lösung für skalierbare und effiziente Cloud-Speicherung.
Pulumi – die Theorie
Warum Pulumi?
Pulumi zeichnet sich aus mehreren überzeugenden Gründen unter den IaC-Tools aus:
- Verwenden Sie vertraute Programmiersprachen: Im Gegensatz zu traditionellen IaC-Tools, die auf domänenspezifische Sprachen (DSLs) setzen, können Sie mit Pulumi vertraute Programmiersprachen verwenden. Das bedeutet, dass Sie keine neue Syntax lernen müssen und anspruchsvolle Logik, Bedingungen und Schleifen direkt in Ihren Infrastrukturcode integrieren können.
- Nahtlose Integration in Entwicklungs-Workflows: Pulumi lässt sich mühelos in bestehende Entwicklungs-Workflows und -Tools integrieren und passt somit natürlich zu modernen Softwareprojekten. Ob Sie eine einfache Web-App oder eine komplexe Multi-Cloud-Architektur verwalten, Pulumi bietet die Flexibilität, ohne Einbußen bei der Benutzerfreundlichkeit zu skalieren.
Herausforderungen mit Pulumi
Wie jedes Tool bringt Pulumi seine eigenen Herausforderungen mit sich:
- Lernkurve: Obwohl Pulumi Allzwecksprachen nutzt, müssen Entwickler die von ihnen gewählte Sprache, wie z. B. Python oder TypeScript, beherrschen. Dies kann eine Hürde für diejenigen sein, die mit diesen Sprachen nicht vertraut sind.
- Wachsendes Ökosystem: Als relativ neues Tool befindet sich das Ökosystem von Pulumi noch im Aufbau. Es entspricht möglicherweise noch nicht den umfangreichen Plugin-Bibliotheken älterer IaC-Tools, aber seine lebendige und schnell wachsende Community ist ein vielversprechendes Zeichen für die Zukunft.
Statusverwaltung in Pulumi: Gewährleistung der Konsistenz über Bereitstellungen hinweg
Eine effektive Infrastrukturverwaltung hängt von einer ordnungsgemäßen Statusverwaltung ab. Pulumi zeichnet sich in diesem Bereich durch die Verfolgung des Status Ihrer Infrastruktur aus, wodurch es Ressourcen effizient verwalten kann. Diese Fähigkeit stellt sicher, dass Pulumi genau weiß, was während der Bereitstellung erstellt, aktualisiert oder gelöscht werden muss. Pulumi bietet verschiedene Optionen für die Statusspeicherung:
- Lokaler Status: Wird direkt auf Ihrem lokalen Dateisystem gespeichert. Diese Option ist ideal für Einzelprojekte oder einfache Setups.
- Remote-Status: Standardmäßig speichert Pulumi den Status remote im Pulumi Service (einer von Pulumi bereitgestellten Cloud-basierten Plattform), ermöglicht es Ihnen aber auch, die Speicherung auf AWS S3, Azure Blob Storage oder Google Cloud Storage zu konfigurieren. Dies ist besonders nützlich in Teamumgebungen, in denen die Zusammenarbeit unerlässlich ist.
Die effektive Verwaltung des Status ist entscheidend für die Aufrechterhaltung der Konsistenz über Bereitstellungen hinweg, insbesondere in Szenarien, in denen mehrere Teammitglieder an derselben Infrastruktur arbeiten.
Andere IaC-Tools: Vergleich von Pulumi mit traditionellen IaC-Tools
Beim Vergleich von Pulumi mit anderen Infrastructure as Code (IaC)-Tools werden mehrere Nachteile traditioneller Ansätze deutlich:
- Einschränkungen durch domänenspezifische Sprachen (DSL): Viele IaC-Tools sind auf DSLs angewiesen, wie z. B. HCL von Terraform, was von den Benutzern verlangt, eine spezielle Sprache zu lernen, die spezifisch für das Tool ist.
- YAML/JSON-Beschränkungen: Tools, die auf YAML oder JSON basieren, können sowohl restriktiv als auch ausführlich sein, was die Verwaltung komplexerer Konfigurationen erschwert.
- Hohe Lernkurve: Die Notwendigkeit, DSLs oder bestimmte Konfigurationsformate zu beherrschen, erhöht die Lernkurve, insbesondere für Neueinsteiger in IaC.
- Begrenzte logische Fähigkeiten: DSLs unterstützen oft keine fortgeschrittenen logischen Konstrukte wie Schleifen, Bedingungen und Wiederverwendbarkeit. Diese Einschränkung kann zu sich wiederholendem Code führen, der schwer zu warten ist.
- Enges Ökosystem: Einige IaC-Tools haben ein kleineres Ökosystem und bieten weniger Plugins, Module und Community-gesteuerte Ressourcen.
- Herausforderungen bei der Wiederverwendbarkeit von Code: Die Unfähigkeit, Code über verschiedene Projekte oder Komponenten hinweg wiederzuverwenden, kann die Effizienz und Skalierbarkeit in der Infrastrukturverwaltung beeinträchtigen.
- Testkomplexität: Das Testen von Infrastrukturkonfigurationen, die in DSLs geschrieben sind, kann eine Herausforderung sein, was es schwierig macht, die Zuverlässigkeit und Robustheit des Infrastrukturcodes sicherzustellen.
Pulumi – in der Praxis
Einführung
In diesem Abschnitt werden wir uns mit einem praktischen Beispiel befassen, um die Fähigkeiten von Pulumi besser zu verstehen. Wir werden auch untersuchen, wie man ein Projekt mit Pulumi mit AWS einrichtet und es mit GitHub Actions für CI/CD automatisiert.
Voraussetzungen
Bevor Sie mit der Verwendung von Pulumi mit AWS beginnen und Ihre Infrastrukturverwaltung über GitHub Actions automatisieren, stellen Sie sicher, dass Sie die folgenden Voraussetzungen erfüllen:
- Pulumi CLI: Beginnen Sie mit der Installation der Pulumi CLI, indem Sie den offiziellen Installationsanweisungen folgen. Überprüfen Sie nach der Installation, ob Pulumi korrekt eingerichtet und in Ihrem System-PATH zugänglich ist, indem Sie eine schnelle Versionsprüfung durchführen.
- AWS CLI: Installieren Sie die AWS CLI, die für die Interaktion mit AWS-Diensten unerlässlich ist. Konfigurieren Sie die AWS CLI mit Ihren AWS-Anmeldeinformationen, um sicherzustellen, dass Sie Zugriff auf die erforderlichen AWS-Ressourcen haben. Stellen Sie sicher, dass Ihr AWS-Konto mit den erforderlichen Berechtigungen ausgestattet ist, insbesondere für IAM, EC2, S3 und alle anderen AWS-Dienste, die Sie mit Pulumi verwalten möchten.
- AWS IAM Benutzer/Rolle für GitHub Actions: Erstellen Sie einen dedizierten IAM-Benutzer oder eine Rolle in AWS, die speziell für die Verwendung in Ihren GitHub Actions-Workflows bestimmt ist. Dieser Benutzer oder diese Rolle sollte über die Berechtigungen verfügen, die zur Verwaltung der Ressourcen in Ihrem Pulumi-Stack erforderlich sind. Speichern Sie die AWS_ACCESS_KEY_ID und AWS_SECRET_ACCESS_KEY sicher als Geheimnisse in Ihrem GitHub-Repository.
- Pulumi-Konto: Richten Sie ein Pulumi-Konto ein, falls Sie dies noch nicht getan haben. Generieren Sie ein Pulumi-Zugriffstoken und speichern Sie es als Geheimnis in Ihrem GitHub-Repository, um eine sichere Automatisierung zu ermöglichen.
- Python und Pip: Installieren Sie Python (Version 3.7 oder höher wird empfohlen) zusammen mit Pip, die für das Python SDK von Pulumi erforderlich sind. Sobald Python installiert ist, fahren Sie mit der Installation des Python SDK von Pulumi zusammen mit allen erforderlichen AWS-Paketen fort, um die Infrastrukturverwaltung über Python zu ermöglichen.
- GitHub-Konto: Stellen Sie sicher, dass Sie ein aktives GitHub-Konto haben, um Ihren Code zu hosten und Ihr Repository zu verwalten. Erstellen Sie ein GitHub-Repository, in dem Sie Ihr Pulumi-Projekt und die zugehörigen Automatisierungs-Workflows speichern. Speichern Sie kritische Geheimnisse wie AWS_ACCESS_KEY_ID, AWS_SECRET_ACCESS_KEY und Ihr Pulumi-Zugriffstoken sicher im Geheimnisbereich des GitHub-Repositorys.
- GitHub Runners: Verwenden Sie von GitHub gehostete Runner, um Ihre GitHub Actions-Workflows auszuführen, oder richten Sie selbst gehostete Runner ein, falls Ihr Projekt dies erfordert. Vergewissern Sie sich, dass auf den Runnern alle notwendigen Tools installiert sind, einschließlich Pulumi, AWS CLI, Python und alle anderen Abhängigkeiten, die Ihr Pulumi-Projekt möglicherweise benötigt.
Projektstruktur
Bei der Arbeit mit Infrastructure as Code (IaC) mit Pulumi ist die Aufrechterhaltung einer organisierten Projektstruktur unerlässlich. Eine klare und gut definierte Verzeichnisstruktur rationalisiert nicht nur den Entwicklungsprozess, sondern verbessert auch die Zusammenarbeit und die Bereitstellungseffizienz. In diesem Beitrag werden wir eine typische Verzeichnisstruktur für ein Pulumi-Projekt untersuchen und die Bedeutung jeder Komponente erläutern.
Überblick über ein typisches Pulumi-Projektverzeichnis
Ein Standard-Pulumi-Projekt könnte wie folgt organisiert sein:
/project-root
├── .github
│ └── workflows
│ └── workflow.yml # GitHub Actions workflow for CI/CD
├── __main__.py # Entry point for the Pulumi program
├── infra.py # Infrastructure code
├── pulumi.dev.yml # Pulumi configuration for the development environment
├── pulumi.prod.yml # Pulumi configuration for the production environment
├── pulumi.yml # Pulumi configuration (common or default settings)
├── requirements.txt # Python dependencies
└── test_infra.py # Tests for infrastructure code
NetApp FSx on AWS
Einführung
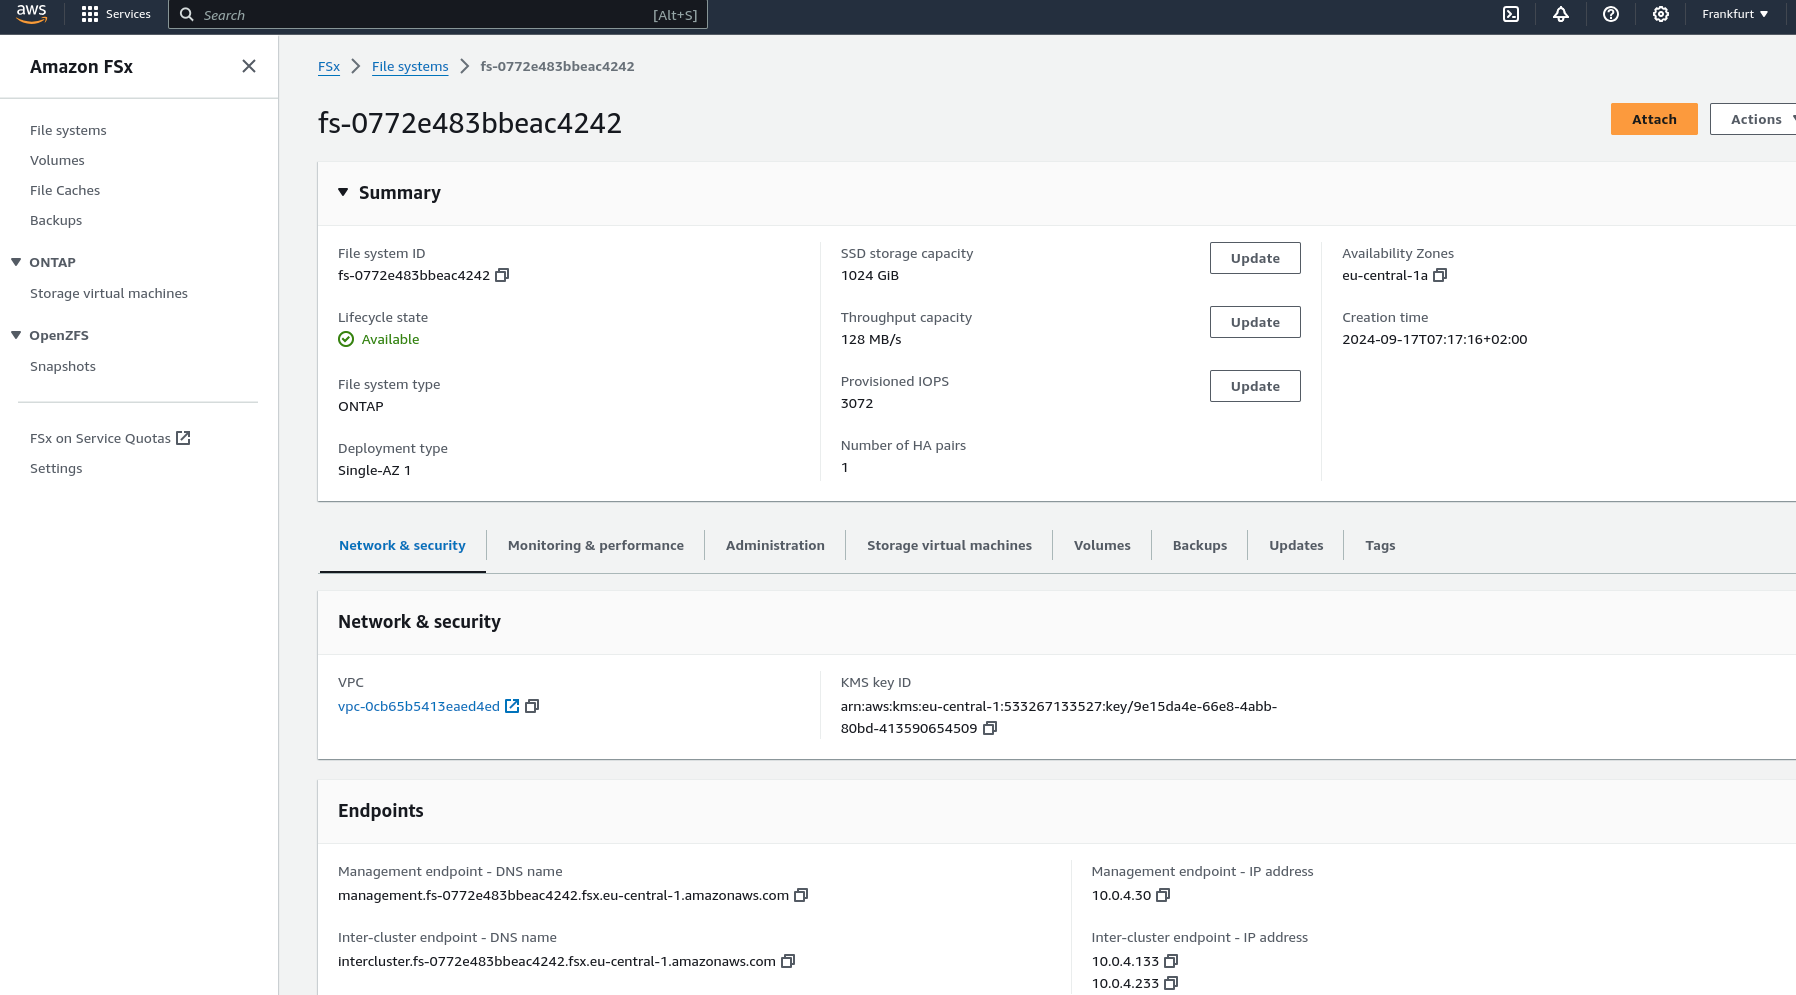
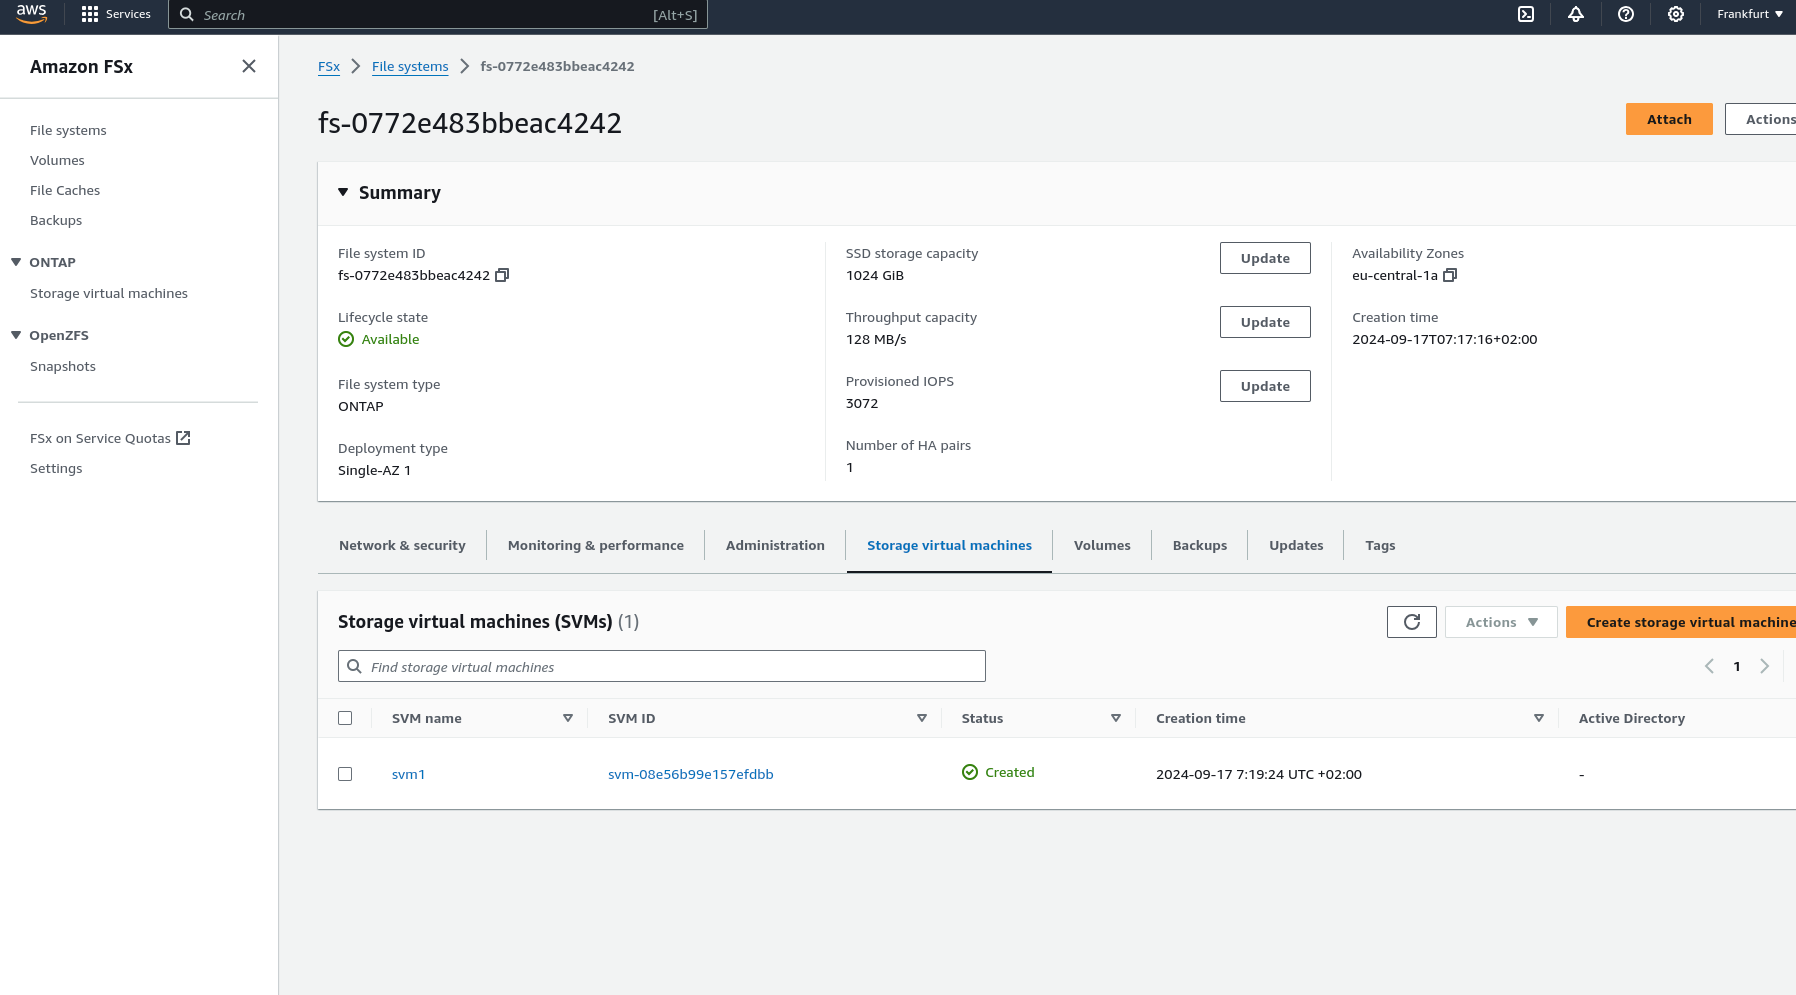
Amazon FSx for NetApp ONTAP bietet eine vollständig verwaltete, skalierbare Speicherlösung, die auf dem NetApp ONTAP-Dateisystem basiert. Es bietet hochleistungsfähigen, hochverfügbaren gemeinsam genutzten Speicher, der sich nahtlos in Ihre AWS-Umgebung integriert. FSx for NetApp ONTAP nutzt die fortschrittlichen Datenverwaltungsfunktionen von ONTAP und ist ideal für Anwendungen, die robuste Speicherfunktionen und Kompatibilität mit bestehenden NetApp-Systemen benötigen.
Hauptmerkmale
- Hohe Leistung: FSx for ONTAP bietet Speicher mit niedriger Latenz, der für anspruchsvolle Workloads mit hohem Durchsatz ausgelegt ist.
- Skalierbarkeit: Kann skaliert werden, um Petabyte an Speicher zu unterstützen, wodurch es sowohl für kleine als auch für große Anwendungen geeignet ist.
- Erweiterte Datenverwaltung: Nutzt die umfassenden Datenverwaltungsfunktionen von ONTAP, einschließlich Snapshots, Klonen und Disaster Recovery.
- Multi-Protokoll-Zugriff: Unterstützt NFS- und SMB-Protokolle und bietet flexible Zugriffsoptionen für eine Vielzahl von Clients.
- Kosteneffizienz: Implementiert Tiering-Richtlinien, um weniger häufig aufgerufene Daten automatisch in kostengünstigere Speicher zu verschieben, wodurch die Speicherkosten optimiert werden.
Worum geht es?
In den nächsten Abschnitten werden wir die Besonderheiten der Einrichtung jeder Komponente mit Pulumi-Code durchgehen und veranschaulichen, wie Sie eine VPC erstellen, Subnetze konfigurieren, eine Sicherheitsgruppe einrichten und ein FSx for NetApp ONTAP-Dateisystem bereitstellen, während Sie gleichzeitig die robusten Funktionen von Pulumi und AWS nutzen.
Architekturüberblick
Eine visuelle Darstellung der Architektur, die wir mit Pulumi bereitstellen werden: Single AZ Deployment mit FSx und EC2

Das obige Diagramm veranschaulicht die Architektur für die Bereitstellung eines FSx for NetApp ONTAP-Dateisystems innerhalb einer einzelnen Availability Zone. Das Setup umfasst eine VPC mit öffentlichen und privaten Subnetzen, ein Internet Gateway für ausgehenden Datenverkehr und eine Sicherheitsgruppe, die den Zugriff auf das FSx-Dateisystem und die EC2-Instanz steuert. Die EC2-Instanz ist so konfiguriert, dass sie das FSx-Volume mit NFS mountet, wodurch ein nahtloser Zugriff auf den Speicher ermöglicht wird.
Pulumi einrichten
Führen Sie die folgenden Schritte aus, um Pulumi einzurichten und in AWS zu integrieren:
Pulumi installieren: Beginnen Sie mit der Installation von Pulumi mit dem folgenden Befehl:
curl -fsSL https://get.pulumi.com | shAWS CLI installieren: Wenn Sie es noch nicht installiert haben, installieren Sie die AWS CLI, um AWS-Dienste zu verwalten:
pip install awscliAWS CLI konfigurieren: Konfigurieren Sie die AWS CLI mit Ihren Anmeldeinformationen:
aws configureNeues Pulumi-Projekt erstellen: Initialisieren Sie ein neues Pulumi-Projekt mit AWS und Python:
pulumi new aws-pythonIhren Pulumi-Stack konfigurieren: Legen Sie die AWS-Region für Ihren Pulumi-Stack fest:
pulumi config set aws:region eu-central-1Ihren Stack bereitstellen: Stellen Sie Ihre Infrastruktur mit Pulumi bereit:
pulumi preview ; pulumi upBeispiel: VPC, Subnetze und FSx for NetApp ONTAP
Lassen Sie uns in ein Pulumi-Beispielprojekt eintauchen, das eine Virtual Private Cloud (VPC), Subnetze, eine Sicherheitsgruppe, ein Amazon FSx for NetApp ONTAP-Dateisystem und eine EC2-Instanz einrichtet.
Pulumi-Codebeispiel: VPC, Subnetze und FSx for NetApp ONTAP
Der erste Schritt besteht darin, alle Parameter zu definieren, die zum Einrichten der Infrastruktur erforderlich sind. Sie können das folgende Beispiel verwenden, um diese Parameter wie in der Datei pulumi.dev.yaml angegeben zu konfigurieren.
Diese Datei pulumi.dev.yaml enthält Konfigurationseinstellungen für ein Pulumi-Projekt. Sie gibt verschiedene Parameter für die Bereitstellungsumgebung an, einschließlich der AWS-Region, der Availability Zones und des Schlüsselnamens. Außerdem werden CIDR-Blöcke für Subnetze definiert. Diese Einstellungen werden verwendet, um Cloud-Infrastrukturressourcen in der angegebenen AWS-Region zu konfigurieren und bereitzustellen.
config:
  aws:region: eu-central-1
  demo:availabilityZone: eu-central-1a
  demo:keyName: XYZ
  demo:subnet1CIDER: 10.0.3.0/24
  demo:subnet2CIDER: 10.0.4.0/24
Der folgende Code-Snippet sollte in der Datei infra.py platziert werden. Er beschreibt die Einrichtung der VPC, der Subnetze, der Sicherheitsgruppe und des FSx for NetApp ONTAP-Dateisystems im Detail. Jeder Schritt im Code wird durch Inline-Kommentare erläutert.
import pulumi
import pulumi_aws as aws
import pulumi_command as command
import os

# Retrieve configuration values from Pulumi configuration files
aws_config = pulumi.Config("aws")
region = aws_config.require("region")  # The AWS region where resources will be deployed

demo_config = pulumi.Config("demo")
availability_zone = demo_config.require("availabilityZone")  # Availability Zone for the deployment
subnet1_cidr = demo_config.require("subnet1CIDER")  # CIDR block for the public subnet
subnet2_cidr = demo_config.require("subnet2CIDER")  # CIDR block for the private subnet
key_name = demo_config.require("keyName")  # Name of the SSH key pair for EC2 instance access# Create a new VPC with DNS support enabled
vpc = aws.ec2.Vpc(
    "fsxVpc",
    cidr_block="10.0.0.0/16",  # VPC CIDR block
    enable_dns_support=True,    # Enable DNS support in the VPC
    enable_dns_hostnames=True   # Enable DNS hostnames in the VPC
)

# Create an Internet Gateway to allow internet access from the VPC
internet_gateway = aws.ec2.InternetGateway(
    "vpcInternetGateway",
    vpc_id=vpc.id  # Attach the Internet Gateway to the VPC
)

# Create a public route table for routing internet traffic via the Internet Gateway
public_route_table = aws.ec2.RouteTable(
    "publicRouteTable",
    vpc_id=vpc.id,
    routes=[aws.ec2.RouteTableRouteArgs(
        cidr_block="0.0.0.0/0",  # Route all traffic (0.0.0.0/0) to the Internet Gateway
        gateway_id=internet_gateway.id
    )]
)

# Create a single public subnet in the specified Availability Zone
public_subnet = aws.ec2.Subnet(
    "publicSubnet",
    vpc_id=vpc.id,
    cidr_block=subnet1_cidr,  # CIDR block for the public subnet
    availability_zone=availability_zone,  # The specified Availability Zone
    map_public_ip_on_launch=True  # Assign public IPs to instances launched in this subnet
)

# Create a single private subnet in the same Availability Zone
private_subnet = aws.ec2.Subnet(
    "privateSubnet",
    vpc_id=vpc.id,
    cidr_block=subnet2_cidr,  # CIDR block for the private subnet
    availability_zone=availability_zone  # The same Availability Zone
)

# Associate the public subnet with the public route table to enable internet access
public_route_table_association = aws.ec2.RouteTableAssociation(
    "publicRouteTableAssociation",
    subnet_id=public_subnet.id,
    route_table_id=public_route_table.id
)

# Create a security group to control inbound and outbound traffic for the FSx file system
security_group = aws.ec2.SecurityGroup(
    "fsxSecurityGroup",
    vpc_id=vpc.id,
    description="Allow NFS traffic",  # Description of the security group
    ingress=[
        aws.ec2.SecurityGroupIngressArgs(
            protocol="tcp",
            from_port=2049,  # NFS protocol port
            to_port=2049,
            cidr_blocks=["0.0.0.0/0"]  # Allow NFS traffic from anywhere
        ),
        aws.ec2.SecurityGroupIngressArgs(
            protocol="tcp",
            from_port=111,  # RPCBind port for NFS
            to_port=111,
            cidr_blocks=["0.0.0.0/0"]  # Allow RPCBind traffic from anywhere
        ),
        aws.ec2.SecurityGroupIngressArgs(
            protocol="udp",
            from_port=111,  # RPCBind port for NFS over UDP
            to_port=111,
            cidr_blocks=["0.0.0.0/0"]  # Allow RPCBind traffic over UDP from anywhere
        ),
        aws.ec2.SecurityGroupIngressArgs(
            protocol="tcp",
            from_port=22,  # SSH port for EC2 instance access
            to_port=22,
            cidr_blocks=["0.0.0.0/0"]  # Allow SSH traffic from anywhere
        )
    ],
    egress=[
        aws.ec2.SecurityGroupEgressArgs(
            protocol="-1",  # Allow all outbound traffic
            from_port=0,
            to_port=0,
            cidr_blocks=["0.0.0.0/0"]  # Allow all outbound traffic to anywhere
        )
    ]
)

# Create the FSx for NetApp ONTAP file system in the private subnet
file_system = aws.fsx.OntapFileSystem(
    "fsxFileSystem",
    subnet_ids=[private_subnet.id],  # Deploy the FSx file system in the private subnet
    preferred_subnet_id=private_subnet.id,  # Preferred subnet for the FSx file system
    security_group_ids=[security_group.id],  # Attach the security group to the FSx file system
    deployment_type="SINGLE_AZ_1",  # Single Availability Zone deployment
    throughput_capacity=128,  # Throughput capacity in MB/s
    storage_capacity=1024  # Storage capacity in GB
)

# Create a Storage Virtual Machine (SVM) within the FSx file system
storage_virtual_machine = aws.fsx.OntapStorageVirtualMachine(
    "storageVirtualMachine",
    file_system_id=file_system.id,  # Associate the SVM with the FSx file system
    name="svm1",  # Name of the SVM
    root_volume_security_style="UNIX"  # Security style for the root volume
)

# Create a volume within the Storage Virtual Machine (SVM)
volume = aws.fsx.OntapVolume(
    "fsxVolume",
    storage_virtual_machine_id=storage_virtual_machine.id,  # Associate the volume with the SVM
    name="vol1",  # Name of the volume
    junction_path="/vol1",  # Junction path for mounting
    size_in_megabytes=10240,  # Size of the volume in MB
    storage_efficiency_enabled=True,  # Enable storage efficiency features
    tiering_policy=aws.fsx.OntapVolumeTieringPolicyArgs(
        name="SNAPSHOT_ONLY"  # Tiering policy for the volume
    ),
    security_style="UNIX"  # Security style for the volume
)

# Extract the DNS name from the list of SVM endpoints
dns_name = storage_virtual_machine.endpoints.apply(lambda e: e[0]['nfs'][0]['dns_name'])

# Get the latest Amazon Linux 2 AMI for the EC2 instance
ami = aws.ec2.get_ami(
    most_recent=True,
    owners=["amazon"],
    filters=[{"name": "name", "values": ["amzn2-ami-hvm-*-x86_64-gp2"]}]  # Filter for Amazon Linux 2 AMI
)

# Create an EC2 instance in the public subnet
ec2_instance = aws.ec2.Instance(
    "fsxEc2Instance",
    instance_type="t3.micro",  # Instance type for the EC2 instance
    vpc_security_group_ids=[security_group.id],  # Attach the security group to the EC2 instance
    subnet_id=public_subnet.id,  # Deploy the EC2 instance in the public subnet
    ami=ami.id,  # Use the latest Amazon Linux 2 AMI
    key_name=key_name,  # SSH key pair for accessing the EC2 instance
    tags={"Name": "FSx EC2 Instance"}  # Tag for the EC2 instance
)

# User data script to install NFS client and mount the FSx volume on the EC2 instance
user_data_script = dns_name.apply(lambda dns: f"""#!/bin/bash
sudo yum update -y
sudo yum install -y nfs-utils
sudo mkdir -p /mnt/fsx
if ! mountpoint -q /mnt/fsx; then
sudo mount -t nfs {dns}:/vol1 /mnt/fsx
fi
""")

# Retrieve the private key for SSH access from environment variables while running with Github Actions
private_key_content = os.getenv("PRIVATE_KEY")
print(private_key_content)

# Ensure the FSx file system is available before executing the script on the EC2 instance
pulumi.Output.all(file_system.id, ec2_instance.public_ip).apply(lambda args: command.remote.Command(
    "mountFsxFileSystem",
    connection=command.remote.ConnectionArgs(
        host=args[1],
        user="ec2-user",
        private_key=private_key_content
    ),
    create=user_data_script,
    opts=pulumi.ResourceOptions(depends_on=[volume])
))
Pytest mit Pulumi
# Importing necessary libraries
import pulumi
import pulumi_aws as aws
from typing import Any, Dict, List

# Setting up configuration values for AWS region and various parameters
pulumi.runtime.set_config('aws:region', 'eu-central-1')
pulumi.runtime.set_config('demo:availabilityZone1', 'eu-central-1a')
pulumi.runtime.set_config('demo:availabilityZone2', 'eu-central-1b')
pulumi.runtime.set_config('demo:subnet1CIDER', '10.0.3.0/24')
pulumi.runtime.set_config('demo:subnet2CIDER', '10.0.4.0/24')
pulumi.runtime.set_config('demo:keyName', 'XYZ') - Change based on your own key

# Creating a class MyMocks to mock Pulumi's resources for testing
class MyMocks(pulumi.runtime.Mocks):
    def new_resource(self, args: pulumi.runtime.MockResourceArgs) -> List[Any]:
        # Initialize outputs with the resource's inputs
        outputs = args.inputs

        # Mocking specific resources based on their type
        if args.typ == "aws:ec2/instance:Instance":
            # Mocking an EC2 instance with some default values
            outputs = {
                **args.inputs,  # Start with the given inputs
                "ami": "ami-0eb1f3cdeeb8eed2a",  # Mock AMI ID
                "availability_zone": "eu-central-1a",  # Mock availability zone
                "publicIp": "203.0.113.12",  # Mock public IP
                "publicDns": "ec2-203-0-113-12.compute-1.amazonaws.com",  # Mock public DNS
                "user_data": "mock user data script",  # Mock user data
                "tags": {"Name": "test"}  # Mock tags
            }
        elif args.typ == "aws:ec2/securityGroup:SecurityGroup":
            # Mocking a Security Group with default ingress rules
            outputs = {
                **args.inputs,
                "ingress": [
                    {"from_port": 80, "cidr_blocks": ["0.0.0.0/0"]},  # Allow HTTP traffic from anywhere
                    {"from_port": 22, "cidr_blocks": ["192.168.0.0/16"]}  # Allow SSH traffic from a specific CIDR block
                ]
            }

        # Returning a mocked resource ID and the output values
        return [args.name + '_id', outputs]

    def call(self, args: pulumi.runtime.MockCallArgs) -> Dict[str, Any]:
        # Mocking a call to get an AMI
        if args.token == "aws:ec2/getAmi:getAmi":
            return {
                "architecture": "x86_64",  # Mock architecture
                "id": "ami-0eb1f3cdeeb8eed2a",  # Mock AMI ID
            }

        # Return an empty dictionary if no specific mock is needed
        return {}

# Setting the custom mocks for Pulumi
pulumi.runtime.set_mocks(MyMocks())

# Import the infrastructure to be tested
import infra

# Define a test function to validate the AMI ID of the EC2 instance
@pulumi.runtime.test
def test_instance_ami():
    def check_ami(ami_id: str) -> None:
        print(f"AMI ID received: {ami_id}")
        # Assertion to ensure the AMI ID is the expected one
        assert ami_id == "ami-0eb1f3cdeeb8eed2a", 'EC2 instance must have the correct AMI ID'

    # Running the test to check the AMI ID
    pulumi.runtime.run_in_stack(lambda: infra.ec2_instance.ami.apply(check_ami))

# Define a test function to validate the availability zone of the EC2 instance
@pulumi.runtime.test
def test_instance_az():
    def check_az(availability_zone: str) -> None:
        print(f"Availability Zone received: {availability_zone}")
        # Assertion to ensure the instance is in the correct availability zone
        assert availability_zone == "eu-central-1a", 'EC2 instance must be in the correct availability zone'

    # Running the test to check the availability zone
    pulumi.runtime.run_in_stack(lambda: infra.ec2_instance.availability_zone.apply(check_az))

# Define a test function to validate the tags of the EC2 instance
@pulumi.runtime.test
def test_instance_tags():
    def check_tags(tags: Dict[str, Any]) -> None:
        print(f"Tags received: {tags}")
        # Assertions to ensure the instance has tags and a 'Name' tag
        assert tags, 'EC2 instance must have tags'
        assert 'Name' in tags, 'EC2 instance must have a Name tag'

    # Running the test to check the tags
    pulumi.runtime.run_in_stack(lambda: infra.ec2_instance.tags.apply(check_tags))

# Define a test function to validate the user data script of the EC2 instance
@pulumi.runtime.test
def test_instance_userdata():
    def check_user_data(user_data_script: str) -> None:
        print(f"User data received: {user_data_script}")
        # Assertion to ensure the instance has user data configured
        assert user_data_script is not None, 'EC2 instance must have user_data_script configured'

    # Running the test to check the user data script
    pulumi.runtime.run_in_stack(lambda: infra.ec2_instance.user_data.apply(check_user_data))
Github-Aktionen
Einführung
GitHub Actions ist ein leistungsstarkes Automatisierungstool, das in GitHub integriert ist und es Entwicklern ermöglicht, ihre Workflows zu automatisieren, einschließlich des Testens, Erstellens und Bereitstellens von Code. Pulumi hingegen ist ein Infrastructure as Code (IaC)-Tool, mit dem Sie Cloud-Ressourcen mithilfe vertrauter Programmiersprachen verwalten können. In diesem Beitrag werden wir untersuchen, warum Sie GitHub Actions verwenden sollten und welchen spezifischen Zweck es in Kombination mit Pulumi erfüllt.
Warum GitHub Actions verwenden und seine Bedeutung
GitHub Actions ist ein leistungsstarkes Tool zur Automatisierung von Workflows innerhalb Ihres GitHub-Repositorys und bietet mehrere wichtige Vorteile, insbesondere in Kombination mit Pulumi:
- Integrierte CI/CD: GitHub Actions integriert Continuous Integration und Continuous Deployment (CI/CD) nahtlos direkt in Ihr GitHub-Repository. Diese Automatisierung verbessert die Konsistenz beim Testen, Erstellen und Bereitstellen von Code und reduziert das Risiko manueller Fehler.
- Benutzerdefinierte Workflows: Es ermöglicht Ihnen, benutzerdefinierte Workflows für verschiedene Phasen Ihres Softwareentwicklungslebenszyklus zu erstellen, wie z. B. Code-Linting, Ausführen von Unit-Tests oder Verwalten komplexer Bereitstellungsprozesse. Diese Flexibilität stellt sicher, dass Ihre Automatisierung auf Ihre spezifischen Bedürfnisse abgestimmt ist.
- Ereignisgesteuerte Automatisierung: Sie können GitHub Actions mit Ereignissen wie Pushes, Pull Requests oder der Erstellung von Issues auslösen. Dieser ereignisgesteuerte Ansatz stellt sicher, dass Aufgaben genau dann automatisiert werden, wenn sie benötigt werden, wodurch Ihr Workflow optimiert wird.
- Wiederverwendbarer Code: GitHub Actions unterstützt wiederverwendbare „Aktionen“, die über mehrere Workflows oder Repositorys hinweg gemeinsam genutzt werden können. Dies fördert die Wiederverwendung von Code und sorgt für Konsistenz in Automatisierungsprozessen.
- Integrierter Marketplace: Der GitHub Marketplace bietet eine breite Palette vorgefertigter Aktionen aus der Community, die es einfach machen, Dienste von Drittanbietern zu integrieren oder gängige Aufgaben zu implementieren, ohne benutzerdefinierten Code zu schreiben.
- Verbesserte Zusammenarbeit: Durch die Verwendung der Pull Request- und Review-Workflows von GitHub können Teams Änderungen vor der Bereitstellung diskutieren und genehmigen. Dieser Prozess reduziert Risiken und verbessert die Zusammenarbeit bei Infrastrukturänderungen.
- Automatisierte Bereitstellung: GitHub Actions automatisiert die Bereitstellung von Infrastrukturcode, indem Pulumi verwendet wird, um Änderungen anzuwenden. Diese Automatisierung reduziert das Risiko manueller Fehler und gewährleistet einen konsistenten Bereitstellungsprozess.
- Testen: Das Ausführen von Tests vor der Bereitstellung mit GitHub Actions hilft zu bestätigen, dass Ihr Infrastrukturcode korrekt funktioniert, potenzielle Probleme frühzeitig zu erkennen und die Stabilität sicherzustellen.
- Konfigurationsmanagement: Es verwaltet und richtet notwendige Konfigurationen für Pulumi und AWS ein und stellt sicher, dass Ihre Umgebung korrekt für Bereitstellungen konfiguriert ist.
- Vorschau und Anwendung von Änderungen: GitHub Actions ermöglicht Ihnen die Vorschau von Änderungen, bevor Sie diese anwenden. Dies hilft Ihnen, die Auswirkungen von Modifikationen zu verstehen und das Risiko unbeabsichtigter Änderungen zu minimieren.
- Bereinigung: Sie können den Stack optional nach dem Testen oder der Bereitstellung zerstören, um Kosten zu kontrollieren und eine saubere Umgebung zu erhalten.
Ausführung
So führen Sie den GitHub Actions-Workflow aus:
- Platzierung: Speichern Sie die YAML-Workflow-Datei im Verzeichnis .github/workflows Ihres Repositorys. Diese Einrichtung stellt sicher, dass GitHub Actions den Workflow automatisch erkennt und ausführt, sobald ein Push in den Haupt-Branch Ihres Repositorys erfolgt.
- Workflow-Aktionen: Die Workflow-Datei führt mehrere kritische Aktionen aus:
- Umgebungseinrichtung: Konfiguriert die notwendige Umgebung für die Ausführung des Workflows.
- Abhängigkeitsinstallation: Installiert die erforderlichen Abhängigkeiten, einschließlich Pulumi CLI und anderer Python-Pakete.
- Testen: Führt Ihre Tests aus, um zu überprüfen, ob Ihr Infrastrukturcode wie erwartet funktioniert.
- Vorschau und Anwendung von Änderungen: Verwendet Pulumi, um eine Vorschau aller Änderungen an Ihrer Infrastruktur anzuzeigen und diese anzuwenden.
- Bereinigung: Zerstört optional den Stack nach Tests oder der Bereitstellung, um Kosten zu verwalten und eine saubere Umgebung zu erhalten.
Durch die Einbindung dieses Workflows stellen Sie sicher, dass Ihre Pulumi-Infrastruktur kontinuierlich integriert und mit ordnungsgemäßer Validierung bereitgestellt wird, wodurch die Zuverlässigkeit und Effizienz Ihres Infrastrukturmanagementprozesses erheblich verbessert werden.
Beispiel: Infrastruktur mit Pulumi bereitstellen
name: Pulumi Deployment
on:
push:
branches:
- main
env:
# Environment variables for AWS credentials and private key.
AWS_ACCESS_KEY_ID: ${{ secrets.AWS_ACCESS_KEY_ID }}
AWS_SECRET_ACCESS_KEY: ${{ secrets.AWS_SECRET_ACCESS_KEY }}
AWS_DEFAULT_REGION: ${{ secrets.AWS_DEFAULT_REGION }}
PRIVATE_KEY: ${{ secrets.PRIVATE_KEY }}
jobs:
pulumi-deploy:
runs-on: ubuntu-latest
environment: dev
steps:
- name: Checkout code
uses: actions/checkout@v3
# Check out the repository code to the runner.
- name: Configure AWS credentials
uses: aws-actions/configure-aws-credentials@v3
with:
aws-access-key-id: ${{ secrets.AWS_ACCESS_KEY_ID }}
aws-secret-access-key: ${{ secrets.AWS_SECRET_ACCESS_KEY }}
aws-region: eu-central-1
# Set up AWS credentials for use in subsequent actions.
- name: Set up SSH key
run: |
mkdir -p ~/.ssh
echo "${{ secrets.SSH_PRIVATE_KEY }}" > ~/.ssh/XYZ.pem
chmod 600 ~/.ssh/XYZ.pem
# Create an SSH directory, add the private SSH key, and set permissions.
- name: Set up Python
uses: actions/setup-python@v4
with:
python-version: '3.9'
# Set up Python 3.9 environment for running Python-based tasks.
- name: Set up Node.js
uses: actions/setup-node@v3
with:
node-version: '14'
# Set up Node.js 14 environment for running Node.js-based tasks.
- name: Install project dependencies
run: npm install
working-directory: .
# Install Node.js project dependencies specified in `package.json`.
- name: Install Pulumi
run: npm install -g pulumi
# Install the Pulumi CLI globally.
- name: Install dependencies
run: |
python -m pip install --upgrade pip
pip install -r requirements.txt
working-directory: .
# Upgrade pip and install Python dependencies from `requirements.txt`.
- name: Login to Pulumi
run: pulumi login
env:
PULUMI_ACCESS_TOKEN: ${{ secrets.PULUMI_ACCESS_TOKEN }}
# Log in to Pulumi using the access token stored in secrets.
- name: Set Pulumi configuration for tests
run: pulumi config set aws:region eu-central-1 --stack dev
# Set Pulumi configuration to specify AWS region for the `dev` stack.
- name: Pulumi stack select
run: pulumi stack select dev
working-directory: .
# Select the `dev` stack for Pulumi operations.
- name: Run tests
run: |
pulumi config set aws:region eu-central-1
pytest
working-directory: .
# Set AWS region configuration and run tests using pytest.
- name: Preview Pulumi changes
run: pulumi preview --stack dev
working-directory: .
# Preview the changes that Pulumi will apply to the `dev` stack.
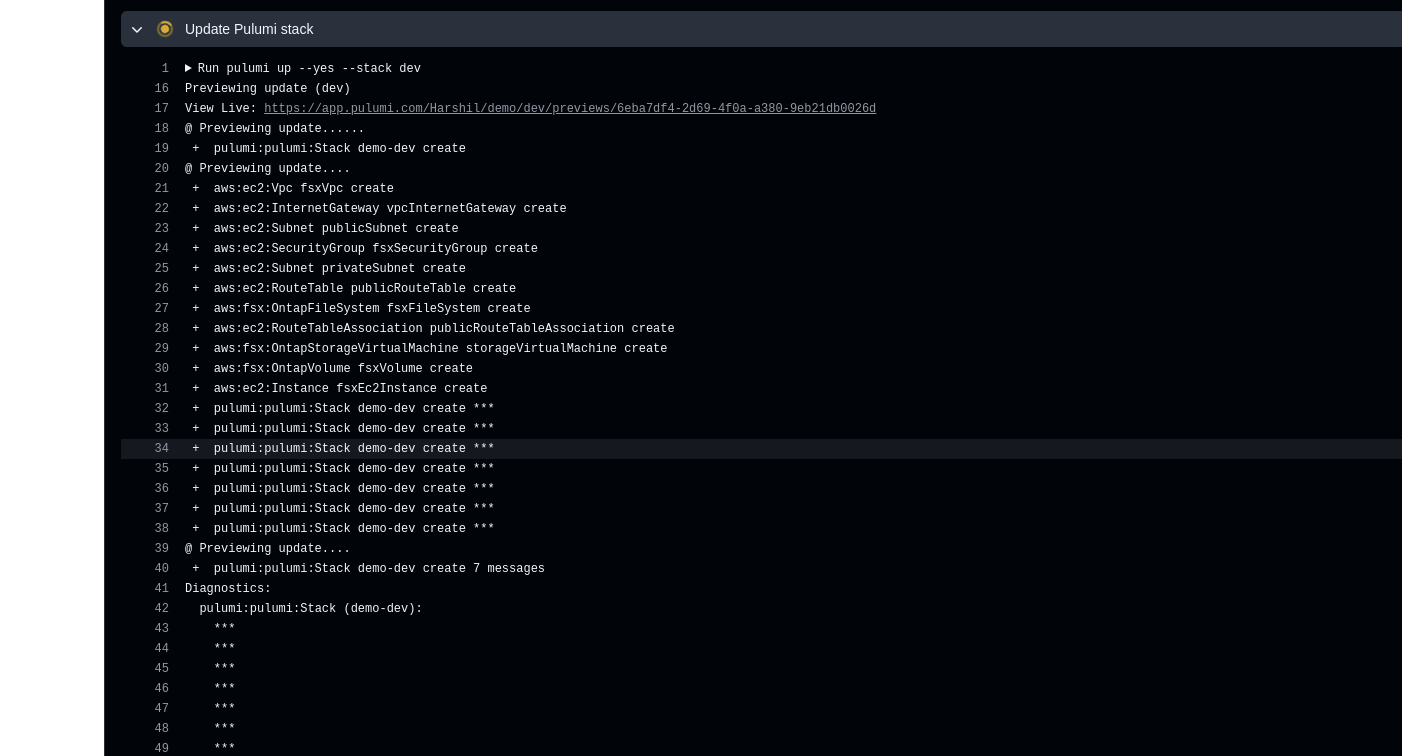
- name: Update Pulumi stack
run: pulumi up --yes --stack dev
working-directory: .
# Apply the changes to the `dev` stack with Pulumi.
- name: Pulumi stack output
run: pulumi stack output
working-directory: .
# Retrieve and display outputs from the Pulumi stack.
- name: Cleanup Pulumi stack
run: pulumi destroy --yes --stack dev
working-directory: .
# Destroy the `dev` stack to clean up resources.
- name: Pulumi stack output (after destroy)
run: pulumi stack output
working-directory: .
# Retrieve and display outputs from the Pulumi stack after destruction.
- name: Logout from Pulumi
run: pulumi logout
# Log out from the Pulumi session.Ausgabe:
über den Autor
credativ Redaktion
zur Person
Dieser Account dient als Sammelpunkt für die wertvollen Beiträge ehemaliger Mitarbeiter von credativ. Wir bedanken uns für ihre großartigen Inhalte, die das technische Wissen in unserem Blog über die Jahre hinweg bereichert haben. Ihre Artikel bleiben hier weiterhin für unsere Leser zugänglich.
