Introduction and Project History
Nowadays, cloud storage is included with every second account for various services. Whether it is a Google account with Drive or a Dropbox account created to collaborate with other project participants. Unfortunately, these are unencrypted, and it is often unclearly communicated how the service provider handles the stored data and what it might be used for. This means, however, that it cannot be used securely.
Cryptomator is an open-source encryption tool developed in 2015 by the German company Skymatic GmbH to enable the secure storage of data in cloud storage solutions. The project arose from the realization that while many cloud providers offer convenience, they do not guarantee sufficient control over the confidentiality of stored data. It addresses this problem through client-side, transparent encryption that works independently of the respective provider. This is implemented by creating encrypted vaults (“Vaults”) in any cloud storage, with all encryption operations performed locally on the end device. As a result, control over the data remains entirely with the user.
Since its release, Cryptomator has evolved into one of the most well-known open-source solutions for cloud encryption. In 2016, the project was even honored with the CeBIT Innovation Award in the “Usable Security and Privacy” category. Development continues actively, with a focus on stability, compatibility, and cryptographic robustness.
Licensing
The project itself is available under a dual licensing structure. The desktop version is licensed as an open-source project under the GNU General Public License v3.0 (GPLv3). This means that the source code is freely viewable, modifiable, and redistributable, as long as the terms of the license are met. The source code is publicly accessible on GitHub: https://github.com/cryptomator/cryptomator.
For companies wishing to integrate Cryptomator into commercial products (e.g., as a white-label solution), the manufacturer offers a proprietary licensing option. The desktop software remains free to use, while development is primarily funded through donations and revenue from the mobile apps.
The mobile applications for Android and iOS are available in their respective app stores. While the basic functions are free, full functionality requires in-app purchases which, as mentioned, fund the project.
Architecture and Functionality
Cryptomator is based on the principle of transparent, client-side encryption. It creates encrypted directories—so-called vaults—within any folder managed by a cloud synchronization service. The software mounts these vaults as a virtual drive, making them behave like a normal folder in the file system for the user. This also works in local folders and does not necessarily have to be located in a synchronized folder.
All file operations (reading, writing, renaming) are transparently intercepted and encrypted or decrypted by Cryptomator before they are stored on the hard drive and/or synchronized to the cloud. The actual synchronization is handled by the respective cloud client—Cryptomator itself does not perform any network communication.
Cryptomator generates many small files from the data (e.g., dXXX for data blocks). It is important that the cloud client synchronizes these reliably to avoid data corruption. However, this also ensures that no conclusions can be drawn from the number and size of the files.
The architecture is designed so that no central servers are required. There is no registration, no accounts, and no transmission of metadata. The system operates strictly according to the zero-knowledge principle: only the user possesses the key for decryption.
However, this also means that if the “vault key” is lost, there is no longer any way to access the data. There is, however, the option to have an additional recovery key created when a vault is set up. This should then be kept in a suitably secure location, such as in a KeePass database or another password manager of your choice.
Since the file masterkey.cryptomator is also critical for decryption, it must be ensured that it is not deleted. In case of doubt, it can simply be backed up externally, just like the password and the recovery key.
If a vault is unlocked, it can be selected directly via the GUI client and opened in the file manager using a button.
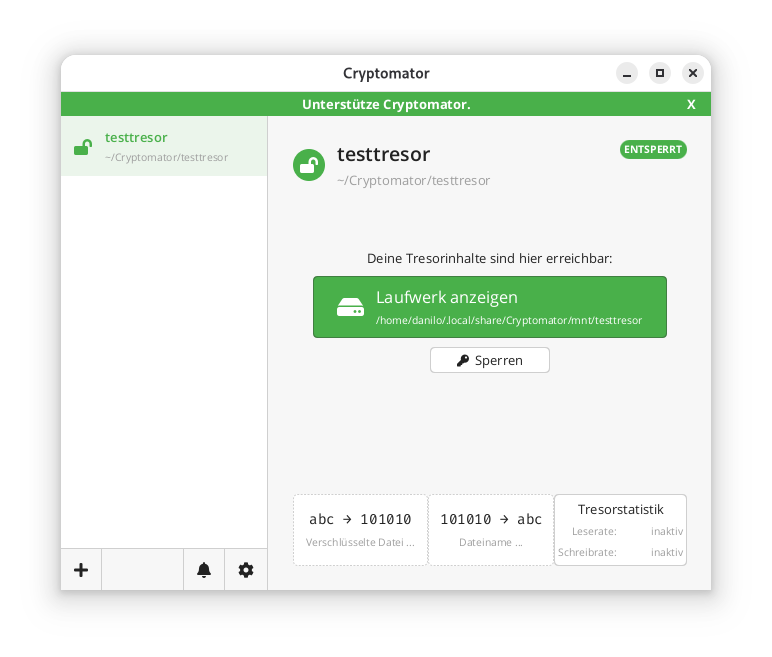
In the locally mounted and decrypted vault, currently only the initial file can be found:
$ ls -l ~/.local/share/Cryptomator/mnt/testtresor
 total 0
 -rw-rw-r-- 1 danilo danilo 471 10. Feb 11:07 WELCOME.rtf
In the actual file system where the vault was created in encrypted form, it looks like this instead:
$ tree ~/Cryptomator/testtresor/
 /home/danilo/Cryptomator/testtresor/
 ├── c
 ├── d
 │   └── KY
 │   └── FEV7TA6N4UV5I3PFT6P7D7DCTNGLDU
 │   ├── dirid.c9r
 │   └── feotyFJDU3AD_3wyOp7Tbd83QUgUGcB46vYT.c9r
 ├── IMPORTANT.rtf
 ├── masterkey.cryptomator
 ├── masterkey.cryptomator.57A62350.bkup
 ├── vault.cryptomator
 └── vault.cryptomator.2BB16E73.bkup
 5 directories, 7 files
The IMPORTANT.rtf file created here only contains a note indicating that it is a Cryptomator vault and a link to the documentation.
Cryptographic Procedures
Cryptomator’s security is based on established, standard-compliant cryptographic procedures:
– Encryption of file contents: AES-256 in SIV-CTR-MAC or GCM mode, depending on the version. This ensures both confidentiality and integrity.
– Encryption of file and folder names: AES-SIV to enable deterministic encryption without opening security vulnerabilities.
– Password derivation: The master key is derived from the user password using **scrypt**, a memory-intensive key derivation algorithm that makes brute-force attacks more difficult.
– Key management: Each vault has a 256-bit encryption and MAC master key. This is encrypted with the Key Encryption Key (KEK) derived from the password and stored in the `masterkey.cryptomator` file.
Further details on the cryptographic architecture are described in the official documentation.
Integration of Third-Party Services
Cryptomator distinguishes between desktop and mobile clients regarding cloud integration.
On desktop systems (Windows, macOS, Linux), integration works via the local synchronization folder of the respective cloud provider. Since Cryptomator only encrypts a folder and does not perform direct network communication, compatibility is very high. Any provider that provides a local folder (e.g., Dropbox, Google Drive, OneDrive, Nextcloud) can be used. Aside from this, an official [CLI client](https://github.com/cryptomator/cli) is also available. However, this appears to be less actively developed than the GUI client; at least the last commit and release are already more than six months old.
On mobile devices (Android, iOS), integration takes place either via native APIs or via the WebDAV protocol. Supported providers such as Dropbox, Google Drive, or OneDrive are offered directly in the app. For other services that support WebDAV (e.g., Nextcloud, ownCloud, MagentaCLOUD, GMX, WEB.DE), a connection can be established manually via the WebDAV interface.
A current list of supported services is available here.
Important Notes on Integration
– WebDAV and Two-Factor Authentication (2FA): For providers with 2FA, an app-specific password is often required, as the main password cannot be used for WebDAV.
– pCloud: WebDAV is disabled when 2FA is activated, which makes use via Cryptomator impossible.
– Multi-Vault Support: Multiple vaults can also be managed in parallel in the client.
External Security Validation of the Project
In 2017, Cryptomator underwent a comprehensive security audit by the recognized security company Cure53. The test covered the project’s core cryptographic libraries, including cryptolib, cryptofs, siv-mode, and cryptomator-objc-cryptor. The audit was predominantly positive: the architecture was rated as robust and the attack surface as very small.
One critical finding concerned unintentional public access to the private GPG signing key, which has since been resolved. Another less critical note referred to the use of AES/ECB as the default mode in an internal class, which, however, was not used in the main encryption path.
The full audit report in PDF format is publicly available.
This is the only publicly available audit of the project that the author could find. However, since audits are generally expensive and time-consuming, the project should be credited for having it conducted and made publicly available.
All other known security issues are also listed on the project’s GitHub page and are visible to everyone.
Conclusion
Cryptomator represents a technically sophisticated, transparent, and cross-platform solution for encrypting data in cloud storage or local data. Through the consistent implementation of the zero-knowledge principle and the use of established cryptographic procedures, it offers high security combined with good user-friendliness.
The separation between encryption and synchronization enables broad compatibility with existing cloud services without them having to change their infrastructure. The open-source nature of the software allows for audits and fosters trust in its security.
Even for less technically savvy users who want to maintain control over their data, Cryptomator is one of the best options available thanks to the GUI client. The specific notes regarding the peculiarities of mobile integration and the fact that both the master key and the password must be strictly protected are, of course, still essential.
Open source software differs from proprietary software primarily in the availability of the source code and the licensing. With open source, the source code is freely accessible and can be viewed, modified, and distributed by users. Proprietary software, on the other hand, is distributed with closed source code that belongs exclusively to the manufacturer. These fundamental differences influence costs, flexibility, support, and strategic decisions in companies. In this article, I would like to attempt a comparison of open source software vs. proprietary software.
(more…)Many companies use open-source software without knowing what rights and obligations the respective license—whether GPL, MIT, or Apache—actually entails. Understanding open-source licenses is not purely a legal task, but a strategic prerequisite for any company that develops or deploys software. This guide explains the three most important open-source licenses in comparison and provides you with a practical decision-making foundation for your project.
Note: This article reflects the author’s professional assessment and does not constitute legal advice. For legal advice on licensing matters, please consult an attorney.
What are open source licenses and why are they important?
Open source licenses are legal agreements that define the terms under which software may be freely used, copied, modified, and distributed. They create legal certainty for developers and users by defining clear rules for dealing with the source code. Without these licenses, the use of third-party software would be legally problematic.
The legal significance of open source licenses is immense: they replace the standard copyright, which prohibits any use, with specific permissions. Companies need to understand these licenses, as violations can lead to costly litigation. The internationally recognized reference is the Open Source Initiative (OSI), a nonprofit organization that reviews and certifies licenses based on the Open Source Definition. OSI-certified licenses—including GPL, MIT, and Apache—meet defined minimum requirements for freedom of use, distribution, and source code access. For enterprises, the OSI certification is a reliable signal that a license is legally proven and accepted in the community.
Open source licenses can be divided into two main categories:
- Copyleft licenses (such as the GPL): require changes to be published under the same license
- Permissive licenses (such as MIT, Apache): allow integration into proprietary software without publication obligation
This distinction significantly influences your business strategy and product development. Copyleft licenses promote community development but can restrict commercial models. In the context of copyleft licenses, the term “infectious” conditions is often used, not with a negative connotation, but simply to indicate that by using copyleft-licensed code, derivative works are generally also subject to the same license. A distinction is made between strong copyleft (GPL), limited copyleft (LGPL), and file-based copyleft (MPL). Permissive licenses offer more flexibility for companies that want to develop proprietary solutions.
Important for enterprises: The copyleft effect of the GPL only applies when you distribute the software to third parties. If you use GPL-licensed software exclusively internally, without distributing it, there is no obligation to publish the source code. 
What is the difference between GPL, MIT, and Apache licenses?
The open-source license comparison between GPL, MIT, and Apache is the first step for many companies in understanding open-source licenses and their practical implications. The GPL license is a strict copyleft license that requires all modifications and derivative works to also be under the GPL. MIT and Apache are permissive licenses that offer more freedoms, with Apache containing additional patent protection. The choice between these licenses determines how you can use the software in your projects.
GPL (General Public License) protects the freedom of software through the copyleft principle. If you use and distribute GPL-licensed software, you must:
- provide or make available the source code
- also place your changes under the GPL
- clearly identify the license terms
The MIT license is the simplest permissive license. It allows virtually anything as long as you:
- retain the original copyright notice
- include the license terms in copies of the software
The Apache license is similar to the MIT license, but also offers:
- explicit patent protection for users
- protection against trademark infringement
- clearer rules for contributions to the software
Practical examples of use: Use the GPL for community projects that should remain open. The MIT license is suitable for libraries that are to be widely distributed. The Apache license is ideal for corporate projects where patent protection is important.
Which license should you choose for your project?
The right open-source license choice depends on your business model, project goals, and desired community participation. Those who want to understand open-source licenses and select the appropriate open-source license should first examine what goals the project pursues and what dependencies already exist. Choose the GPL for maximum openness, the MIT license for maximum distribution, and the Apache license for enterprise projects with patent protection. Also consider the licenses of the software components you already use.
For community-driven projects, the GPL is suitable because it ensures that all improvements benefit the community. This choice encourages contributions from other developers and prevents companies from using your work without compensation.
For libraries and tools, the MIT license is often the best choice. The low legal hurdle leads to higher adoption and more feedback. Many successful JavaScript libraries use the MIT license for this reason.
For enterprise software, the Apache license offers the best balance between openness and legal certainty. Patent protection prevents legal problems and makes the project more attractive to other companies.
Important decision factors:
- Do you want to allow commercial use without an obligation to return?
- Is patent protection relevant to your project?
- What licenses do your dependencies use?
- How important is maximum distribution compared to community control?
Which licenses can be combined with each other?
MIT and Apache-2.0 are permissive licenses and can generally be combined with many other licenses without any problems. Code under MIT can be integrated into GPLv2 or GPLv3. Apache-2.0 is compatible with GPLv3, but not with GPLv2, as GPLv2 does not accept the Apache-2.0 patent clause. GPL licenses are copyleft, meaning that as soon as GPL code is combined, the entirety must be distributed under GPL. GPLv2 and GPLv3 are not mutually compatible, unless a project uses the “v2 or later” option.
Crosstab: Compatibility / Combinability
| Combination | MIT → other | Apache‑2.0 → other | GPLv2 → other | GPLv3 → other |
|---|---|---|---|---|
| MIT | ✔️ | ✔️ | ✔️ | ✔️ |
| Apache‑2.0 | ✔️ | ✔️ | ❌ not with GPLv2 | ✔️ compatible |
| GPLv2 | ✔️ | ❌ | ✔️ under GPLv2 | ❌ except “v2 or later” |
| GPLv3 | ✔️ | ✔️ | ❌ except “v2 or later” | ✔️ |
Overview
Here is a summary of the three major open-source license models:
| Function | MIT | Apache 2.0 | GPL (v2/v3) |
|---|---|---|---|
| License type | Permissive | Permissive | Strong Copyleft |
| Derived works | Can be closed source | Can be closed source | Must be open source |
| Patent protection | No explicit clause | Yes (grant/retaliation) | Yes (v3 only) |
| Attribution | Note required | Note required | Note required |
| Primary goal | Maximum flexibility | Legal certainty | Protection of the ecosystem |
GPLv2 vs. GPLv3: Why the Version of Your GPL License Matters
GPL Version 2 and GPL Version 3 both pursue the goal of ensuring software freedom, but differ in several key aspects. GPLv3, released in 2007, addresses technical and legal developments that were not yet considered in GPLv2 from 1991. An important difference is the handling of Tivoization: Manufacturers provide the source code, but technically prevent users from running modified versions. A classic example is a digital video recorder (such as the namesake TiVo) that uses GPL software but only accepts firmware signed by the manufacturer. Users can view and modify the code, but cannot install their changes on the device – a clear contradiction to the spirit of the GPL. The GPLv3 explicitly prevents this.
In addition, GPLv3 strengthens protection against software patents, improves license compatibility, and takes greater account of international legal spaces. Overall, it expands the freedom of use, while GPLv2 is considered more stable but less comprehensive.
Special cases
The AGPL dilemma: Protection vs. ecosystem
Switching to the Affero GNU Public License (AGPL) or even to specific “Source Available” licenses—as can be observed in prominent examples such as MongoDB (SSPL) or Elasticsearch (ELv2)—seems tempting at first glance in order to protect one’s own business model against commercial use by large cloud providers. In practice, however, this path often proves risky: such licenses frequently lead to legal uncertainty for corporate customers, a fragmentation of the developer community, and the loss of official “Open Source” status according to the OSI definition. Instead of sustainably protecting the project, there is a risk of undermining precisely the collaborative dynamics and trust that made the software’s original success possible in the first place. In fact, we are seeing a blanket rejection of such licenses, especially among large companies. In particular, the AGPL is very often found on a blacklist.
LGPL – Lesser GPL
The Lesser General Public License (LGPL) was also developed by the Free Software Foundation (FSF). The LGPL allows developers or companies to incorporate software under LGPL into their own projects without being forced to disclose their source code as a whole due to a so-called strong copyleft. However, end users must be able to change the LGPL-licensed code, which is why this code in proprietary software is usually outsourced to dynamic libraries that can also be replaced when the program as a whole is only available in binary code. The license represents a compromise between the various strict copyleft licenses such as GPLv2 or v3 on the one hand and permissive licenses such as MIT or BSD licenses on the other.
BSD and Mozilla Public License: Additional Relevant License Types at a Glance
In addition to GPL, MIT, and Apache, there are other open-source licenses that are regularly encountered in practice. In particular, the BSD license and the Mozilla Public License (MPL) are widely used in certain project contexts and deserve separate consideration. A basic understanding of these license types helps you correctly assess dependencies in your projects and make licensing decisions more confidently.
BSD License: The Permissive License for System-Level Software and Maximum Freedom
The BSD license is one of the oldest permissive open-source licenses and imposes even fewer requirements than the MIT license. It originated in the Berkeley Software Distribution, a Unix derivative from the University of California, and is now primarily used in two variants: BSD-2-Clause and BSD-3-Clause. Both variants require only the retention of the copyright notice and a disclaimer of liability; BSD-3-Clause additionally prohibits the use of the original developers’ names for advertising purposes without express permission.
Typical use cases for the BSD license are operating system components, network software, and Unix-like systems—many parts of BSD-based operating systems such as FreeBSD or OpenBSD are under this license. In terms of compatibility, the BSD license behaves similarly to MIT: BSD-licensed code can be integrated into GPLv2 and GPLv3 projects without any problems and combined with Apache-2.0.
Mozilla Public License (MPL): File-Based Copyleft as a Middle Ground
The Mozilla Public License 2.0 offers a middle ground between permissive licenses and strong copyleft: only the files that contain MPL-licensed code must be kept under the MPL—the rest of your project can be under a different license, including proprietary licenses. This concept of file-based copyleft makes the MPL particularly attractive for companies that want to contribute individual components to the open-source community without having to disclose their entire product.
Well-known projects under the MPL are Mozilla Firefox® and parts of LibreOffice®. As for compatibility, MPL 2.0 is explicitly compatible with GPLv2, GPLv3, and Apache-2.0, provided the respective files are correctly marked. For projects that want to incorporate MPL-licensed code, however, it should be noted that the disclosure obligation at the file level must be consistently observed.
Does an open-source license contradict every business model?
The clear answer is “No!” Open-source software and commercial business models are not mutually exclusive—on the contrary, thousands of successful projects show that open source code and economic success are very compatible. Which model fits best depends on your goals, your target audience, and the chosen license.
SaaS Model: Open-Source Development with Commercial Hosting
In the SaaS model, software development takes place entirely under an open-source license, while a commercial provider offers the software as a hosted service. Users benefit from the transparency of the open source code, but pay for hosting, maintenance, and support. A very well-known example is the blogging software WordPress®: the source code is freely available at https://wordpress.org/, while https://wordpress.com/ offers hosting and paid additional services such as cloud storage and backups. The advantage lies in broad community participation; the disadvantage is that competitors can also host the software.
Dual Licensing: Free and Commercial License in Parallel
In the dual licensing model, the same software is offered simultaneously under a free open-source license and a commercial license. Companies that want to use the software in proprietary products can purchase a commercial license that includes additional guarantees or extended usage rights. This model makes it possible to serve the open-source community while generating revenue from the commercial segment. The disadvantage is that managing two license tracks creates organizational overhead.
Open-Core Model: Community Edition and Full Version
The open-core model provides a community edition under an open-source license, while an extended “full version” with additional features is offered commercially and proprietary. In the community, this model is less popular, as it often results in only a small developer community voluntarily contributing to further development—the incentive to contribute to a project whose core features are commercially withheld is naturally lower. For providers, however, the model offers a clear monetization strategy.
Service and Consulting Model: Expertise Around Open-Source Software
In addition to product-based models, there is the option to sell services and consulting around open-source software. The software used remains completely open source, while companies pay for design, implementation, operation, and support. This is exactly the approach we take at credativ®: we advise clients for a fee on how they can implement their infrastructure with open-source software and support them in ongoing operations—consistently relying on pure open-source solutions.
But isn’t open-source software always free?
No, open-source licenses do not prevent the commercial distribution of software. However, they sometimes force the source code to be published, which may promote competitive products, but it is not necessarily free. Richard Stallman once formulated this as “Free as in free speech, not free beer.” In addition, a TCO analysis always includes costs for conception, rollout, and operation. These are just as present with proprietary software. However, open source offers the advantage that you get a high degree of independence with the source code, which means that you are not in a vendor lock-in trap if the provider massively increases prices.
What about software without license information?
Software without explicit license information is legally fully protected in most legal systems (“all rights reserved”). This means that users may neither use, copy, modify nor pass on the code, even if it is publicly accessible, for example on GitHub. An explicit license is therefore always necessary for permitted use.
Anyone who consciously wants to make software public domain can do this via CC0 (Creative Commons Zero). CC0 waives copyright claims – as far as legally possible – and enables almost unrestricted use without conditions.
It is important to distinguish between Open Source / FOSS and Public Domain: Open Source does not mean “free of rights”, but describes licensed software that grants certain freedoms of use (e.g. MIT, Apache, GPL). The Public Domain, on the other hand, is actually free of copyrights, either through the expiry of the protection period or through explicit waiver as with CC0.
What happens if you misuse open source licenses?
License violations can lead to costly litigation, claims for damages, and the obligation to publish your own source code. Common mistakes include ignoring copyleft provisions, missing license notices, and using incompatible licenses in a project. Preventive measures such as license audits protect against legal problems. There are also specialized service providers and software offerings that take over the analysis of the code used.
Legal consequences of license violations are diverse:
- Cease and desist orders that can stop your software distribution
- Claims for damages for lost license fees
- Obligation to subsequently publish the source code
- Attorney and court costs
Common mistakes in practice arise from a lack of awareness:
- GPL software in proprietary products without source code publication
- Removal or modification of copyright notices
- Mixing incompatible licenses without considering the implications
- lack of documentation of used open source components
Companies can protect themselves by conducting regular license audits, training developers, and using tools for automatic license detection. A clear guideline for the use of open source software helps to avoid problems from the outset.
Various software tools are also available for license audits, some of which are offered commercially or as SaaS. But of course, there are also various open-source tools that support you in the license audit. As an example, we would like to mention the following here:
- FOSSology – an open-source license compliance system that already supports code scanners during the development stage to avoid introducing unwanted license combinations.
- AboutCode ScanCode describes itself as an industry-leading SCA code scanner and can also be integrated into build pipelines for automatic code scanning.
license checkeris particularly exciting for web or web-related developers, as it fits seamlessly into the npm / npx universe.
Of course, the list does not claim to be complete and, as always, can change again and again in the open-source environment.
License Compliance in Daily Business Operations: Processes and Responsibilities
License compliance is not a one-time task, but an ongoing process that must be organizationally anchored. Many companies only react to license violations when legal consequences are imminent—yet most risks can be significantly reduced through proactive measures. Establishing structured compliance processes not only protects against legal problems, but also creates internal clarity about which open-source components are in use and under what conditions they may be used.
The following measures form the foundation of a robust open-source compliance program:
- Establish an open-source policy: Define internally which licenses are allowed, restricted, or completely prohibited in your projects. Such a policy provides developers with clear guidance and prevents problematic licenses from entering your codebase unnoticed.
- Introduce Software Composition Analysis (SCA): Integrate automated SCA tools into your development cycle to continuously capture open-source components used and their licenses and check for compatibility. Tools such as FOSSology or ScanCode can be integrated directly into build pipelines.
- Train developers regularly: License obligations are unfamiliar territory for many developers. Regular training ensures that your team knows the basics and acts in compliance with licenses in daily project work.
- Clearly assign responsibilities: Designate a responsible person or role—such as an Open Source Officer or compliance manager—who maintains an overview of the licenses used and serves as a point of contact for license questions.
Building such structures requires experience and a deep understanding of the open-source license landscape. This is exactly where we support you at credativ®—from developing a tailored open-source policy to implementing appropriate compliance processes in your company.
How credativ® helps with open source licensing issues
We support companies in the practical use of open source software through comprehensive consulting and practical implementation assistance. Our team of Linux specialists and open source experts knows many pitfalls and helps you avoid them while making the most of the benefits of free software.
With over 20 years of experience in the open source field, we understand both the technical and legal challenges. We help you to use open source software safely and effectively in your IT infrastructure without taking legal risks. Our comprehensive services cover all aspects of open source consulting.
Contact us for a non-binding consultation on your open source deployment. Together, we will develop a strategy that harnesses the innovative power of open source software for your company.
In our previous article on Buildah, we explained how to create containers without Docker and root privileges.
This article will focus on how to use those very containers without elevated privileges.
Alongside the already mentioned Buildah and Skopeo, Podman is part of the Red Hat Container Tools and is, in short, a daemonless runtime environment for containers. Like the Docker daemon, it is designed for operating a single host and does not offer cluster functionality.
Development
Podman version 1.0 was released on January 11, 2019, and is also licensed under Apache 2.0.
The implementation is done in Golang and is primarily driven by the “containers organization”. This includes both Red Hat employees and external developers.
The code can be viewed on Github. Development does not follow a fixed release cycle. Thus, there can be months or weeks between versions, depending on when it is decided that enough new features have been implemented for a release.
Podman itself is built entirely on libpod, or one could say that it is the tool for libpod. Therefore, the repository’s name is libpod and not podman.
Containers without Root Privileges
A central component of both Buildah and Podman is libpod, which allows starting containers and creating images with user privileges only.
This relies on slirp4netns, fuse-overlayfs, and /etc/sub(u|g)id.
This topic has already been extensively covered in the Buildah article, which is why it is only referenced here to avoid repetition.
Installation
Podman is directly available in the repositories of common Red Hat distributions.
These can be installed there, depending on the version, via dnf install podman or yum install podman installed.
It should be noted that the packages in CentOS distributions are not necessarily up-to-date. Therefore, it is advisable to switch to Kubic here as well.
For Debian and derivatives, as well as Suse, packages are available in Kubic, similar to Buildah.
Further information can be found in the documentation
[podmanager@buildah ~]$ podman -v
podman version 1.8.2
Configuration
The configuration file for Podman is, similar to Builder, located under /etc/containers/libpod.conf for the global and under ~/.config/containers/libpod.conf for the user-specific configuration.
The template with default values can be found under /usr/share/containers/libpod.conf. However, this should not be adjusted directly, but rather through the two alternatives.
Various parameters for Podman can be configured in the file; such as which CNI plugin should be used, which container runtime, or where the container volumes are located.
An online example can be found on Github
However, no changes are required here for an initial test operation; it merely serves to adapt Podman to your own preferences if necessary.
Working with Podman
Podman was designed as a drop-in replacement for Docker, and therefore most commands like ps, rm, inspect, logs or exec are analogous to Docker and will only be briefly mentioned here if at all. The functionality is not limited to operating containers; it is also possible to create containers to a limited extent. In the background, Podman relies on Buildah’s functionality, but it can only create containers from a Containerfile.
Details can be found in the documentation.
A podman top $ContainerID also works, as does creating, migrating, and restoring a checkpoint.
[user@system1 ~]$ podman container checkpoint <container_id> -e /tmp/checkpoint.tar.gz
[user@system1 ~]$ scp /tmp/checkpoint.tar.gz <destination_system>:/tmp

[user@system2 ~]$ podman container restore -i /tmp/checkpoint.tar.gz
Therefore, the following sections will primarily focus on the differences in container handling between Docker and Podman.
Starting a Container
To start a container of choice (here, postgres), we pull the image and then start it.
[podmanager@buildah ~]$ podman pull postgres
...
Copying config 73119b8892 done
Writing manifest to image destination
Storing signatures
73119b8892f9cda38bb0f125b1638c7c0e71f4abe9a5cded9129c3f28a6d35c3

[podmanager@buildah ~]$ podman inspect postgres | grep "PG_VERSION="
 "PG_VERSION=12.2-2.pgdg100+1",
 "created_by": "/bin/sh -c #(nop) ENV PG_VERSION=12.2-2.pgdg100+1",

[podmanager@buildah ~]$ podman run -d -e POSTGRES_PASSWORD=SuperDB --name=postgres_dev postgres
c8b9732b6ad253710ae6e75f934a74e8469e61bc5b5d88c2fa92c7257d00d2e7
[podmanager@buildah ~]$ podman ps
CONTAINER ID IMAGE COMMAND CREATED STATUS PORTS NAMES
c8b9732b6ad2 docker.io/library/postgres:latest postgres 5 seconds ago Up 4 seconds ago postgres_dev
A PostgreSQL® container named “postgres_dev” is now running. This does not differ from Docker so far.
Podman’s unique feature only becomes apparent in the process list:
podmana+ 2209 1 0 13:11 ? Ssl 0:00 /usr/bin/conmon --api-version 1 -c c8b9732b6ad253710ae6e75f934a74e8469e61bc5b5d88c2fa92c7257d00d2e7 -u c8b9732b6ad253710ae6e75f934a74e8469e61bc5b5d88c2fa92c7257d00d2e7 -r /usr/bin/runc -b

232070 2219 2209 0 13:11 ? Ss 0:00 \_ postgres
The PostgreSQL® process does not run as a child of a daemon process, but rather as a child of the “conmon” component.
This monitors the container’s state after startup. It also provides the socket for communication and the stream for output, which
are written to the log configured by Podman.
Further information on conmon can be found on Github.
If we now start a second container (postgres_prod) via Podman, another conmon process will be started:
[podmanager@buildah ~]$ podman run -d -e POSTGRES_PASSWORD=SuperDB --name=postgres_prod postgres
6581a25c82620c725fe1cfb6546479edac856228ecb3c11ad63ab95a453c1b64

[podmanager@buildah ~]$ podman ps
CONTAINER ID IMAGE COMMAND CREATED STATUS PORTS NAMES
6581a25c8262 docker.io/library/postgres:latest postgres 15 seconds ago Up 15 seconds ago postgres_prod
c8b9732b6ad2 docker.io/library/postgres:latest postgres 7 minutes ago Up 7 minutes ago postgres_dev
podmana+ 2209 1 0 13:11 ? Ssl 0:00 /usr/bin/conmon --api-version 1 -c c8b9732b6ad253710ae6e75f934a74e8469e61bc5b5d88c2fa92c7257d00d2e7 -u c8b9732b6ad253710ae6e75f934a74e8469e61bc5b5d88c2fa92c7257d00d2e7 -r /usr/bin/runc -b
232070 2219 2209 0 13:11 ? Ss 0:00 \_ postgres
...
podmana+ 2337 1 0 13:19 ? Ssl 0:00 /usr/bin/conmon --api-version 1 -c 6581a25c82620c725fe1cfb6546479edac856228ecb3c11ad63ab95a453c1b64 -u 6581a25c82620c725fe1cfb6546479edac856228ecb3c11ad63ab95a453c1b64 -r /usr/bin/runc -b
232070 2348 2337 0 13:19 ? Ss 0:00 \_ postgres
...
Here, the UUIDs of the containers can be found in the process.
The cmdline of the process is, of course, much longer than shown here. Below is a complete example, manually formatted:
[podmanager@buildah ~]$ ps -ef f | grep conmon
...
podmana+ 2209 1 0 13:11 ? Ssl 0:00 /usr/bin/conmon
--api-version 1
-c c8b9732b6ad253710ae6e75f934a74e8469e61bc5b5d88c2fa92c7257d00d2e7
-u c8b9732b6ad253710ae6e75f934a74e8469e61bc5b5d88c2fa92c7257d00d2e7
-r /usr/bin/runc
-b /home/podmanager/.local/share/containers/storage/overlay-containers/c8b9732b6ad253710ae6e75f934a74e8469e61bc5b5d88c2fa92c7257d00d2e7/userdata
-p /var/tmp/run-1002/containers/overlay-containers/c8b9732b6ad253710ae6e75f934a74e8469e61bc5b5d88c2fa92c7257d00d2e7/userdata/pidfile
-l k8s-file:/home/podmanager/.local/share/containers/storage/overlay-containers/c8b9732b6ad253710ae6e75f934a74e8469e61bc5b5d88c2fa92c7257d00d2e7/userdata/ctr.log
--exit-dir /var/tmp/run-1002/libpod/tmp/exits
--socket-dir-path /var/tmp/run-1002/libpod/tmp/socket
--log-level error
--runtime-arg --log-format=json
--runtime-arg --log
--runtime-arg=/var/tmp/run-1002/containers/overlay-containers/c8b9732b6ad253710ae6e75f934a74e8469e61bc5b5d88c2fa92c7257d00d2e7/userdata/oci-log
--conmon-pidfile /var/tmp/run-1002/containers/overlay-containers/c8b9732b6ad253710ae6e75f934a74e8469e61bc5b5d88c2fa92c7257d00d2e7/userdata/conmon.pid
--exit-command /usr/bin/podman
--exit-command-arg --root
--exit-command-arg /home/podmanager/.local/share/containers/storage
--exit-command-arg --runroot
--exit-command-arg /var/tmp/run-1002/containers
--exit-command-arg --log-level
--exit-command-arg error
--exit-command-arg --cgroup-manager
--exit-command-arg cgroupfs
--exit-command-arg --tmpdir
--exit-command-arg /var/tmp/run-1002/libpod/tmp
--exit-command-arg --runtime
--exit-command-arg runc
--exit-command-arg --storage-driver
--exit-command-arg overlay
--exit-command-arg --storage-opt
--exit-command-arg overlay.mount_program=/usr/bin/fuse-overlayfs
--exit-command-arg --storage-opt
--exit-command-arg overlay.mount_program=/usr/bin/fuse-overlayfs
--exit-command-arg --events-backend
--exit-command-arg file
--exit-command-arg container
--exit-command-arg cleanup
--exit-command-arg c8b9732b6ad253710ae6e75f934a74e8469e61bc5b5d88c2fa92c7257d00d2e7
...
The formatting clearly shows how parameters are passed between Podman and conmon via *args.
In addition to conmon, an instance of slirp4netns and fuse-overlayfs is also started for each container to provide network and storage without root privileges.
podmana+ 2201 1 0 13:11 ? Ss 0:00 /usr/bin/fuse-overlayfs -o lowerdir=/home/podmanager/.local/share/containers/storage/overlay/l/FX4RZGGJ5HSNVMGVFG6K3I7PIL:/home/podmanager/.local/share/containers/storage/overlay/l/AIHUOS

podmana+ 2206 1 0 13:11 pts/0 S 0:00 /usr/bin/slirp4netns --disable-host-loopback --mtu 65520 --enable-sandbox -c -e 3 -r 4 --netns-type=path /tmp/run-1002/netns/cni-18902a12-5b1b-15d3-0c31-138efe1d66ba tap0

podmana+ 2209 1 0 13:11 ? Ssl 0:00 /usr/bin/conmon --api-version 1 -c c8b9732b6ad253710ae6e75f934a74e8469e61bc5b5d88c2fa92c7257d00d2e7 -u c8b9732b6ad253710ae6e75f934a74e8469e61bc5b5d88c2fa92c7257d00d2e7 -r /usr/bin/runc -b

232070 2219 2209 0 13:11 ? Ss 0:00 \_ postgres
Creating a Systemd Service File
Since containers run without a daemon and can be started individually, it is also natural to control them via Systemd rather than Docker.
However, writing service files is generally tedious, which is why Podman has a built-in function for this.
Below is an example for our postgres_dev
[podmanager@buildah ~]$ podman generate systemd postgres_dev
# container-c8b9732b6ad253710ae6e75f934a74e8469e61bc5b5d88c2fa92c7257d00d2e7.service
# autogenerated by Podman 1.8.2
# Tue Mar 24 13:47:11 CET 2020

[Unit]
Description=Podman container-c8b9732b6ad253710ae6e75f934a74e8469e61bc5b5d88c2fa92c7257d00d2e7.service
Documentation=man:podman-generate-systemd(1)
Wants=network.target
After=network-online.target

[Service]
Environment=PODMAN_SYSTEMD_UNIT=%n
Restart=on-failure
ExecStart=/usr/bin/podman start c8b9732b6ad253710ae6e75f934a74e8469e61bc5b5d88c2fa92c7257d00d2e7
ExecStop=/usr/bin/podman stop -t 10 c8b9732b6ad253710ae6e75f934a74e8469e61bc5b5d88c2fa92c7257d00d2e7
PIDFile=/var/tmp/run-1002/containers/overlay-containers/c8b9732b6ad253710ae6e75f934a74e8469e61bc5b5d88c2fa92c7257d00d2e7/userdata/conmon.pid
KillMode=none
Type=forking

[Install]
WantedBy=multi-user.target default.target
However, there is still one error here. The user under whom the container should be started must be added to the service file, provided this is not to happen as root. To do this, only [Service] needs to be added to the User=podmanager section (or the username on your system).
To register the container as a service under CentOS 8, the following steps would need to be performed:
[podmanager@buildah ~]$ podman generate systemd --files --name postgres_dev
/home/podmanager/container-postgres_dev.service
# User= add to service file
[podmanager@buildah ~]$ sudo cp /home/podmanager/container-postgres_dev.service /etc/systemd/system/
[podmanager@buildah ~]$ sudo systemctl daemon-reload
[podmanager@buildah ~]$ sudo systemctl start container-postgres_dev.service
[podmanager@buildah ~]$ systemctl status container-postgres_dev.service
● container-postgres_dev.service - Podman container-postgres_dev.service
 Loaded: loaded (/etc/systemd/system/container-postgres_dev.service; disabled; vendor preset: disabled)
 Active: active (running) since Tue 2020-03-24 14:04:14 CET; 1s ago
 Docs: man:podman-generate-systemd(1)
 Process: 7691 ExecStart=/usr/bin/podman start postgres_dev (code=exited, status=0/SUCCESS)
 Main PID: 7717 (conmon)
 Tasks: 11 (limit: 25028)
 Memory: 46.7M
 CGroup: /system.slice/container-postgres_dev.service
 ├─7710 /usr/bin/fuse-overlayfs -o lowerdir=/home/podmanager/.local/share/containers/storage/overlay/l/FX4RZGGJ5HSNVMGVFG6K3I7PIL:/home/podmanager/.local/share/containers/storage/overlay/l/AIHUOSIVGT5DN5GCUR7PRELVKK:/home/podma>
 ├─7714 /usr/bin/slirp4netns --disable-host-loopback --mtu 65520 --enable-sandbox -c -e 3 -r 4 --netns-type=path /tmp/run-1002/netns/cni-a0ee9d78-2f8c-a563-1947-92d0766a43b7 tap0
 ├─7717 /usr/bin/conmon --api-version 1 -c c8b9732b6ad253710ae6e75f934a74e8469e61bc5b5d88c2fa92c7257d00d2e7 -u c8b9732b6ad253710ae6e75f934a74e8469e61bc5b5d88c2fa92c7257d00d2e7 -r /usr/bin/runc -b /home/podmanager/.local/share/c>
 ├─7727 postgres
 ├─7758 postgres: checkpointer
 ├─7759 postgres: background writer
 ├─7760 postgres: walwriter
 ├─7761 postgres: autovacuum launcher
 ├─7762 postgres: stats collector
 └─7763 postgres: logical replication launcher

Mär 24 14:04:13 buildah.localdomain systemd[1]: Starting Podman container-postgres_dev.service...
Mär 24 14:04:14 buildah.localdomain podman[7691]: postgres_dev
Mär 24 14:04:14 buildah.localdomain systemd[1]: Started Podman container-postgres_dev.service.
It is important to mention that containers started via Systemd can of course also be managed/accessed via podman, but that starting and stopping should be left to the service.
Creating a Pod
As the name suggests, Podman not only allows creating containers but also organizing them into pods.
Similar to Kubernetes, a pod represents an organizational grouping of containers that can share certain namespaces such as pids, network, or similar.
These are then administered via podman pod $cmd administered.
Below, we will load the image of the postgres-exporter for Prometheus and create a pod named postgres-prod-pod from it.
[podmanager@buildah ~]$ podman pull docker.io/wrouesnel/postgres_exporter

[podmanager@buildah ~]$ podman pod create --name postgres-prod-pod
727e7544515e0e683525e555934e02a341a42009a9c49fb2fd53094187a1e97c

[podmanager@buildah ~]$ podman run -d --pod postgres-prod-pod -e POSTGRES_PASSWORD=SuperDB postgres:latest
8f313260973ef6eb6fa84d2893875213cee89b48c93d08de7642b0a8b03c4a88

[podmanager@buildah ~]$ podman run -d --pod postgres-prod-pod -e DATA_SOURCE_NAME="postgresql://postgres:password@localhost:5432/postgres?sslmode=disable" postgres_exporter
fee22f24ff9b2ace599831fa022fb1261ef836846e0ba938c7b469d8dfb8a48a

[podmanager@buildah ~]$ podman pod ps
POD ID NAME STATUS CREATED # OF CONTAINERS INFRA ID
727e7544515e postgres-prod-pod Running 48 seconds ago 3 6edc862441f1

[podmanager@buildah ~]$ podman pod inspect postgres-prod-pod
{
 "Config": {
 "id": "727e7544515e0e683525e555934e02a341a42009a9c49fb2fd53094187a1e97c",
 "name": "postgres-prod-pod",
 "hostname": "postgres-prod-pod",
 "labels": {

  },
 "cgroupParent": "/libpod_parent",
 "sharesCgroup": true,
 "sharesIpc": true,
 "sharesNet": true,
 "sharesUts": true,
 "infraConfig": {
 "makeInfraContainer": true,
 "infraPortBindings": null
  },
 "created": "2020-03-24T14:44:27.01249721+01:00",
 "lockID": 0
  },
 "State": {
 "cgroupPath": "/libpod_parent/727e7544515e0e683525e555934e02a341a42009a9c49fb2fd53094187a1e97c",
 "infraContainerID": "6edc862441f18234f0c61693f11d946f601973a71b85fa9d777273feed68ed3c",
 "status": "Running"
  },
 "Containers": [
  {
 "id": "6edc862441f18234f0c61693f11d946f601973a71b85fa9d777273feed68ed3c",
 "state": "running"
  },
  {
 "id": "8f313260973ef6eb6fa84d2893875213cee89b48c93d08de7642b0a8b03c4a88",
 "state": "running"
  },
  {
 "id": "fee22f24ff9b2ace599831fa022fb1261ef836846e0ba938c7b469d8dfb8a48a",
  "state": "running"
  }
 ]
}
It can now be seen that the pod contains both the postgres and postgres-exporter containers (compare UUIDs).
The third container is the infra-container for bootstrapping and will not be discussed further here.
In the process list, this appears as follows:
podmana+ 6279 1 0 14:44 ? Ss 0:00 /usr/bin/fuse-overlayfs -o lowerdir=/home/podmanager/.local/share/containers/storage/overlay/l/
podmana+ 6281 1 0 14:44 pts/2 S 0:00 /usr/bin/slirp4netns --disable-host-loopback --mtu 65520 --enable-sandbox -c -e 3 -r 4 --netns-type=path /tmp/run-1002/netns/cni-5fe4356e-77c0-8127-f72b-7335c2ed05c4 tap0
podmana+ 6284 1 0 14:44 ? Ssl 0:00 /usr/bin/conmon --api-version 1 -c 6edc862441f18234f0c61693f11d946f601973a71b85fa9d777273feed68ed3c -u 6edc862441f18234f0c61693f11d946f601973a71b85fa9d777273feed68ed3c -r /usr/bin/runc -b
podmana+ 6296 6284 0 14:44 ? Ss 0:00 \_ /pause
podmana+ 6308 1 0 14:44 ? Ss 0:00 /usr/bin/fuse-overlayfs -o lowerdir=/home/podmanager/.local/share/containers/storage/overlay/l/FX4RZGGJ5HSNVMGVFG6K3I7PIL:/home/podmanager/.local/share/containers/storage/overlay/l/AIHUOS
podmana+ 6312 1 0 14:44 ? Ssl 0:00 /usr/bin/conmon --api-version 1 -c 8f313260973ef6eb6fa84d2893875213cee89b48c93d08de7642b0a8b03c4a88 -u 8f313260973ef6eb6fa84d2893875213cee89b48c93d08de7642b0a8b03c4a88 -r /usr/bin/runc -b
232070 6322 6312 0 14:44 ? Ss 0:00 \_ postgres
...
232070 6549 6322 0 14:44 ? Ss 0:00 \_ postgres: postgres postgres ::1(51290) idle
podmana+ 6520 1 0 14:44 ? Ss 0:00 /usr/bin/fuse-overlayfs -o lowerdir=/home/podmanager/.local/share/containers/storage/overlay/l/P5NJW4TB6JUFOBBIN2MOHW7272:/home/podmanager/.local/share/containers/storage/overlay/l/KVC54Z
podmana+ 6523 1 0 14:44 ? Ssl 0:00 /usr/bin/conmon --api-version 1 -c fee22f24ff9b2ace599831fa022fb1261ef836846e0ba938c7b469d8dfb8a48a -u fee22f24ff9b2ace599831fa022fb1261ef836846e0ba938c7b469d8dfb8a48a -r /usr/bin/runc -b
251072 6534 6523 0 14:44 ? Ssl 0:00 \_ /postgres_exporter
Here you can see that although there are several conmon and overlayfs processes for the containers, there is only one slirp4netns, as the containers share this and can also communicate via localhost.
You can also see that the PostgreSQL® database has a connection from localhost (PID 6549), which is the exporter.
Normally, when creating a pod via podman pod create, the following namespaces are grouped for the containers: net, ipc, uts, and user.
Thus, each container still has its own PID namespace despite being grouped in the pod.
However, if this is desired, the parameter --share can be used during creation to specify what should be shared.
For example, this is what the process list of the pod without a shared PID namespace looks like. Each container has its own process structure.
[podmanager@buildah ~]$ podman pod top postgres-prod-pod
USER PID PPID %CPU ELAPSED TTY TIME COMMAND
0 1 0 0.000 11m45.845291911s ? 0s /pause
postgres 1 0 0.000 11m45.854330176s ? 0s postgres
postgres 25 1 0.000 11m45.854387876s ? 0s postgres: checkpointer
postgres 26 1 0.000 11m45.854441615s ? 0s postgres: background writer
postgres 27 1 0.000 11m45.854483844s ? 0s postgres: walwriter
postgres 28 1 0.000 11m45.854525645s ? 0s postgres: autovacuum launcher
postgres 29 1 0.000 11m45.854567082s ? 0s postgres: stats collector
postgres 30 1 0.000 11m45.854613262s ? 0s postgres: logical replication launcher
postgres 31 1 0.000 11m45.854653703s ? 0s postgres: postgres postgres ::1(51292) idle
postgres_exporter 1 0 0.000 11m45.859505449s ? 0s /postgres_exporter
As an alternative, the output when creating the pod using podman pod create --name postgres-prod-pod --share=pid,net,ipc,uts,user
[podmanager@buildah ~]$ podman pod top postgres-prod-pod
USER PID PPID %CPU ELAPSED TTY TIME COMMAND
root 1 0 0.000 20.396867487s ? 0s /pause
postgres 6 0 0.000 20.396936905s pts/0 0s postgres
postgres 60 6 0.000 18.396997034s ? 0s postgres: checkpointer
postgres 61 6 0.000 18.397086198s ? 0s postgres: background writer
postgres 62 6 0.000 18.39713465s ? 0s postgres: walwriter
postgres 63 6 0.000 18.39718056s ? 0s postgres: autovacuum launcher
postgres 64 6 0.000 18.397229737s ? 0s postgres: stats collector
postgres 65 6 0.000 18.397279102s ? 0s postgres: logical replication launcher
20001 66 0 0.000 16.397325377s pts/0 0s /postgres_exporter
Available options for --share are ipc, net, pid, user, and uts.
The entire pod can now also be started and stopped via podman pod stop/start.
Similarly, systemd service files can be generated for pods as well as containers.
Podman and Kubernetes
Podman offers some support in the area of Kubernetes YAML.
For example, it is possible to generate Kubernetes Pod YAML from pods created with Podman.
[podmanager@buildah ~]$ podman generate kube postgres-prod-pod -f postgres-prod-pod.yaml
[podmanager@buildah ~]$ cat postgres-prod-pod.yaml
# Generation of Kubernetes YAML is still under development!
#
# Save the output of this file and use kubectl create -f to import
# it into Kubernetes.
#
# Created with podman-1.8.2
apiVersion: v1
kind: Pod
metadata:
 creationTimestamp: "2020-03-24T14:08:14Z"
 labels:
 app: postgres-prod-pod
 name: postgres-prod-pod
spec:
 containers:
 - command:
 - postgres
 env:
  ...
 image: docker.io/library/postgres:latest
 name: reverentptolemy
 resources: {}
 securityContext:
 allowPrivilegeEscalation: true
 capabilities: {}
 privileged: false
 readOnlyRootFilesystem: false
 seLinuxOptions: {}
 workingDir: /
 - env:
  ...
 image: docker.io/wrouesnel/postgres_exporter:latest
 name: friendlyshirley
  resources: {}
  securityContext:
  allowPrivilegeEscalation: true
  capabilities: {}
  privileged: false
  readOnlyRootFilesystem: false
 runAsGroup: 20001
 runAsUser: 20001
  seLinuxOptions: {}
  workingDir: /
status: {}
With the -s option, a service with potentially published ports is even generated:
---
apiVersion: v1
kind: Service
metadata:
 creationTimestamp: "2020-03-24T14:10:42Z"
  labels:
  app: postgres-prod-pod
  name: postgres-prod-pod
spec:
 selector:
  app: postgres-prod-pod
 type: NodePort
status:
 loadBalancer: {}
The generate-yaml functionality applies to both pods and services, and in both directions.
With podman play, it is possible to test pod and container definitions in Podman.
Conclusion
This was a brief overview of the possibilities for running containers without a daemon and root privileges on a host.
Of course, much more is possible with Podman, but explaining every option here would go beyond the scope.
It is perhaps also worth mentioning that Podman with cgroupsV2 enabled can also evaluate resource usage in pods, for example.
However, this is currently only enabled by default under Fedora 31.