The Linux® installation for beginners may seem complex at first glance, but with the right guidance, switching to the open-source operating system is entirely achievable. Linux® offers security and stability as well as full cost transparency with no licensing fees. This guide walks you through the key steps for a successful Linux installation and shows you what to pay attention to. From choosing the right distribution to the initial configuration, you will receive practical tips to help you get started in the Linux world. (more…)
The Linux® market share is expected to continue growing through 2026, particularly in the areas of servers, cloud computing, and enterprise solutions. While Linux® still occupies a niche in desktop systems, it is already widely adopted in servers and cloud infrastructures. This development significantly influences corporate decisions, as Linux & Open Source solutions offer both cost savings and technical flexibility.
What does the current Linux market share mean for companies?
Linux® currently holds approximately 3% of the desktop market, but is represented with over 70% in the server sector and nearly 100% of the world’s top 500 supercomputers. This distribution clearly shows in which areas Linux & Open Source is deployed and what strategic opportunities companies can derive from this.
In the server segment, companies use Linux® due to its stability, security, and cost efficiency. Cloud providers such as Amazon Web Services®, Google Cloud®, and Microsoft® Azure® base their infrastructures largely on Linux systems. This widespread adoption makes Linux expertise relevant for IT teams.
For business decisions, this specifically means:
- Reduced licensing costs by eliminating proprietary operating system licenses
- Flexibility in adapting systems to specific requirements
- Security through transparent source code and rapid patch cycles
- Independence from individual vendors and their licensing policies
Mobile devices further reinforce this trend, as Android® is based on the Linux kernel and thus accounts for a large share of mobile operating systems. This widespread adoption creates an ecosystem in which Linux competencies are becoming increasingly relevant.
How is Linux developing compared to other operating systems?
Linux® shows different development patterns compared to Windows® and macOS® depending on the area of deployment. While Windows continues to lead the desktop market, Linux is continuously gaining market share in the server sector with distributions such as Ubuntu®, Red Hat® Enterprise Linux, and SUSE®.
In enterprise environments, Linux is valued for its adaptability and the ability to tailor systems precisely to corporate requirements. Windows remains established in office environments, but comes with licensing costs.
The characteristics of Linux are particularly evident in:
- Container technologies and microservice architectures
- Cloud-native applications and DevOps environments
- IoT devices and embedded systems
- High-performance computing and scientific applications
macOS® maintains its position in creative industries, while Linux grows in technical and development-oriented environments. This specialization leads many companies to pursue hybrid approaches, deploying different operating systems depending on the use case.
The trend shows: Linux gains market share wherever technical flexibility, cost efficiency, and adaptability are relevant. Linux & Open Source technologies thus become a strategic option for forward-thinking companies.
Which factors will influence Linux growth until 2026?
Linux growth through 2026 will be primarily driven by cloud computing, containerization, and digital transformation. These technology trends increase demand for flexible, cost-effective, and secure operating systems, making Linux & Open Source solutions increasingly relevant.
Cloud computing remains a key growth driver. Since most cloud infrastructures are based on Linux, Linux usage automatically increases with cloud adoption. Companies migrating their workloads to the cloud inevitably encounter Linux systems.
Container technologies such as Docker® and Kubernetes® or virtualization with, for example, Proxmox®, which primarily run on Linux, are changing how applications are developed and deployed. These technologies enable companies to scale and manage applications more efficiently.
Other decisive factors include:
- Internet of Things (IoT) – Linux runs on many IoT devices due to its adaptability
- Cost savings – no license fees and reduced hardware requirements
- Security aspects – transparent code and fast security updates
- Edge Computing – Linux is well-suited for decentralized computing architectures
- Artificial Intelligence – most AI frameworks run on Linux
The growing importance of open source in digital transformation further reinforces this development. Companies are increasingly recognizing the value of open standards and vendor-independent solutions for their long-term IT strategy.
Why are more and more German companies relying on Linux?
German companies are increasingly turning to Linux because it complies with the strict data protection requirements of the GDPR and allows full control over data processing and storage. The transparency of Linux & Open Source systems significantly facilitates the fulfillment of compliance requirements.
Regulatory aspects play a decisive role. German authorities and companies value the ability to audit the source code and ensure that no hidden functions or backdoors exist. This transparency is particularly important for critical infrastructures and sensitive data processing.
Cost factors further reinforce Linux adoption in Germany. Small and medium-sized enterprises can achieve significant savings by eliminating licensing costs, which can then be invested in other areas of digitalization.
Specific aspects for German companies:
- Data sovereignty through full control over IT systems
- Independence from individual technology vendors
- Support for the European digital strategy
- Promotion of local IT expertise and innovation
- Long-term planning security without licensing surprises
The German preference for engineering excellence and technical perfection aligns with the Linux philosophy. Open source enables German companies to optimize systems according to their exact requirements while meeting high quality standards.
How credativ® helps with Linux migration and support
credativ® has been supporting companies since 1999 in the successful introduction and operation of Linux systems through comprehensive consulting, professional migration, and continuous 24/7 support. As a vendor-independent company, we offer tailored Linux & Open Source solutions for every company size.
Our Linux services include:
- Strategic consulting for Linux migrations and system architectures
- Professional migration of existing systems to Linux platforms
- 24/7 support for Debian Linux, PostgreSQL®, and other open-source projects
- Training and knowledge transfer for internal IT teams
- Long-term maintenance and optimization of Linux infrastructures
As a German company, we understand the specific requirements of the German market, including data protection regulations and compliance requirements. Our support team consists exclusively of permanent specialists without an intermediate call center.
Would you like to leverage the possibilities of Linux for your company? Contact us for a no-obligation consultation and learn how we can successfully implement your Linux migration. Schedule an appointment with our Linux experts today.
Transparency notice
credativ® is an authorized reseller for Red Hat® (Red Hat Inc.) and PostgreSQL® Competence Center (PostgreSQL Community). Linux® is a registered trademark of Linus Torvalds. Windows®, Microsoft®, and Azure® are registered trademarks of Microsoft Corporation. Amazon Web Services® is a registered trademark of Amazon.com Inc. Google Cloud® is a registered trademark of Google LLC. Android® is a registered trademark of Google LLC. Ubuntu® is a registered trademark of Canonical Ltd. SUSE® is a registered trademark of SUSE LLC. Docker® is a registered trademark of Docker Inc. Kubernetes® is a registered trademark of the Cloud Native Computing Foundation. macOS® is a registered trademark of Apple Inc.
The mention of trademarks serves solely for the factual description of migration scenarios and services of credativ GmbH. There is no business relationship with the mentioned trademark owners.
Introduction
When it comes to providing extended support for end-of-life (EOL) Linux distributions, the traditional method of building packages from sources may present certain challenges. One of the biggest challenges is the need for individual developers to install build dependencies on their own build environments. This often leads to different build dependencies being installed, resulting in issues related to binary compatibility. Additionally, there are other challenges to consider, such as establishing an isolated and clean build environment for different package builds in parallel, implementing an effective package validation strategy, and managing repository publishing, etc.
To overcome these challenges, it is highly recommended to have a dedicated build infrastructure that enables the building of packages in a consistent and reproducible way. With such an infrastructure, teams can address these issues effectively, and ensures that the necessary packages and dependencies are available, eliminating the need for individual developers to manage their own build environments.
OpenSUSE’s Open Build Service (OBS) provides a widely recognized public build infrastructure that supports RPM-based, Debian-based, and Arch-based package builds. This infrastructure is well-regarded among users who require customized package builds on major Linux distributions. Additionally, OBS can be deployed as a private instance, offering a robust solution for organizations engaged in private software package builds. With its extensive feature set, OBS serves as a comprehensive build infrastructure that meets the requirements of teams to build security-patched package on top of already existing packages in order to extend the support of end-of-life (EOL) Linux distributions, for example.
Facts
On June 30, 2024, two major Linux distributions, Debian 10 “Buster” and CentOS 7, have reached their End-of-Life (EOL) status. These distributions gained widespread adoption in numerous large enterprise environments. However, due to various factors, organizations may face challenges in completing migration processes in a timely manner, requiring temporary extended support for these distributions.
When a distribution reaches its End-of-Life (EOL) support from upstream, mirrors and corresponding infrastructure are typically removed. This creates a significant challenge for organizations still using those distributions and seeking extended support, as they not only require access to a local offline mirror but also need the infrastructure to rebuild packages in such a way that is consistent with their former original upstream builds whenever there is a need to rebuild packages for security reasons.
Goal
To provide utilities that support teams building packages, OBS is able to help them. Thereby, it also helps them to have a build infrastructure that builds all existing source and binary packages along with their security patches in a semi-original build environment, further extending their support of EOL Linux distributions. This is achieved by keeping package builds at a similar level of quality and compatibility to their former original upstream builds.
Requirements
To achieve the goal mentioned above, two essential components are required:
- Local mirror of the EOL Linux distribution
- Private OBS instance.
In order to set up a private OBS instance, you can fetch OBS from the upstream GitHub repository and install as well as build it on your local machine, or alternatively, you can simply download the OBS Appliance Installer to integrate a private OBS instance as a new build infrastructure.
Keep in mind that the local mirror typically doesn’t contain the security patches to properly extend the support of the EOL distribution. Just rebuilding the existing packages won’t automatically extend the support of such distributions. Either those security patches must be maintained by the teams themselves and added to the package update by hand, or they are obtained from an upstream project that provides those patches already.
Nevertheless, once the private OBS instance is successfully installed, it can then be linked with the local offline mirror that the team wants to extend the support for, and be configured as a semi-original build environment. By doing so, the build environment can be configured as close as possible to the original upstream build environment to keep a similar level of quality and compatibility although packages might get built for security update with new patches.
This way, the already ended support of a Linux distribution can be extended because a designated team can not only build packages on their own but also provide patches for packages that are affected by bugs or security vulnerabilities.
Achievement
The OBS build infrastructure provides a semi-original build environment to simplify the package building process, reduce inconsistencies, and achieve reproducibility. By adopting this approach, teams can simplify their development and testing workflows and enhance the overall quality and reliability of the generated packages.
Demonstrates
Allow us to demonstrate how OBS can be utilized as a build infrastructure for teams in order to provide the build and publish infrastructure needed for extending the support of End-of-Life (EOL) Linux distributions. However, please note that the following examples are purely for demonstration purposes and may not precisely reflect the specific approach.
Config OBS
Once your private OBS instance is set up, you can log in to OBS by using its WebUI. You must use the ‘Admin‘ account with its default password ‘opensuse‘. After that, you can create a new project for the EOL Linux distribution as well as add users and groups for teams that are going to work on this project. In addition, you must link your project with a local mirror of the EOL Linux distribution and customize your OBS project to replicate the former upstream build environment.
OBS supports the Download on Demand (DoD) feature that can establish a connection with a local mirror on the OBS instance with the designated project within OBS to fetch build dependencies on-demand during the build process. This simplifies the build workflow and reduces the need for manual intervention.
Note: some configurations are only available with the Admin account, including Manage Users, Groups and Add Download on Demand (DoD) Repository.
Now, let’s dive into the OBS configuration of such a project.
Where to Add DoD Repository
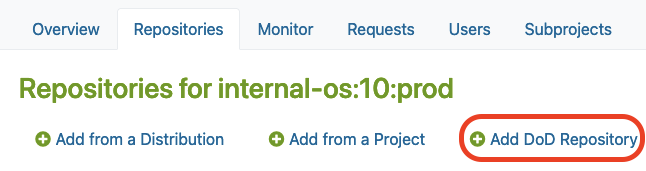
After you created a new project in OBS, you may find the “Add DoD Repository” option in the Repositories tab under the ‘Admin’ account.
There, you must click the Add DoD Repository button as shown below:
Link your local mirror via DoD
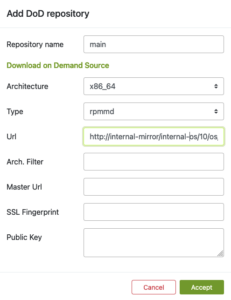
Next, you can provide a URL to link your local mirror via “Add DoD Repository“.
By doing so, you are going to configure the DoD repository. For this, you have to:
- Name the DoD Repo
- Provide a URL that points to the local mirror that is going to be used as a base for building packages in our project
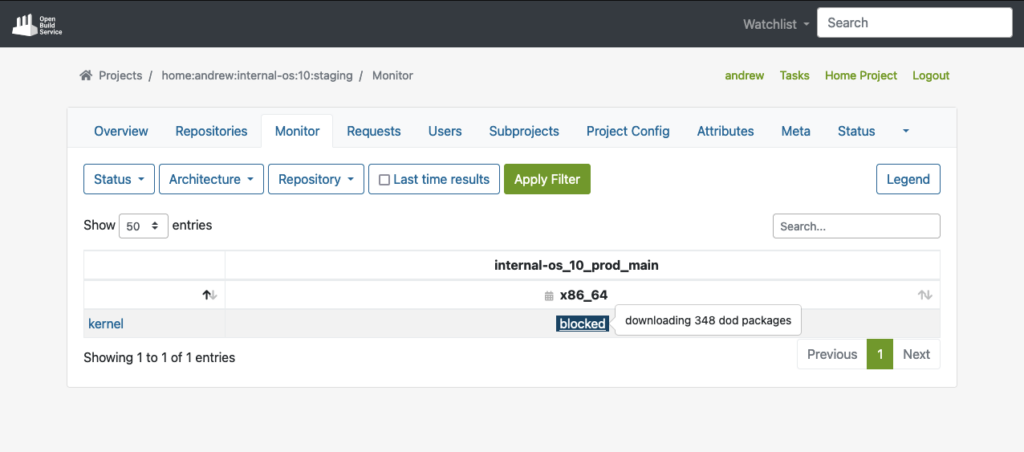
The build dependencies should now be available for OBS to download automatically via the DoD feature.
As you can see in the example below, OBS was able to fetch all the build dependencies for the shown “kernel” package via DoD before it actually started to build the package:
However, after you connected the local mirror with the EOL Linux Distribution, we should also customize the project configuration to re-create the semi-original build environment of the former upstream project in our OBS project.
Project Config
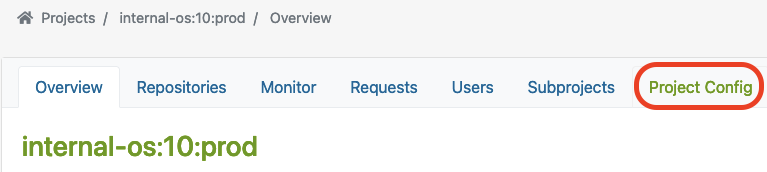
OBS offers a customizable build environment via Project Config, allowing teams to meet specific project requirements.
It allows teams to customize the build environment through the project configuration, enabling them to define macros, packages, flags, and other build-related settings. This helps to adapt their project to all requirements needed to keep the compatibility with the original packages.
You can find the Project Config here:
Let’s have a closer look at some examples showing how the project configuration could look like for building RPM-based packages or Debian-based packages.
Depending on the actual package type that has been used by the EOL Linux distribution, the project configuration must be adjusted accordingly.
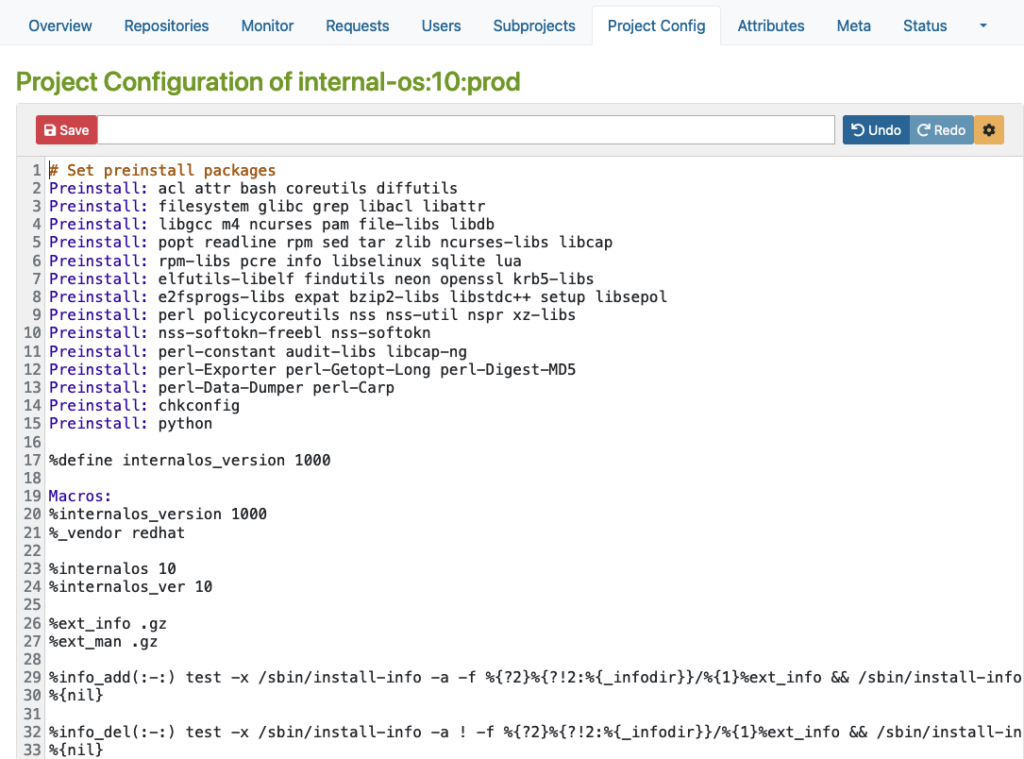
RPM-based config
Here is an example for an RPM-based distribution where you can define macros, packages, flags, and other build-related settings.
Please note that this example is only for demonstration purposes:
Debian based config
Then, there is another example for Debian-based distribution where you can specify Repotype: debian, define preinstalled packages, and build-related settings in the build environment.
Again, please note that this example is for demonstration purposes only:
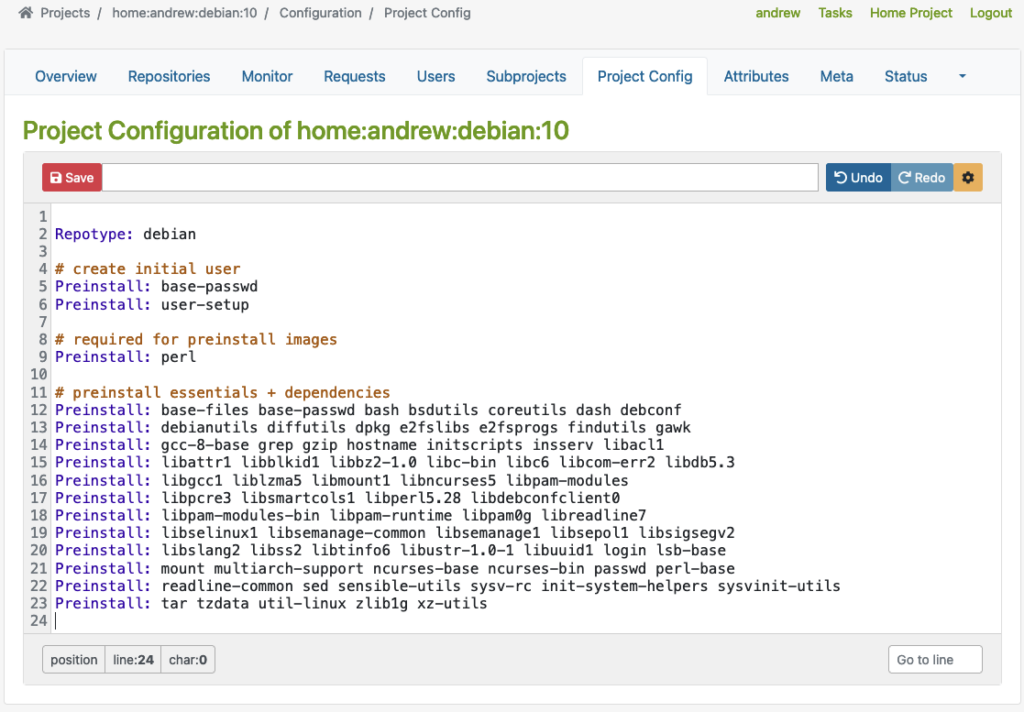
As you can see in the examples above, the Repotype defines the repository format for the published repositories. Preinstall defines packages that should be available in the build environment while building other packages. You may find more details about the syntax in the Build Configuration chapter in the manual provided by OpenSuSE.
With this customizable build environment feature, each build starts in a clean chroot or KVM environment, providing consistency and reproducibility in the build process. Teams may have different build environments in different projects that are isolated and can be built in parallel. The separated projects together, with dedicated chroot or KVM environments for building packages prevent interference or conflicts between builds.
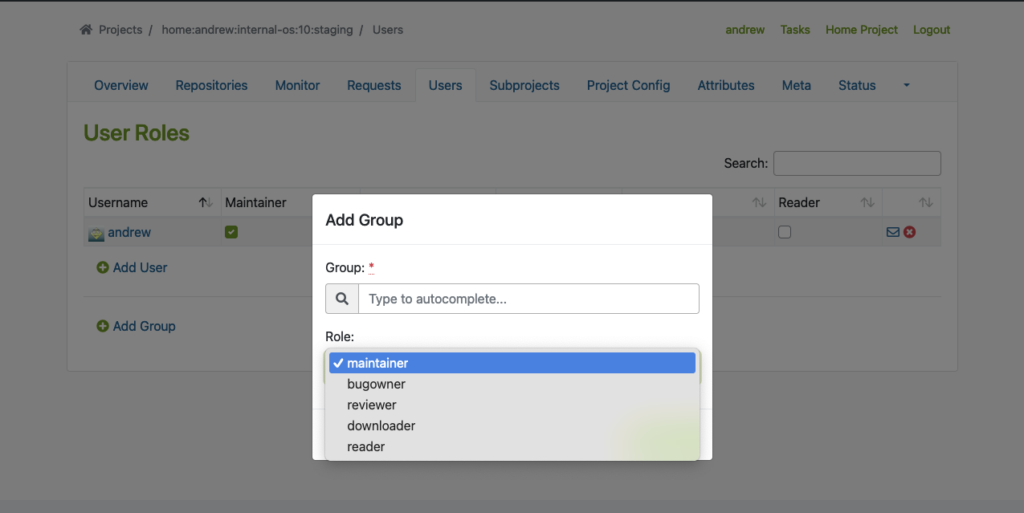
User Management
In addition to projects, OBS offers flexible access control, allowing team members to have different roles and permissions for various projects or distributions. This ensures efficient collaboration and streamlined workflow management.
To use this feature properly, we must create Users and Groups by using the Admin account in OBS. You may find the ‘Users‘ tab within the project where you can add users and groups with different roles.
The following example shows how to add users and groups in a given project:
Flexible Project Setup
OBS allows teams to create separate projects for development, staging, and publishing purposes. This controlled workflow ensures thorough testing and validation of packages before they are submitted to the production project for publishing.
Testing Strategy with Projects
Before packages are released and published, proper testing of those packages is crucial. To achieve this, OBS offers repository publish integration that helps to implement a Testing Strategy. Developers may get their packages published in a corresponding Staging repository first before starting the validation process of the packages, so that they can be submitted to the Production project. From there, they will then be published and made available to other systems.
It seamlessly integrates with local repository publishing, ensuring that all packages in the build process are readily available. This eliminates the need for additional configuration on internal or external repositories.
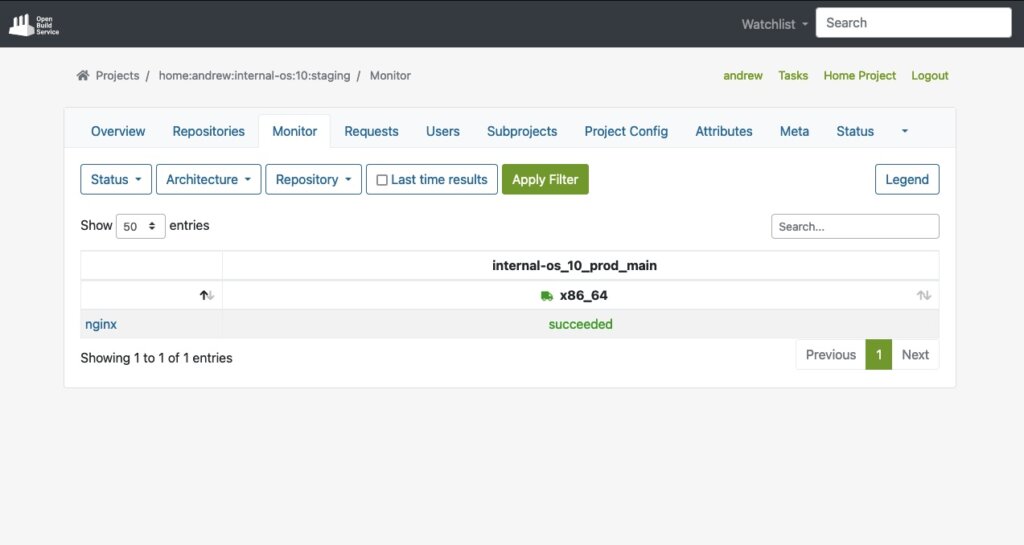
The next example shows a ‘home:andrew:internal-os:10:staging’ project, which is used as a staging purposed repository. There, we import the nginx source package to build and validate it afterward.
Start the Build Process
Once the build dependencies are downloaded via DoD, the build process starts automatically.
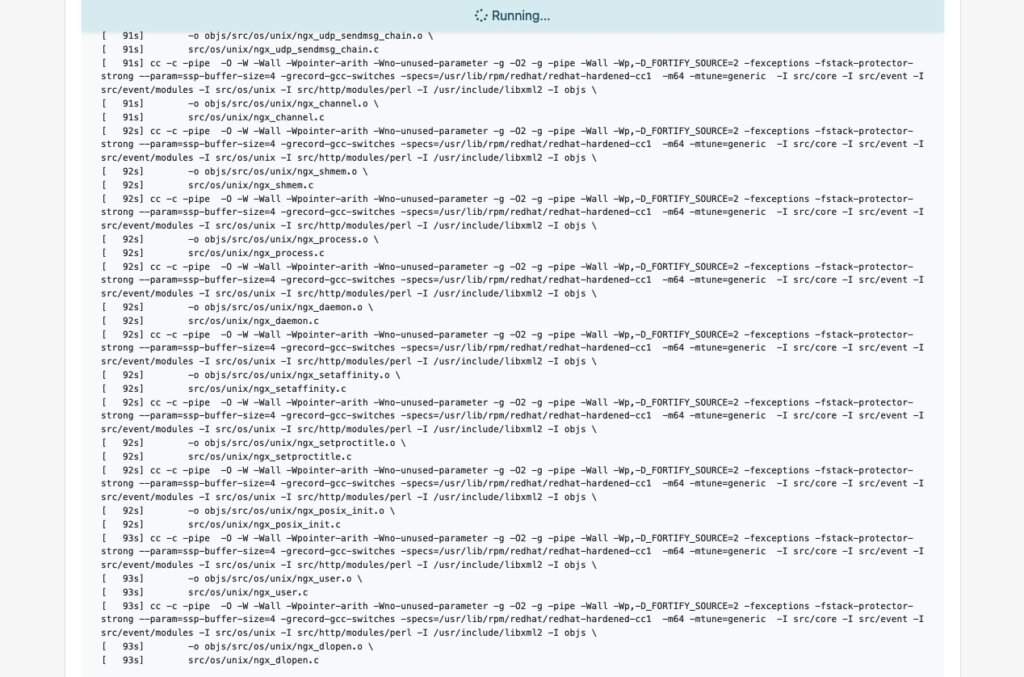
As soon as the build process for a package like ‘nginx’ succeeds, we will also see it in the interface:
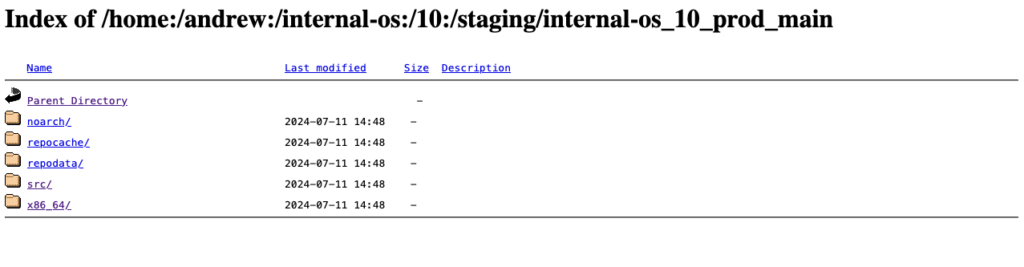
Last but not least, the package will automatically be published into a repository that is ready to be used with package managers like YUM. In our test case, the YUM-ready repository helps us to easily perform validation by conducting tests on VM or actual hardware.
Below, you can see an example of this staging repository (Index of the YUM-ready staging repository):
Please note: To meet the testing strategy in our example, packages should only be submitted to the Prod project once they have successfully passed the validation process in the Staging repository.
Submit to Prod after Validation
As soon as we validate the functionality of a package in the staging project and repository, we can move on by submitting the package to the production project. Underneath the package overview page (e.g., in our case, the ‘nginx’ package), you can find the Submit Package button to start this process:

In our example, we use the ‘internal-os:10:prod’ project for the Production repository. Previously, we built and validated the ‘nginx’ package in the Staging repository. Now we want to submit this package into the Production project which we call ‘internal-os:10:prod’.
Once you click “Submit package“, the following dialog should pop up. Here, you can fill out the form to submit the newly built package to production:
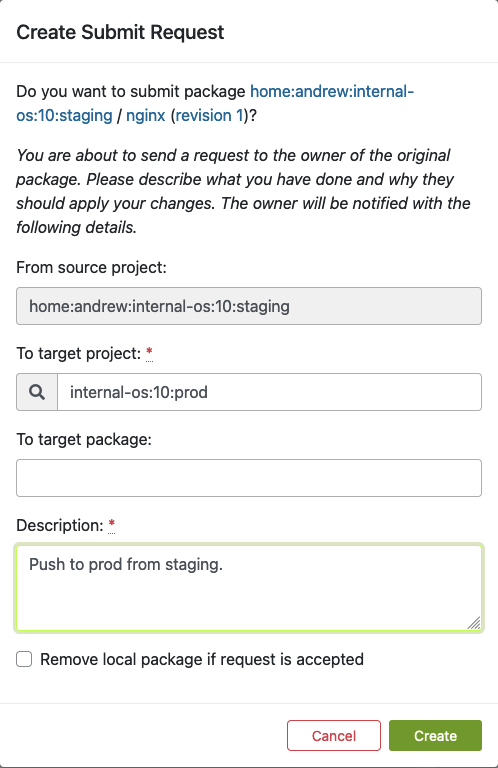
Fill out this form and click ‘Create’ as soon as you are ready to submit the new package to the production project.
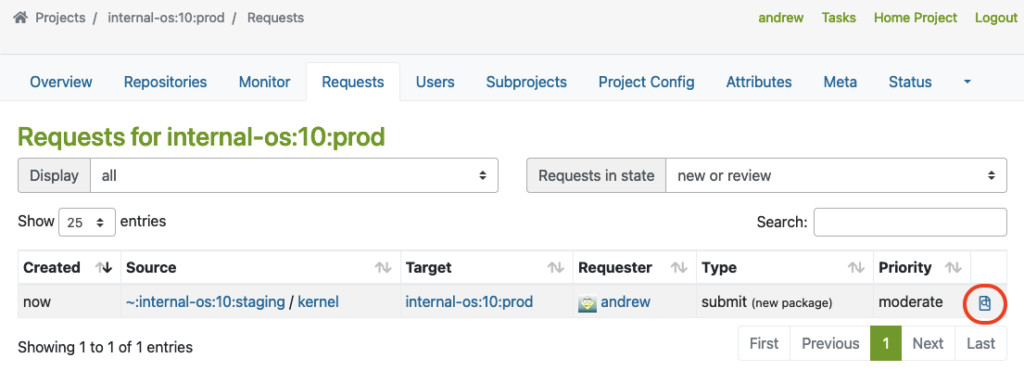
Find Requests
Next to submitting a package, a so-called repository master must approve the newly created requests for the designated project. This master can find a list of all requests in the Requests tab, where he/she can do the Request Review Control.
The master can find ‘Requests‘ in the project overview page like this:
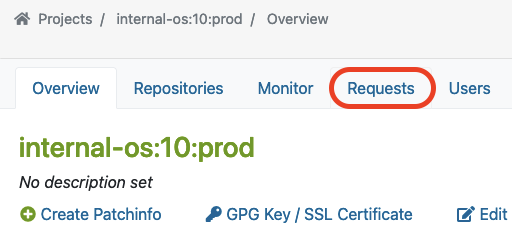
Here, you can see an example of a package that was submitted from Staging to the Prod project.
The master must click on the link marked with a red circle to perform the Request Review Control:
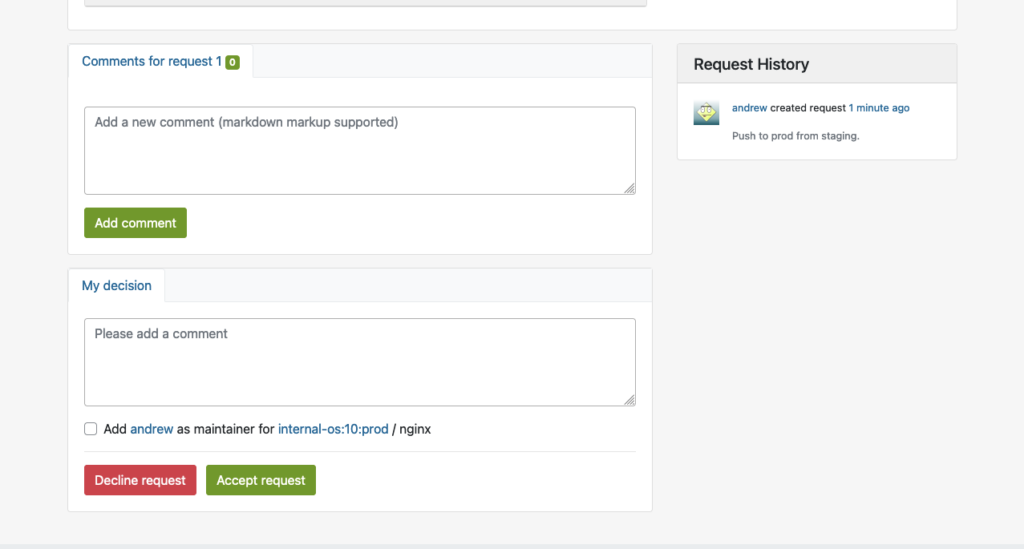
This will bring up the interface for Request Review Control, in which the repository master from the production project may decline or accept the package request:
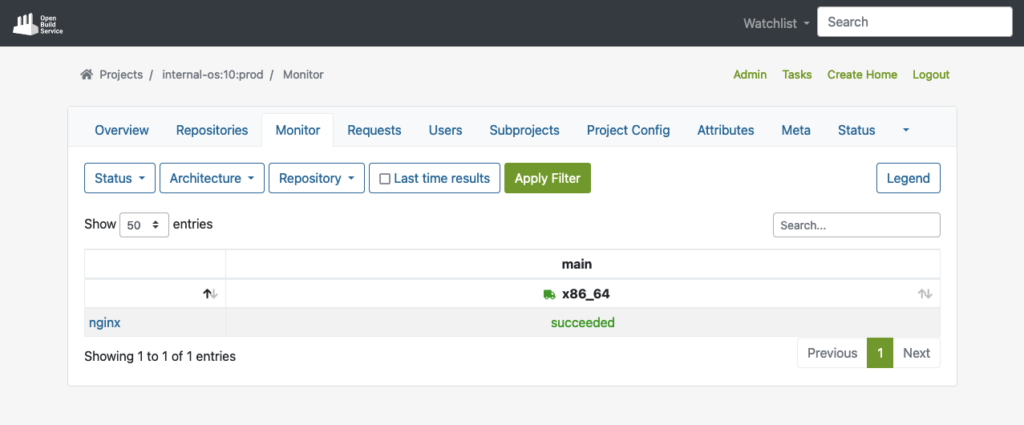
Reproduce in Prod Project
Once the package is accepted into the production project, it will automatically download all required dependencies from DoD, and reproduce the build process.
The example below shows the successfully built package in the production repo after the build process has been completed:
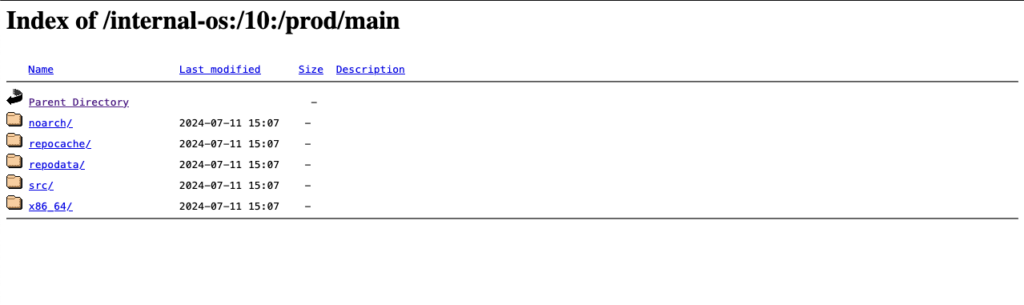
Publish to YUM-ready repository for Prod
Finally, the package will then also be published to the YUM-ready Prod repository as soon as the package has been built successfully. Here, you can see an example of the YUM-ready Prod repository that OBS handles.
(Note: you can name the project and repository name on your preferences):
Extras
In this chapter, we want to have a look at some possible extra customizations for OBS in your build infrastructures.
Automated Build Pipelines
OBS supports automated builds that may seamlessly integrate into delivery pipelines. Teams can set up CI triggers to commit new packages into OBS to initiate builds automatically based on predefined criteria, reducing manual effort and ensuring timely delivery of updated packages.
Packages get automated builds when committed into an OBS project, which enables administrators to easily integrate automated builds via pipelines:

OBS Worker
Further, the Open Build Service is capable of configuring multiple workers (builders) in multiple architectures. If you want to build with other architectures, just install the ‘obs-worker’ package on another hardware with a different architecture and then simply edit the /etc/sysconfig/obs-server file.
In that file, you must set at least those parameters on the worker node:
- OBS_SRC_SERVER
- OBS_REPO_SERVERS
- OBS_WORKER_INSTANCES
This method may also be useful if you want to have more workers in the same architecture available in OBS. The OpenSUSE’s public OBS instance has a large-scale setup which is a good example of this.
Emulated Build
In Open Build Service, it is also possible to configure emulated builds for cross-architecture build capabilities via QEMU. By using this feature, almost no changes are needed in package sources. Developers can build on target architectures without the need for other hardware architectures to be available. However, you might encounter problems with bugs or missing support in QEMU, and emulation may slow down the build process significantly. For instance, see how OpenSuSE managed this on RISC-V when they didn’t have the real hardware in the initial porting stage.
Conclusion
Integrating a private OBS instance as the build infrastructure provides teams a robust and comprehensive solution to build security-patched package for extended support of end-of-life (EOL) Linux distributions. By doing so, teams can unify the package building process, reduce inconsistencies, and achieve reproducibility. This approach simplifies the development and testing workflow while enhancing the overall quality and reliability of the generated packages. Additionally, by replicating the semi-original build environment, the resulting packages builds in the similar level of quality and compatibility to upstream builds.
If you are interested in integrating a private build infrastructure, or require extended support for any EOL Linux distribution. Please reach out to us. Our team is equipped with the expertise to assist you in integrating a private OBS instance into your exist infrastructure.
This article was originally written by Andrew Lee.
With version 256, systemd introduced run0. Lennart Poettering describes run0 as an alternative to sudo and explains on Mastodon at the same time what he sees as the problem with sudo.
In this blog post, however, we do not want to go into the strengths or weaknesses of sudo, but take a closer look at run0 and use it as a sudo alternative.
Unlike sudo, run0 uses neither the configuration file /etc/sudoers nor a SUID bit to extend user permissions. In the background, it uses systemd-run to start new processes, which has been in systemd for several years.
PolKit is used when it comes to checking whether a user has the appropriate permissions to use run0. All rules that the configuration of PolKit provides can be used here. In our example, we will concentrate on a simple variant.
Experimental Setup
For our example, we use an t2.micro EC2 instance with Debian Bookworm. Since run0 was only introduced in systemd version 256 and Debian Bookworm is still delivered with version 252 at the current time, we must first add the Debian Testing Repository.
❯ ssh admin@2a05:d014:ac8:7e00:c4f4:af36:3938:206e
…

admin@ip-172-31-15-135:~$ sudo su -

root@ip-172-31-15-135:~# cat  <
/etc/apt/sources.list.d/testing.list
>  deb https://deb.debian.org/debian testing main
> EOF

root@ip-172-31-15-135:~# apt update
Get:1 file:/etc/apt/mirrors/debian.list Mirrorlist [38 B]
Get:5 file:/etc/apt/mirrors/debian-security.list Mirrorlist [47 B]
Get:7 https://deb.debian.org/debian testing InRelease [169 kB]
Get:2 https://cdn-aws.deb.debian.org/debian bookworm InRelease [151 kB]
…
Fetched 41.3 MB in 6s (6791 kB/s)
Reading package lists... Done
Building dependency tree... Done
Reading state information... Done
299 packages can be upgraded. Run 'apt list --upgradable' to see them.

root@ip-172-31-15-135:~# apt-cache policy systemd
systemd:
Installed: 252.17-1~deb12u1
Candidate: 256.1-2
Version table:
256.1-2 500
500 https://deb.debian.org/debian testing/main amd64 Packages
254.5-1~bpo12+3 100
100 mirror+file:/etc/apt/mirrors/debian.list bookworm-backports/main amd64 Packages
252.22-1~deb12u1 500
500 mirror+file:/etc/apt/mirrors/debian.list bookworm/main amd64 Packages
*** 252.17-1~deb12u1 100
100 /var/lib/dpkg/status
root@ip-172-31-15-135:~# apt-get install systemd
…

root@ip-172-31-15-135:~# dpkg -l | grep systemd
ii libnss-resolve:amd64 256.1-2 amd64 nss module to resolve names via systemd-resolved
ii libpam-systemd:amd64 256.1-2 amd64 system and service manager - PAM module
ii libsystemd-shared:amd64 256.1-2 amd64 systemd shared private library
ii libsystemd0:amd64 256.1-2 amd64 systemd utility library
ii systemd 256.1-2 amd64 system and service manager
ii systemd-cryptsetup 256.1-2 amd64 Provides cryptsetup, integritysetup and veritysetup utilities
ii systemd-resolved 256.1-2 amd64 systemd DNS resolver
ii systemd-sysv 256.1-2 amd64 system and service manager - SysV compatibility symlinks
ii systemd-timesyncd 256.1-2 amd64 minimalistic service to synchronize local time with NTP servers

root@ip-172-31-15-135:~# reboot
…
The user admin is used for the initial login. This user has already been stored in the file /etc/sudoers.d/90-cloud-init-users by cloud-init and can therefore execute any sudo commands without being prompted for a password.
sudo cat /etc/sudoers.d/90-cloud-init-users
# Created by cloud-init v. 22.4.2 on Thu, 27 Jun 2024 09:22:48 +0000

# User rules for admin
admin ALL=(ALL) NOPASSWD:ALL
Analogous to sudo, we now want to enable run0 for the user admin.
Without further configuration, the user admin receives a login prompt asking for the root password. This is the default behavior of PolKit.
admin@ip-172-31-15-135:~$ run0 ==== AUTHENTICATING FOR org.freedesktop.systemd1.manage-units ==== Authentication is required to manage system services or other units. Authenticating as: Debian (admin) Password: Since this does not correspond to the behavior we want, we have to help a little in the form of a PolKit rule. Additional PolKit rules are stored under /etc/polkit-1/rules.d/.
root@ip-172-31-15-135:~# cat  <
/etc/polkit-1/rules.d/99-run0.rules
polkit.addRule(function(action, subject) {
  if (action.id = "org.freedesktop.systemd1.manage-units") {
  if (subject.user === "admin") {
  return polkit.Result.YES;
  }
  }
});
> EOF
The rule used is structured as follows: First, it is checked whether the action listed is org.freedesktop.systemd1.manage-units. If this is the case, it is checked whether the executing user is the user
Alternatively, it could also be checked whether the executing user belongs to a specific group, such as admin or sudo (if (subject.isInGroup("admin")). It would also be conceivable to ask the user for their own password instead of the root password.
The new rule is automatically read in by PolKit and can be used immediately. Via admin can now execute run0 analogously to our initial sudo configuration.
Process Structure
The following listing shows the difference in the call stack between sudo and run0 While in the case of sudo, separate child processes are started, run0 starts a new process via systemd-run.
root@ip-172-31-15-135:~# sudo su -
root@ip-172-31-15-135:~# ps fo tty,ruser,ppid,pid,sess,cmd
TT RUSER PPID PID SESS CMD
pts/2 admin 1484 1514 1484 sudo su -
pts/0 admin 1514 1515 1515 \_ sudo su -
pts/0 root 1515 1516 1515 \_ su -
pts/0 root 1516 1517 1515 \_ -bash
pts/0 root 1517 1522 1515 \_ ps fo tty,ruser,ppid,pid,sess,cmd
admin@ip-172-31-15-135:~$ run0
root@ip-172-31-15-135:/home/admin# ps fo tty,ruser,ppid,pid,sess,cmd
TT RUSER PPID PID SESS CMD
pts/0 root 1 1562 1562 -/bin/bash
pts/0 root 1562 1567 1562 \_ ps fo tty,ruser,ppid,pid,sess,cmd
Conclusion and Note
As the example above has shown, run0 can generally be used as a simple sudo alternative and offers some security-relevant advantages. If run0 prevails over sudo, this will not happen within the next year. Some distributions simply lack a sufficiently up-to-date systemd version. In addition, the configuration of PolKit is not one of the daily tasks for some admins and know-how must first be built up here in order to transfer any existing sudo “constructs”.
In addition, a decisive advantage of run0 should not be ignored: By default, it colors the background red! 😉
This years All Systems Go! took place on 2023-09-13 and 2023-09-14 at the nice location of Neue Mälzerei in Berlin, Germany. One Debian Developer and employee of NetApp had the opportunity to attend this conference: Bastian Blank.
All Systems Go! focuses on low-level user-space for Linux systems. Everything that is above the kernel, but is so fundamental that systems won’t work without.
A lot of talks happened, ranging from how to use TPM with Linux for measured boot, how to overcome another Y2038 problem, up to just how to actually boot fast. Videos for all talks are kindly provided by the nice people of the C3VOC.
As described in the previous post, access control on Unix-like systems is traditionally based on the principle of Discretionary Access Control (DAC). Applications and services run under a specific user and group ID and are granted the corresponding access rights to files and folders.
AppArmor implements a Mandatory Access Control for Linux, based on the Linux Security Modules: an access control strategy that allows specific rights to be granted or denied to individual programs. This security layer exists in addition to the traditional DAC.
Since Debian 10 buster, AppArmor has been included and activated in the kernel by default. The packages apparmor and apparmor-utils provide tools for creating and maintaining AppArmor profiles.
Included Profiles
The two packages mentioned do not come with ready-made profiles, but only the Abstractions mentioned in the previous article: collections of rules that can be included in multiple profiles.
Some programs include their profiles in their own packages, while others contain profiles if corresponding modules are installed later – for example, mod_apparmor for the Apache web server.
The packages apparmor-profiles and apparmor-profiles-extra contain AppArmor profiles that can be found after installation in the directories /etc/apparmor.d (for tested profiles) and /usr/share/apparmor/extra-profiles (for experimental profiles), respectively. These profiles can be used as a basis for custom profiles.
Create Profiles Yourself
While at least experimental profiles are available for most common server services, such as the Apache web server, nothing can be found for the nginx web server. However, this is not a major issue, as a new AppArmor profile can be quickly created with the help of apparmor-utils.
Nginx Example
The following assumes a simple base installation of nginx that only serves HTML files under /var/www/html via HTTP. The focus here is primarily on the general approach, so repetitive steps will be skipped.
The described approach can be applied to any other program. To find out about the paths and files used by a program, dpkg can be used with the -L option, which lists all paths of a package. It should be noted that several packages may need to be queried for this; for nginx, the package of the same name provides hardly any useful information; this is only obtained with the nginx-common package:
# dpkg -L nginx-common
For the following steps, it is recommended to have two terminals open with root privileges.
Before the web server process can be observed for profile creation, all its running processes must be terminated:
# systemctl stop nginx
Once all processes are stopped, aa-genprof is called in the second terminal with the path of the web server’s program file:
# aa-genprof /usr/sbin/nginx
Some information about the current call of aa-genprof appears, including the hint Profiling: /usr/sbin/nginx, followed by Please start the application to be profiled in another window and exercise its functionality now.
To comply with this, the web server process is restarted in the first terminal window:
# systemctl start nginx
Before calling the S option in the second window to search the log files for AppArmor events, the web server should run for a few moments, and it should also be accessed from a browser so that as many typical activities of the process as possible are recorded.
Once this is done, the log files can be searched for events by pressing the S key:
[(S)can system log for AppArmor events] / (F)inish
Reading log entries from /var/log/syslog.
Updating AppArmor profiles in /etc/apparmor.d.
Complain-mode changes:
If an event is found, the affected profile and the action recorded by AppArmor are displayed:
Profile: /usr/sbin/nginx
Capability: dac_override
Severity: 9

 [1 - capability dac_override,]
(A)llow / [(D)eny] / (I)gnore / Audi(t) / Abo(r)t / (F)inish
Here, the program /usr/sbin/nginx requests the Capability dac_override, which was already described in the last article. It is indispensable for the operation of the web server and is allowed by pressing A. Alternatively, the request can be denied with D or ignored with I. With the Audit option, this request would continue to be recorded in the log file during operation.
Profile: /usr/sbin/nginx Capability: net_bind_service Severity: 8 [1 - #include] 2 - capability net_bind_service,
The next event shows that the process requests the Capability net_bind_service, which is needed to open a port with a port number less than 1024.
Unlike the first query, there are two ways to allow access in the future: the first option involves integrating Abstractions for NIS, the Network Information Service. In this Abstraction, which can be found under /etc/apparmor.d/abstractions/nis, in addition to a rule that allows access to rule sets for NIS, the Capability net_bind_service is also listed.
However, since the HTTP server does not include NIS functionality, it is sufficient to only allow the Capability. By pressing 2 and A, this is adopted into the profile.
The same applies to the Abstractions proposed in the following steps for dovecot and postfix: here it is sufficient to only allow the Capabilities setgid and setuid.
Sometimes the designation of the Abstractions can be somewhat misleading: for example, the Abstraction nameservice contains, in addition to rules that allow read access to common nameservice files like passwd or hosts, also rules that permit network access. It is therefore always worthwhile to take a look at the respective file under /etc/apparmor.d/abstractions/ to see if including the Abstraction is beneficial.
After the web server process has received all necessary Capabilities, it apparently tries to open its error log file /var/log/nginx/log with write permissions. It is noticeable here that, in addition to the usual Allow, Deny, and Ignore, the options Glob and Glob with Extension have been added.
Profile: /usr/sbin/nginx
Path: /var/log/nginx/error.log
New Mode: w
Severity: 8

 [1 - /var/log/nginx/error.log w,]
(A)llow / [(D)eny] / (I)gnore / (G)lob / Glob with (E)xtension / (N)ew / Audi(t) / Abo(r)t / (F)inish
Entering E adds another suggestion to the list:
 1 - /var/log/nginx/error.log w,
 [2 - /var/log/nginx/*.log w,]
The filename error.log has been replaced by a wildcard and the extension .log. This rule would grant write permissions to the file /var/log/nginx/error.log as well as, for example, to the file /var/log/nginx/access.log – these are (at least) two rules combined into a single one.
These rules would already be sufficient for this example, but it might also be necessary to allow files that do not have the .log file extension to be written in the /var/log directory. By entering G, another suggestion is added to the list:
  1 - /var/log/nginx/error.log w,
 2 - /var/log/nginx/*.log w,
 [3 - /var/log/nginx/* w,]
The filename has now been replaced by a single wildcard, meaning the process would be allowed to open any files in /var/log/nginx with write permissions.
As already mentioned, the proposed rules only grant write permissions, but no read permissions, even if the file’s access rights would allow more. However, for a web server’s log file, write permissions are entirely sufficient.
Subsequently, nginx requests read access to various configuration files, for example /etc/nginx/nginx.conf. This file is located in the nginx web server’s configuration directory, which contains other files that should also be readable.
Profile: /usr/sbin/nginx
Path: /etc/nginx/nginx.conf
New Mode: owner r
Severity: unknown

 [1 - owner /etc/nginx/nginx.conf r,]
Here too, with G, the rule can be extended to all files in the /etc/nginx directory.
 1 - owner /etc/nginx/nginx.conf r,
 [2 - owner /etc/nginx/* r,]
The same applies to the subdirectories of the configuration directory; these can be covered by globbing as /etc/nginx/*/.
A special case for globbing is the files contained in those subdirectories:
Profile: /usr/sbin/nginx
Path: /etc/nginx/sites-available/default
New Mode: owner r
Severity: unknown

 [1 - owner /etc/nginx/sites-available/default r,]
After entering G twice, the wildcard ** is suggested after the wildcard * known from above, which, as described in the previous article, covers all files located in subdirectories (and their subdirectories).
 1 - owner /etc/nginx/sites-available/default r,
 2 - owner /etc/nginx/sites-available/* r,
 [3 - owner /etc/nginx/** r,]
The last steps also all contained the attribute owner: this ensures that a rule only applies if the accessing process is also the owner of the file. If the file exists but belongs to someone else, access is denied.
There are still some other paths and files such as /usr/share/nginx/modules-available/, /run/nginx.pid, and /proc/sys/kernel/random/boot_id, which nginx also requires for proper operation. However, the procedure remains unchanged.
Once all events have been processed, the program concludes with the message:
= Changed Local Profiles =

The following local profiles were changed. Would you like to save them?

 [1 - /usr/sbin/nginx]
(S)ave Changes / Save Selec(t)ed Profile / [(V)iew Changes] / View Changes b/w (C)lean profiles / Abo(r)t
The options are clear: S saves changes, while V allows them to be viewed as a Diff beforehand. The following listing shows the profile generated in the run above.
include <tunables/global>

profile nginx /usr/sbin/nginx {
 include <abstractions/base>
 include <abstractions/nameservice>

 capability dac_override,
 capability dac_read_search,
 capability setgid,
 capability setuid,

 /usr/sbin/nginx mr,

 /var/log/nginx/*.log w,

 /var/www/html/** r,

 owner /etc/nginx/* r,
 owner /etc/nginx/** r,

 owner /run/nginx.pid rw,

 owner /usr/share/GeoIP/*.mmdb r,
 owner /usr/share/nginx/modules-available/*.conf r,

 owner /var/cache/nginx/** rw,
 owner /var/lib/nginx/** rw,
}
After saving the changes, aa-genprof returns to its start screen. Here, one could search for events in log files again or exit the program with F.
The program ends with the message:
Setting /usr/sbin/nginx to enforce mode.

Reloaded AppArmor profiles in enforce mode.
The profile just created has therefore been loaded and put into enforce mode. This means that the program can only access what is allowed in the profile; all other access attempts are blocked by AppArmor and recorded in the Syslog.
For simple programs, the creation of a profile is thus complete, and AppArmor can perform its work; more complex programs, however, will show previously unknown behavior later on, which would be prevented by the profile created so far. In such cases, it helps to switch the profile to complain mode using aa-complain.
# aa-complain nginx
Accesses that go beyond the known profile are generally allowed in complain mode but are recorded in the Syslog.
Feb 18 15:25:50 web01 kernel: [ 9908.611408] audit: type=1400 audit(1645197950.338:100): apparmor="ALLOWED" operation="open" profile="nginx" name="/srv/www/index.html" pid=4490 comm="nginx" requested_mask="r" denied_mask="r" fsuid=33 ouid=0
In the excerpt from the Syslog above, the webroot directory on host web01 was changed to /srv/www, but the previously created AppArmor profile was not adjusted. Since the profile is now in complain mode, access was still allowed: apparmor="ALLOWED"; in enforce mode, it would say DENIED and access would be denied.
The remaining information clearly shows what happened: the process with process ID (pid) 4190 tried to open the file /srv/www/index.html (name) for reading (requested_mask), which would, however, be forbidden (denied_mask) due to the profile (profile) nginx.
So, if software secured with AppArmor doesn’t work as expected, the first place to look is the Syslog!
After some time, there will be several entries there that should then be incorporated into the AppArmor profile. For this, the program aa-logprof is used: it searches the Syslog for entries and, in the manner of aa-genprof, asks if and how entries should be created in the profile. This process can be repeated as often as necessary.
If no further entries are found in the Syslog, the profile has been sufficiently adjusted and can be switched back to enforce mode with aa-enforce:
# aa-enforce nginx
This completes the basic creation of a simple AppArmor profile, and the nginx processes are controlled and monitored according to the rules defined within it.
We are Happy to Support You
Whether AppArmor, Debian, or PostgreSQL: with over 22+ years of development and service experience in the open-source sector, credativ GmbH can professionally support you with unparalleled and individually configurable support and assist you fully with all questions regarding your open-source infrastructure.
Do you have questions about our article or would you like credativ’s specialists to look at another software of your choice?
Then visit us and contact us via our contact form or write us an email at info@credativ.de.
About Credativ
credativ GmbH is a vendor-independent consulting and service company based in Mönchengladbach.
Fundamentally, access control under Linux is a simple matter:
Files specify their access rights (execute, write, read) separately for their owner, their group, and finally, other users. Every process (whether a user’s shell or a system service) running on the system operates under a user ID and group ID, which are used for access control.
A web server running with the permissions of user www-data and group www-data can thus be granted access to its configuration file in the directory /etc, its log file under /log, and the files to be delivered under /var/www. The web server should not require more access rights for its operation.
Nevertheless, whether due to misconfiguration or a security vulnerability, it could also access and deliver files belonging to other users and groups, as long as these are readable by everyone, as is technically the case, for example, with /etc/passwd. Unfortunately, this cannot be prevented with traditional Discretionary Access Control (DAC), as used in Linux and other Unix-like systems.
However, since December 2003, the Linux kernel has offered a framework with the Linux Security Modules (LSM), which allows for the implementation of Mandatory Access Control (MAC), where rules can precisely specify which resources a process may access. AppArmor implements such a MAC and has been included in the Linux kernel since 2010. While it was originally only used in SuSE and later Ubuntu, it has also been enabled by default in Debian since Buster (2019).
AppArmor
AppArmor checks and monitors, based on a profile, which permissions a program or script has on a system. A profile typically contains the rule set for a single program. For example, it defines how (read, write) files and directories may be accessed, whether a network socket may be created, or whether and to what extent other applications may be executed. All other actions not defined in the profile are denied.
Profile Structure
The following listing (line numbers are not part of the file and serve only for orientation) shows the profile for a simple web server, whose program file is located under /usr/sbin/httpd is located.
By default, AppArmor profiles are located in the directory /etc/apparmor.d and are conventionally named after the path of the program file. The first slash is omitted, and all subsequent slashes are replaced by dots. The web server’s profile is therefore located in the file /etc/apparmor.d/usr.sbin.httpd.
 1 include <tunables/global>
  2
 3 @{WEBROOT}=/var/www/html
  4
 5 profile httpd /usr/sbin/httpd {
 6 include <abstractions/base>
 7 include <abstractions/nameservice>
  8
 9 capability dac_override,
10 capability dac_read_search,
11 capability setgid,
12 capability setuid,
13
14 /usr/sbin/httpd mr,
15
16 /etc/httpd/httpd.conf r,
17 /run/httpd.pid rw,
18
19 @{WEBROOT}/** r,
20
21 /var/log/httpd/*.log w,
22 }
Preamble
The instruction include in line 1 inserts the content of other files in place, similar to the C preprocessor directive of the same name. If the filename is enclosed in angle brackets, as here, the specified path refers to the folder /etc/apparmor.d; with quotation marks, the path is relative to the profile file.
Occasionally, though now outdated, the notation #include can still be found. However, since comments in AppArmor profiles begin with a # and the rest of the line is ignored, the old notation leads to a contradiction: a supposedly commented-out #include instruction would indeed be executed! Therefore, to comment out a include instruction, a space after the # is recommended.
The files in the subfolder tunables typically contain variable and alias definitions that are used by multiple profiles and are defined in only one place, according to the Don’t Repeat Yourself principle (DRY).
In line 2, the variable @{WEBROOT} is created with WEBROOT and assigned the value /var/www/html. If other profiles, in addition to the current one, were to define rules for the webroot directory, it could instead be defined in its own file tunables and included in the respective profiles.
Profile Section
The profile section begins in line 5 with the keyword profile. It is followed by the profile name, here httpd, the path to the executable file, /usr/sbin/httpd, and optionally flags that influence the profile’s behavior. The individual rules of the profile then follow, enclosed in curly braces.
As before, in lines 6 and 7, include also inserts the content of the specified file in place. In the subfolder abstractions, according to the DRY principle, there are files with rule sets that appear repeatedly in the same form, as they cover both fundamental and specific functionalities.
For example, in the file base, access to various file systems such as /dev, /proc, and /sys, as well as to runtime libraries or some system-wide configuration files, is regulated. The file
Starting with line 9, rules with the keyword capability grant a program special privileges, known as capabilities. Among these, setuid and setgid are certainly among the more well-known: they allow the program to change its own uid and gid; for example, a web server can start as root, open the privileged port 80, and then drop its root privileges. dac_override and dac_read_search allow bypassing the checking of read, write, and execute permissions. Without this capability, even a program running under uid root would not be able to access files regardless of their attributes, unlike what one is used to from the shell.
From line 14 onwards, there are rules that determine access permissions for paths (i.e., folders and files). The structure is quite simple: first, the path is specified, followed by a space and the abbreviations for the granted permissions.
Aside: Permissions
The following table provides a brief overview of the most common permissions:
| Abbreviation | Meaning | Description |
|---|---|---|
r | read | read access |
w | write | write access |
a | append | appending data |
x | execute | execute |
m | memory map executable | mapping and executing the file’s content in memory |
k | lock | setting a lock |
l | link | creating a link |
Aside: Globbing
Paths can either be fully written out individually or multiple paths can be combined into one path using wildcards. This process, called globbing, is also used by most shells today, so this notation should not cause any difficulties.
| Expression | Description |
|---|---|
/dir/file | refers to exactly one file |
/dir/* | includes all files within /dir/ |
/dir/** | includes all files within /dir/, including subdirectories |
? | represents exactly one character |
{} | Curly braces allow for alternations |
[] | Square brackets can be used for character classes |
Examples:
| Expression | Description |
|---|---|
/dir/??? | thus refers to all files in /dir whose filename is exactly 3 characters long |
/dir/*.{png,jpg} | refers to all image files in /dir whose file extension is png or jpg |
/dir/[abc]* | refers to all files in /dir whose name begins with the letters a, b, or c |
For access to the program file /usr/sbin/httpd, the web server receives the permissions mr in line 14. The abbreviation r stands for read and means that the content of the file may be read; m stands for memory map executable and allows the content of the file to be loaded into memory and executed.
Anyone who dares to look into the file
/etc/apparmor.d/abstractions/basewill see that the permissionmis also necessary for loading libraries, among other things.
During startup, the web server will attempt to read its configuration from the file /etc/httpd.conf. Since the path has r permission for reading, AppArmor will allow this. Subsequently, httpd writes its PID to the file /run/httpd.pid. The abbreviation w naturally stands for write and allows write operations on the path. (Lines 16, 17)
The web server is intended to deliver files below the WEBROOT directory. To avoid having to list all files and subdirectories individually, the wildcard ** can be used. The expression r.
As usual, all access to the web server is logged in the log files access.log and error.log in the directory /var/log/httpd/. These are only written by the web server, so it is sufficient to set only write permission for the path /var/log/httpd/* with w in line 21.
With this, the profile is complete and ready for use. In addition to those shown here, there are a variety of other rule types with which the allowed behavior of a process can be precisely defined.
Further information on profile structure can be found in the man page for apparmor.d and in the Wiki article on the AppArmor Quick Profile Language; a detailed description of all rules can be found in the AppArmor Core Policy Reference.
Creating a Profile
Some applications and packages already come with ready-made AppArmor profiles, while others still need to be adapted to specific circumstances. Still other packages do not come with any profiles at all – these must be created by the administrator themselves.
To create a new AppArmor profile for an application, a very basic profile is usually created first, and AppArmor is instructed to treat it in the so-called complain mode. Here, accesses that are not yet defined in the profile are recorded in the system’s log files.
Based on these log entries, the profile can then be refined after some time, and if no more entries appear in the logs, AppArmor can be instructed to switch the profile to enforce mode, enforce the rules listed therein, and block undefined accesses.
Even though it is easily possible to create and adapt an AppArmor profile manually in a text editor, the package apparmor-utils contains various helper programs that can facilitate the work: for example, aa-genprof helps create a new profile, aa-complain switches it to complain mode, aa-logprof helps search log files and add corresponding new rules to the profile, and aa-enforce finally switches the profile to enforce mode.
In the next article of this series, we will create our own profile for the web server nginx based on the foundations established here.
We are Happy to Support You
Whether AppArmor, Debian, or PostgreSQL: with over 22+ years of development and service experience in the open source sector, credativ GmbH can professionally support you with unparalleled and individually configurable support, fully assisting you with all questions regarding your open source infrastructure.
Do you have questions about our article or would you like credativ’s specialists to take a look at other software of your choice? Then feel free to visit us and contact us via our contact form or send us an email at info@credativ.de.
About Credativ
credativ GmbH is a vendor-independent consulting and service company based in Mönchengladbach. Since the successful merger with Instaclustr in 2021, credativ GmbH has been the European headquarters of the Instaclustr Group.
The Instaclustr Group helps companies realize their own large-scale applications thanks to managed platform solutions for open source technologies such as Apache Cassandra®, Apache Kafka®, Apache Spark™, Redis™, OpenSearch™, Apache ZooKeeper™, PostgreSQL®, and Cadence. Instaclustr combines a complete data infrastructure environment with practical expertise, support, and consulting to ensure continuous performance and optimization. By eliminating infrastructure complexity, companies are enabled to focus their internal development and operational resources on building innovative, customer-centric applications at lower costs. Instaclustr’s clients include some of the largest and most innovative Fortune 500 companies.
At the beginning of 2018, issues with memory management and Intel processors became public. According to these reports, it is apparently possible to read arbitrary areas of the kernel and userspace memory regions and thus potentially gain access to sensitive areas.
Over the past few days, there have been rumors and speculations about the direction of these developments; meanwhile, there is an official statement from the hackers at Project Zero (Google) who summarize the findings.
What exactly happened?
Essentially, attack vectors were identified that can extract privileged information from the CPU cache, despite a lack of authorization, by leveraging unsuccessful speculative code execution on a processor and precise timing. In doing so, it is possible, despite the lack of authorization (whether from user or kernel space), to read memory areas and interpret their contents. This theoretically enables widespread entry points for malware, such as spying on sensitive data or abusing permissions. These are referred to as Side Channel Attacks. According to current knowledge, not only Intel CPUs (which were initially exclusively assumed to be affected) are impacted, but also AMD CPUs, ARM, and POWER8 and 9 processors.
What is currently happening?
Project Zero summarizes the main issues in the report. Several exploits exist that use different approaches to read privileged memory areas, thereby unauthorizedly accessing information in sensitive areas of the kernel or other processes. Since almost all modern CPUs support speculative execution of instructions to prevent their execution units from idling and thus avoid associated high latencies, a large number of systems are theoretically affected. Another starting point for this attack scenario is the way user and kernel space memory areas interact in current systems. In fact, these memory areas have not truly been separated until now; instead, access to these areas is secured by a special bit. The advantage of this lack of separation is particularly significant when, for example, frequent switching between user and kernel space is required.
The individual attack scenarios are:
- Spectre
This attack scenario utilizes the branch prediction present in modern CPUs, i.e., a preliminary analysis of the probability that certain code or branches can be executed successfully. Here, the CPU is tricked into speculatively executing code that was not actually considered by the prediction. This attack can then be used to execute malicious code. This attack theoretically works on all CPUs with corresponding branch prediction, but according to Project Zero, it is difficult to summarize which processors are affected and in what way. Spectre primarily targets applications in user space. Since Spectre primarily works when faulty code is already present in relevant applications, particular attention should be paid to corresponding updates.
- Meltdown
With Meltdown, speculative execution is used to execute code that cannot actually be reached definitively. These are exception instructions with subsequent instructions that would never be executed. However, due to the CPU’s speculative execution, these instructions are still considered by the CPU. Although there are no side effects from this type of execution, the memory addresses occupied by the instruction remain in the CPU’s cache and can be used from there to test all memory addresses. Since the memory areas of the kernel and user space are currently organized contiguously, not only the entire memory area of the kernel but also all processes running on the system can be read. A detailed description of how the attack works can be found here. Meltdown only works on Intel processors, as only on these are privileges for the addressed memory area no longer checked during out-of-order execution.
Both scenarios exploit the respective security vulnerabilities in different ways. The CVEs for the vulnerabilities are:
What happens next?
To prevent Meltdown attacks, corresponding updates are already available for Linux, Windows, and OSX (the latter has contained corresponding changes for quite some time). Essentially, these updates completely separate memory management for kernel and user space (known in Linux as KPTI patches, Kernel Page Table Isolation, formerly also KAISER). This makes it no longer possible to access kernel memory areas from an unprivileged context through privilege escalation on Intel processors. RedHat, as well as CentOS and Fedora, already provide these with updated kernels.
Meltdown attacks, in particular, are effectively suppressed by this; however, for Spectre attacks themselves, based on the current situation, there are no reliable, effective measures. It is important, however, that eBPF and the corresponding execution of BPF code in the Linux kernel are deactivated.
sysctl -a | grep net.core.bpf_jit_enable
sysctl net.core.bpf_jit_enable=0
The change requires “root” permissions.
Performance of Updated Kernels
Due to the separation of memory management for kernel and user space, context switches and system calls become more expensive. This leads to significantly higher latencies, especially if the application causes many context switches (e.g., network communication). The performance losses here are difficult to quantify, as not every workload truly relies on identical access patterns. For critical systems, load tests on identical test systems are therefore recommended if possible. If not possible, the load parameters should be carefully monitored after updating the system. A general performance loss of around 5% is assumed, but tests by kernel developers have also observed losses of up to 30%. Since Page Table Isolation (so far) is only available for x86_64 architectures, these figures only apply to machines with Intel processors. In fact, KPTI is not enabled by default for AMD by the kernel upstream.
Whether KPTI is enabled can be determined via the kernel log:
dmesg -T | grep "page tables isolation"
[Fr Jan  5 10:10:16 2018] Kernel/User page tables isolation: enabled
Database users, in particular, are sensitive here, as systems like PostgreSQL® typically cause a high number of context switches under heavy load. At credativ, we classified the impact on a small virtualized system. The basis is a Fedora 27 system as a KVM guest with 4 GByte RAM and fast NVMe storage. However, this plays a rather insignificant role in this test, as the database tests performed with pgbench only have a size of just under 750 MByte. The shared buffer pool of the PostgreSQL® instance was configured with 1 GByte so that the entire database fits into the database cache. The tests were performed with 4 and 8 virtual processors, respectively. The host system has an Intel Core i7-6770HQ processor.
The greatest impact is observed when PCID is not present or is deactivated in the kernel. PCID is an optimization that prevents a flush of the Translation Lookaside Buffer (TLB) when a context switch occurs. Virtual memory addresses are only successfully resolved via TLB if the PCID matches the current thread on the respective CPU. PCID is available from kernel 4.14. The test compares a development kernel with Page Table Isolation (PTI) 4.15.0-rc6, current Fedora upstream kernels with and without security patches. PTI can be deactivated by defining a corresponding argument to the kernel via pti=off during boot.
The Fedora test system already has a very recent kernel (4.14). The difference between the old upstream kernel 4.14.8 without security-relevant patches and the new kernel 4.14.11 is approximately 6%. pgbench then provides the following throughput rates (transactions per second):

If the former standard kernel 4.14.8 of Fedora 27 is taken as 100%, the following results are obtained:

The PostgreSQL® community has also already conducted smaller tests to measure the impact. The results align with our findings. The new kernel 4.14.11 with the relevant patches offers approximately the same performance as the development kernel 4.15.0-rc6 on this platform. In these test cases, 4.14.11 even partially outperforms the old upstream kernel (8 vCPU, comparison 4.14.8, green and 4.14.11, brown). However, the advantage here is just over 1%, so it can be assumed that there are no significant speed differences in this test setup.
For those interested, there is also a dedicated page on the topic. This summarizes all essential information. Also recommended is the summary by journalist Hanno Böck on GitHub, which provides a very good list of all patches for Meltdown and Spectre.
This article was originally written by Bernd Helmle.