In this blog, we describe the integration of Icinga2 into Graphite and Grafana on Debian.
What is Graphite
Graphite stores performance data over a configurable period. Services can send metrics to Graphite via a defined interface, which are then stored in a structured manner for the desired period. Possible examples of such metrics include CPU utilization or web server access numbers. Graphs can now be generated from the various metrics via Graphite’s integrated web interface. This allows us to detect and observe changes in values over different periods. A good example of such a trend analysis is disk space utilization. With the help of a trend graph, it is easy to see at what rate the space requirement is growing and approximately when a storage replacement will be necessary.
What is Grafana
Although Graphite offers its own web interface, it is not particularly attractive or flexible. This is where Grafana steps in.
Grafana is a frontend for various metric storage systems. For example, it supports Graphite, InfluxDB, and OpenTSDB. Grafana offers an intuitive interface for creating representative graphs from metrics. It also has a variety of functions to optimize the appearance and display of graphs. Subsequently, graphs can be grouped into dashboards. Parameterization of graphs is also possible. This also allows you to display only a graph from a specific host.
Installing Icinga2
At this point, only the installation required for Graphite is described. Current versions of Icinga2 packages for Debian can be obtained directly from the Debmon Project. The Debmon Project, run by official Debian package maintainers, provides current versions of various monitoring tools for Debian releases in a timely manner. To integrate these packages, the following commands are required:
# add debmon
cat  <<EOF  >/etc/apt/sources.list.d/debmon.list
deb http://debmon.org/debmon debmon-jessie main
EOF

# add debmon key
wget -O - http://debmon.org/debmon/repo.key 2>/dev/null | apt-key add -

# update repos
apt-get update
Next, we can install Icinga2:
apt-get install icinga2
Installing Graphite and Graphite-Web
After Icinga2 is installed, Graphite and Graphite-web can also be installed.
# install packages for icinga2 and graphite-web and carbon

apt-get install icinga2 graphite-web graphite-carbon libapache2-mod-wsgi apache2
Configuring Icinga2 with Graphite
Icinga2 must be configured to export all collected metrics to Graphite. The Graphite component that receives this data is called “Carbon”. In our example installation, Carbon runs on the same host as Icinga2 and also uses the default port. For this reason, no further configuration of Icinga2 is necessary; it is sufficient to enable the export.
The command does this. icinga2 feature enable graphite
Next, Icinga2 must be restarted: service icinga2 restart
If the Carbon server runs on a different host or a different port, the Icinga2 configuration can be adjusted in the file /etc/icinga2/features-enabled/graphite.conf. Details can be found in the Icinga2 documentation.
If the configuration was successful, a number of files should appear shortly in “/var/lib/graphite/whisper/icinga“. If this is not the case, you should check the Icinga2 log file (located in “/var/log/icinga2/icinga2.log“).
Configuring Graphite-web
Grafana uses Graphite’s web frontend as an interface for the metrics stored by Graphite. For this reason, it is necessary to configure Graphite-web correctly. For performance reasons, we operate Graphite-web as a WSGI module. A number of configuration steps are required for this:
- First, we create a user database for Graphite-web. Since we will not have many users, we use sqlite as the backend for our user data at this point. For this purpose, we execute the following commands, which initialize the user database and assign it to the user under which the web frontend runs:
graphite-manage syncdb
chown _graphite:_graphite /var/lib/graphite/graphite.db
- Next, we activate the WSGI module in Apache:
a2enmod wsgi - For simplicity, the web interface should run in its own virtual host and on its own port. To ensure Apache also listens on this port, we add the line “Listen 8000” to the file “/etc/apache2/ports.conf“.
- The Graphite Debian package already provides an Apache configuration file that we can use for our purposes, with slight modifications.
cp /usr/share/graphite-web/apache2-graphite.conf /etc/apache2/sites-available/graphite.confTo ensure the virtual host also uses port 8000, we must replace the line<VirtualHost *:80>
with
<VirtualHost *:8000>
.
- Then we activate the new virtual host via
a2ensite graphiteand restart Apache:systemctl restart apache2 - Graphite-web should now be accessible at http://YOURIP:8000/. If this is not the case, the Apache log files under “/var/log/apache2/” could provide valuable information.
Configuring Grafana
Grafana is currently not included in Debian. However, the author offers an Apt repository through which Grafana can be installed. Even if the repository refers to Wheezy, the packages also work under Debian Jessie.
The repository is only accessible via HTTPS. For this reason, HTTPS support for apt must first be installed: apt-get install apt-transport-https
Next, the repository can be integrated.
# add repo (package for wheezy works on jessie)
cat  <<EOF  >/etc/apt/sources.list.d/grafana.list
deb https://packagecloud.io/grafana/stable/debian/ wheezy main
EOF

# add key
curl -s https://packagecloud.io/gpg.key | sudo apt-key add -

# update repos
apt-get update
Subsequently, the package can be installed: apt-get install grafana. For Grafana to run, we still need to enable the service systemctl enable grafana-server.service and start it systemctl start grafana-server.
Grafana is now accessible at http://YOURIP:3000/. The default username and password in our example is “admin”. This password should, of course, be replaced with a secure password at the next opportunity.
Next, Grafana must be configured to use Graphite as a data source. For simplicity, the configuration is explained via a screencast.
You are currently viewing a placeholder content from Default. To access the actual content, click the button below. Please note that doing so will share data with third-party providers.
After successfully integrating Graphite as a data source, we can create our first graph. There is also a short screencast for this here.
You are currently viewing a placeholder content from Default. To access the actual content, click the button below. Please note that doing so will share data with third-party providers.
Congratulations, you have now successfully installed and configured Icinga2, Graphite, and Grafana. For all further steps, please refer to the documentation of the respective projects:
The page postfix.org/OVERVIEW.html presents and explains the individual parts of Postfix and their functions: services, queues, etc. Although some of the relationships are outlined in a schematic ASCII overview, there is no overall overview. To facilitate understanding of Postfix and make it easier to get started with the topic, we have created this overview as far as possible based on the information on the page:
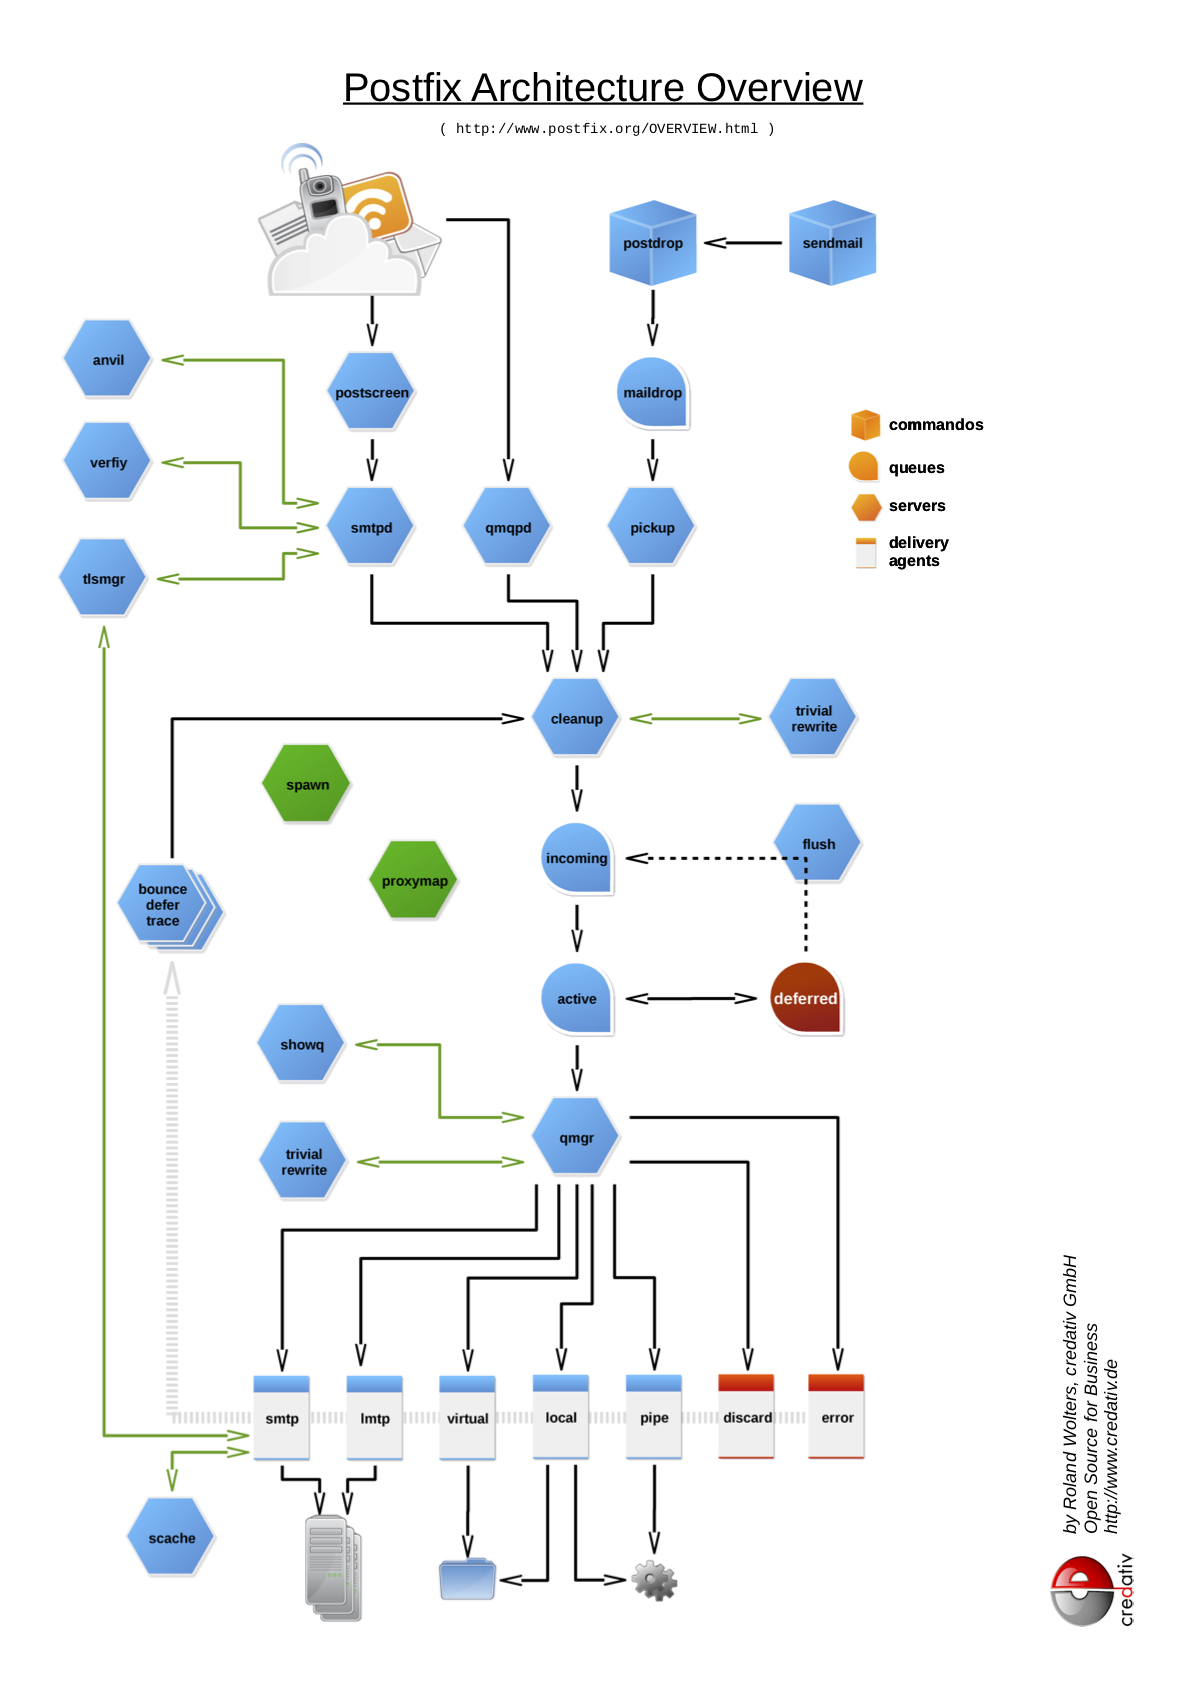
The graphic is also available as a PDF.
However, it should be noted that the diagram does not take into account all connections and relationships. For example, the flush process is greatly simplified, as communication with smtpd and qmgr is not shown. The integration of policyd’s, such as for greylisting, is also missing.
The sources in ODG format are stored in a Github repository – unfortunately, however, the paths in the ODG file do not seem to be particularly stable. Many thanks again to Patrick Ben Koetter for the original idea to create such an image!
This article was originally written by Roland Wolters.
The vast majority of Debian installations are simplified with the use of Preseeding and Netboot. Friedrich Weber, a school student on a work experience placement with us at our German office has observed the process and captured it in a Howto here:
Imagine the following situation: you find yourself with ten to twenty brand new Notebooks and the opportunity to install them with Debian and customise to your own taste. In any case it would be great fun to manually perform the Debian installation and configuration on each Notebook.
This is where Debian Preseed comes into play. The concept is simple and self-explanatory; usually, whoever is doing the installation will be faced with a number of issues during the process (e.g. language, partitioning, packages, Bootloader, etc.) In terms of Preseed, all of these issues can now be resolved. Only those which are not already accounted for in Preseed remain for the Debian installer. In the ideal situation these would become apparent at the outset of the installation, where the solution would differ depending on the target system and which the administrator must deal with manually – only when these have been dealt with can the installation be left to run unattended.
Preseed functions on some simple inbuilt configuration data: preseed.cfg. It includes, as detailed above, the questions which must be answered during installation, and in debconf-format. Data such as this consists of several rows, each row of which defines a debconf configuration option – a response to a question – for example:
d-i debian-installer/locale string de_DE.UTF-8
The first element of these lines is the name of the package, which is configured (d-i is here an abbreviation of debian installer), the second element is the name of the option, which is set, as the third element of the type of option (a string) and the rest is the value of the option.
In this example, we set the language to German using UTF-8-coding. You can put lines like this together yourself, even simpler with the tool debconf-get-selections: these commands provide straight forward and simple options, which can be set locally.
From the selection you can choose your desired settings, adjusted if necessary and copied into preseed.cfg. Here is an example of preseed.cfg:
d-i debian-installer/locale string de_DE.UTF-8
d-i debian-installer/keymap select de-latin1
d-i console-keymaps-at/keymap select de
d-i languagechooser/language-name-fb select German
d-i countrychooser/country-name select Germany
d-i console-setup/layoutcode string de_DE
d-i clock-setup/utc boolean true
d-i time/zone string Europe/Berlin
d-i clock-setup/ntp boolean true
d-i clock-setup/ntp-server string ntp1

tasksel tasksel/first multiselect standard, desktop, gnome-desktop, laptop

d-i pkgsel/include string openssh-client vim less rsync
In addition to language and timezone settings, selected tasks and packages are also set with these options. If left competely unattended, the installation will not complete, but will make a good start.
Now onto the question of where Preseed pulls its data from. It is in fact possible to use Preseed with CD and DVD images or USB sticks, but generally more comfortable to use a Debian Netboot Image, essentially an installer, which is started across the network and which can cover its Preseed configuration.
This boot across the network is implemented with PXE and requires a system that can boot from a network card. Next, the system depends on booting from the network card. It travels from a DHCO server to an IP address per broadcast.
This DHCP server transmits not only a suitable IP, but also to the IP of a so-called Bootserver. A Bootserver is a TFTP-Server, which provides a Bootloader to assist the Administrator with the desired Debian Installer. At the same time the Debian Installer can be shared with the Boot options that Preseed should use and where he can find the Preseed configuration. Here is a snippet of the PXELINUX configuration data pxelinux.cfg/default:
label i386
kernel debian-installer/i386/linux
append vga=normal initrd=debian-installer/i386/initrd.gz netcfg/choose_interface=eth0 domain=example.com locale=de_DE debian-installer/country=DE debian-installer/language=de debian-installer/keymap=de-latin1-nodeadkeys console-keymaps-at/keymap=de-latin1-nodeadkeys auto-install/enable=false preseed/url=http://$server/preseed.cfg DEBCONF_DEBUG=5 -- quiet
When the user types i386, the debian-installer/i386/linux kernel (found on the TFTP server) is downloaded and run. This is in addition to a whole load of bootoptions given along the way. The debian installer allows the provision of debconf options as boot parameters. It is good practice for the installer to somehow communicate where to find the Preseed communication on the network (preseed/url).
In order to download this Preseed configuration, it must also be somehow built into the network. The options for that will be handed over (the options for the hostnames would be deliberately omitted here, as every target system has its own Hostname). auto-install/enable would delay the language set up so that it is only enabled after the network configuration, in order that these installations are read through preseed.cfg.
It is not necessary as the language set up will also be handed over to the kernel options to ensure that the network configuration is German. The examples and configuration excerpts mentioned here are obviously summarised and shortened. Even so, this blog post should have given you a glimpse into the concept of Preseed in connection with netboot. Finally, here is a complete version of preseed.cfg:
d-i debian-installer/locale string de_DE.UTF-8
d-i debian-installer/keymap select de-latin1
d-i console-keymaps-at/keymap select de
d-i languagechooser/language-name-fb select German
d-i countrychooser/country-name select Germany
d-i console-setup/layoutcode string de_DE

# Network
d-i netcfg/choose_interface select auto
d-i netcfg/get_hostname string debian
d-i netcfg/get_domain string example.com

# Package mirror
d-i mirror/protocol string http
d-i mirror/country string manual
d-i mirror/http/hostname string debian.example.com
d-i mirror/http/directory string /debian
d-i mirror/http/proxy string
d-i mirror/suite string lenny

# Timezone
d-i clock-setup/utc boolean true
d-i time/zone string Europe/Berlin
d-i clock-setup/ntp boolean true
d-i clock-setup/ntp-server string ntp.example.com

# Root-Account
d-i passwd/make-user boolean false
d-i passwd/root-password password secretpassword
d-i passwd/root-password-again password secretpassword

# Further APT-Options
d-i apt-setup/non-free boolean false
d-i apt-setup/contrib boolean false
d-i apt-setup/security-updates boolean true

d-i apt-setup/local0/source boolean false
d-i apt-setup/local1/source boolean false
d-i apt-setup/local2/source boolean false

# Tasks
tasksel tasksel/first multiselect standard, desktop
d-i pkgsel/include string openssh-client vim less rsync
d-i pkgsel/upgrade select safe-upgrade

# Popularity-Contest
popularity-contest popularity-contest/participate boolean true

# Command to be followed after the installation. `in-target` means that the following
# Command is followed in the installed environment, rather than in the installation environment.
# Here http://$server/skript.sh nach /tmp is downloaded, enabled and implemented.
d-i preseed/late_command string in-target wget -P /tmp/ http://$server/skript.sh; in-target chmod +x /tmp/skript.sh; in-target /tmp/skript.sh>
All Howtos of this blog are grouped together in the Howto category – and if you happen to be looking for Support and Services for Debian you’ve come to the right place at credativ.
This post was originally written by Irenie White.
The administration of a large number of servers can be quite tiresome without a central configuration management. This article gives a first introduction into the configuration management tool, Puppet.
Introduction
In our daily work at the Open Source Support Center we maintain a large number of servers. Managing larger clusters or setups means maintaining dozens of machines with an almost identical configuration and only slight variations, if any. Without central configuration management, making small changes to the configuration would mean repeating the same step on all machines. This is where Puppet comes into play.
As with all configuration management tools, Puppet uses a central server which manages the configuration. The clients query the server on a regular basis for new configuration via an encrypted connection. If a new configuration is found, it is imported as the server instructs: the client imports new files, modifies rights, starts services and executes commands, whatever the server says. The advantages are obvious:
- Each configuration change is done only once, regardless of the actual number of maintained servers. Unnecessary – and pretty boring – repetition is avoided, lucky us!
- The configuration is streamlined for all machines, which makes it much easier to maintain.
- A central infrastructure makes it easier to quickly get an overview about the setup – “running around” is not necessary anymore.
- Last but not least, a central configuration tree enables you to incorporate a simple version control of your configuration: for example, playing back the configuration “PRE-UPDATE” on all machines of an entire setup only takes a couple of commands!
Technical workflow
Puppet consists of a central server, called “Puppet Master”, and the clients, called “Nodes”. The nodes query the master for the current configuration. The master responds with a list of configuration and management items: files, services which have to be running, commands which need to be executed, and so on – the possibilities are practically endless:
- The master can hand over files which the node copies to a defined place – if it does not already exist.
- The node is asked to check certain file and directory permissions and to correct them if necessary.
- Depending upon the operating system, the node checks the state of services and starts or stops them. It can also check for installed packages and if they are up to date.
- The master can force the node to execute arbitrary commands
- etc.
Of course, in general all tasks can be fulfilled by handing over files from the master to the client. However, in more complex setups this kind of behaviour is not easily arranged, nor does it simplify the setup. Puppet’s strength is that it facilitates abstract system tasks (restart services, ensure installed packages, add users, etc.), regardless of the actual changed files in the background. You can even use the same statement in Puppet to configure different versions of Linux or Unix.
Installation
First, you need the master, the center of all the configuration you want to manage: apt-get install puppetmaster Puppet expects that all machines in the network have FQDNs – but that should be the case anyway in a well maintained network.
Other machines become a node by installing the Puppet client: apt-get install puppet
Puppet, main configuration
The Puppet nodes do not need to be configured – they will check for a machine called Puppet in the local network. As long as that name points to the master you do not have to do anything else.
Since the master provides files to the nodes, the internal file server must be configured accordingly. There are different solutions for the internal file server, depending on the needs of your setup. For example, it might be better for your setup to store all files you provide to the nodes on one place, and the actual configuration you provide to the nodes somewhere else. However, in our example we keep the files and the configuration for the nodes close, as it is outlined in Puppet’s Best Practice Guide and in the Module Configuration part of the Puppet documentation. Thus, it is enough to change the file /etc/puppet/fileserver.conf to:
[modules]
allow 192.168.0.1/24
allow *.credativ.de
Configuration of the configuration – Modules
Puppet’s way of managing configuration is to use sets of tasks grouped by topic. For example, all tasks related to SSH should go into the module “ssh”, while all tasks related to apache should be placed in the module “apache” and so on. These sets of tasks are called “Modules” and are the core of Puppet – in a perfect Puppet setup everything is defined in modules! We will explain the structure of a SSH module to highlight the basics and ideas behind Puppet’s modules. We will also try to stay close to the Best Practise Guide to make it easier to check back against the Puppet documentation.
Please note, however, that this example is an example: in a real world setup the SSH configuration would be a bit more dynamic, but we focused on simple and easy-to-understand methods.
The SSH module
We have the following requirements:
- The package open-ssh must be installed and be the newest version.
- Each node’s sshd_config file has to be the same as the one saved on the master.
- In the event that the sshd_config is changed on any node, the sshd service should be restarted.
- The user credativ needs to have certain files in his/her directory $HOME/.ssh.
To comply with these requirements we start by creating some necessary paths:
mkdir -p /etc/puppet/modules/ssh/manifests
mkdir -p /etc/puppet/modules/ssh/files
The directory “manifests” contains the actual configuration instructions of the module and the directory “files” provides the files we hand over to the clients.
The instructions themselves are written down in init.pp in the “manifests” directory. The set of instructions to fulfil aims 1 – 4 are grouped in a so called “class”. For each task a “class” has one subsection, a type. So in our case we have four types, one for each aim:
class ssh{
        package { "openssh-server":
                 ensure => latest,
        }
        file { "/etc/ssh/sshd_config":
                owner   => root,
                group   => root,
                mode    => 644,
                source  => "puppet:///ssh/sshd_config",
        }
        service { ssh:
                ensure          => running,
                hasrestart      => true,
                subscribe       => File["/etc/ssh/sshd_config"],
        }
        file { "/home/credativ/.ssh":
                path    => "/home/credativ/.ssh",
                owner   => "credativ",
                group   => "credativ",
                mode    => 600,
                recurse => true,
                source  => "puppet:///ssh/ssh",
                ensure  => [directory, present],
        }
}
Each type is another task and calls another action on the node:
package
Here we make sure that the package openssh-server is installed in the newest version.
file
A file on the node is compared with the version on the server and overwritten if necessary. Also, the rights are adjusted.
service
Well, as the name says, this deals with services: in our case the service
file
Here we have again the file type, but this time we do not compare a file, but an entire directory.
As mentioned above, the files and directories you configured so that the server provides them to the nodes must be available in the directory /etc/puppet/modules/ssh/files/.
Nodes and modules
We now have three parts: the master, the nodes and the modules. The next step is to tell the master which nodes are related to which modules. First, you must tell the master that this module exists in /etc/puppet/manifests/modules.pp:
import "ssh"
Next, you need to modify /etc/puppet/manifests/nodes.pp. This specifies which module is loaded for which node, and which modules should be loaded as default in the event that a node does not have a special entry. The entries for the nodes support inheritance.
So, for example, to have the module “rsyslog” ready for all nodes but the module “ssh” only ready for the node “external” you need the following entry:
node default {
   include rsyslog
}

node 'external' inherits default {
  include ssh
}
Puppet is now configured!
Certificates – secured communication between nodes and master
As mentioned above, the communication between master and node is encrypted. But that implies you have to verify the partners at least once. This can be done after a node queries the master for the first time. Whenever the master is queried by an unknown node it does not provide the default configuration but instead puts the node on a waiting list. You can check the waiting list with the command: # puppetca --list To verify a node and incorporate it into the Puppet system you need to verify it: # puppetca --sign external.example.com The entire process is explained in more detail in the puppet doceumentation.
Closing words
The example introduced in this article is very simple – as I noted, a real world example would be more complex and dynamic. However, it is a good way to start with Puppet, and the documentation linked throughout this article will help the willing reader to dive deeper into the components of Puppet.
We, here at credativ’s Open Source Support Center have gained considerable experience with Puppet in recent years and really like the framework. Also, in our day to day support and consulting work we see the market growing as more and more customers are interested in the framework. Right now, Puppet is in the fast lane and it will be interesting to see how more established solutions like cfengine will react to this competition.
This post was originally written by Roland Wolters.