How and when to use Software-Defined Networks in Proxmox VE
 What is Software-Defined Networking?
How to configure a SDN
Knowing the basics and possibilities of Software-Defined Networking (SDN) now, it gets interesting to set up such a network within a Proxmox cluster.
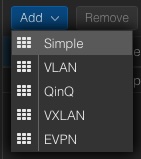
Proxmox comes with support for software-defined networking (SDN), allowing users to integrate various types of network configurations to suit their specific networking needs. With Proxmox, you have the flexibility to select from several SDN types, including “Simple”, which is likely aimed at straightforward networking setups without the need for advanced features. For environments requiring network segmentation, VLAN support is available, providing the means to isolate and manage traffic within distinct virtual LANs. More complex scenarios might benefit from QinQ support, which allows multiple VLAN tags on a single interface. Also and very interesting for data centers, Proxmox also includes VxLAN support, which extends layer 2 networking over a layer 3 infrastructure which significantly increases the number of possible VLANs which would else be limited to 4096 VLANs. Lastly to mention is the EVPN support which is also part of Proxmox’s SDN offerings, facilitating advanced layer 2 and layer 3 virtualization and providing a scalable control plane with BGP (Border Gateway Protocol) for multi-tenancy environments.
In this guide, we’ll walk through the process of setting up a streamlined Software-Defined Network (SDN) within a Proxmox Cluster environment. The primary goal is to establish a new network, including its own network configuration that is automatically propagated across all nodes within the cluster. This newly created network will created by its own IP space where virtual machines (VMs) receiving their IP addresses dynamically via DHCP. This setup eliminates the need for manual IP forwarding or Network Address Translation (NAT) on the host machines. An additional advantage of this configuration is the consistency it offers; the gateway for the VMs will always remain constant regardless of the specific host node they are operating on.
Configuration
The configuration of Software-Defined Networking (SDN) got very easy within the latest Proxmox VE versions where the whole process can be done in the Proxmox web UI. Therefore, we just connect to the Proxmox management web interface which typically reachable at:
- https://HOSTNAME:8006
 The SDN options are integrated within the datacenter chapter, in the sub chapter SDN. All further work will only be done within this chapter. Therefore, we navigate to:
–> Datacenter
—-> SDN
——–> Zones
The menu on the right site offers to add a new zone where the new zone of the type Simple will be selected. A new windows pops up where we directly activate the advanced options at the bottom. Afterwards, further required details will be provided.
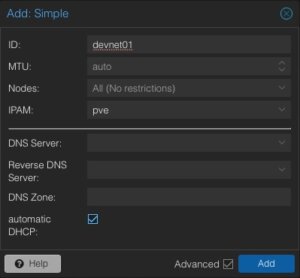
ID: devnet01
MTU: Auto
Nodes: All
IPAM: pve
Automatic DHCP: Activate
The ID represents the unique identifier of this zone. It might make sense to give it a recognisable name. Usually, we do not need to adjust the MTU size for this kind of default setups. However, there may always be some corner cases. In the node sections, this zone can be assigned to specific nodes or simply to all ones. There may also be scenarios where zones might only be limited to specific nodes. According to our advanced options, further details like DNS server and also the forward- & reverse zones can be defined. For this basic setup, this will not be used but the automatic DHCP option must be activated.
Now, the next steps will be done in the chapter VNets where the previously created zone will be linked to a virtual network. In the same step we will also provide additional network information like the network range etc.
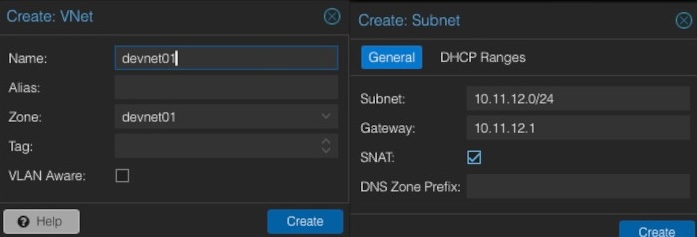
When creating a new VNet, an identifier or name must be given. It often makes sense to align the virtual network name to the previously generated zone name. In this example, the same names will be used. Optionally, an alias can be defined. The important part is to select the desired zone that should be used (e.g., devnet01). After creating the new VNet, we have the possibility to create a new subnet in the same window by clicking on the Create Subnet button.
Within this dialog, some basic network information will be entered. In general, we need to provide the desired subnet in CIDR notation (e.g., 10.11.12.0/24). Defining the IP address for the gateway is also possible. In this example the gateway will be placed on the IP address 10.11.12.1. Important is to activate the option SNAT. SNAT (Source Network Address Translation) is a technique to modify the source IP address of outgoing network traffic to appear as though it originates from a different IP address, which is usually the IP address of the router or firewall. This method is commonly employed to allow multiple devices on a private network to access external networks.
After creating and linking the zone, VNet and the subnet, the configuration can simply be applied on the web interface by clicking on the apply button. The configuration will now be synced to the desired nodes (in our example all ones).
Usage
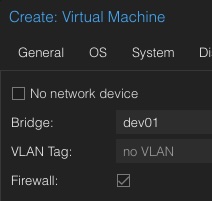 After applying the configuration on the nodes within the cluster, virtual machines must still be assigned to this network. Luckily, this can easily be done by using the regular Proxmox web interface which now also provides the newly created network devnet01 in the networking chapter of the VM. But also already present virtual machines can be assigned to this network.
When it comes to DevOps and automation, this is also available in the API where virtual machines can be assigned to the new network. Such a task could look like in the following example in Ansible:
 - name: Create Container in Custom Network
 community.general.proxmox:
 vmid: 100
 node: de01-dus01-node03
 api_user: root@pam
 api_password: {{ api_password }}
 api_host: de01-dus01-node01
 password: {{ container_password }}
 hostname: {{ container_fqdn }}
 ostemplate: 'local:vztmpl/debian-12-x86_64.tar.gz'
 netif: '{"net0":"name=eth0,ip=dhcp,ip6=dhcp,bridge=devnet01"}'
Virtual machines assigned to this network will immediately get IP addresses within our previously defined network 10.11.12.0/24 and can access the internet without any further needs. VMs may also moved across nodes in the cluster without any needs to adjust the gateway, even a node get shut down or rebooted for maintenances.
Conclusion
In conclusion, the integration of Software-Defined Networking (SDN) into Proxmox VE represents a huge benefit from a technical, but also from a user perspective where this feature is also usable from the Proxmox’s web ui. This ease of configuration empowers even those with limited networking experience to set up and manage even more complex network setups as well.
Proxmox makes it also easier with simple SDNs to create basic networks that let virtual machines connect to the internet. You don’t have to deal with complicated settings or gateways on the main nodes. This makes it quicker to get virtual setups up and running and lowers the chance of making mistakes that could lead to security problems.
For people just starting out, Proxmox has a user friendly website that makes it easy to set up and control networks. This is really helpful because it means they don’t have to learn a lot of complicated stuff to get started. Instead, they can spend more time working with their virtual computers and not worry too much about how to connect everything.
People who know more about technology will like how Proxmox lets them set up complex networks. This is good for large scaled setups because it can make the network run better, handle more traffic, and keep different parts of the network separate from each other.
Just like other useful integrations (e.g. Ceph), also the SDN integration provides huge benefits to its user base and shows the ongoing integration of useful tooling in Proxmox.
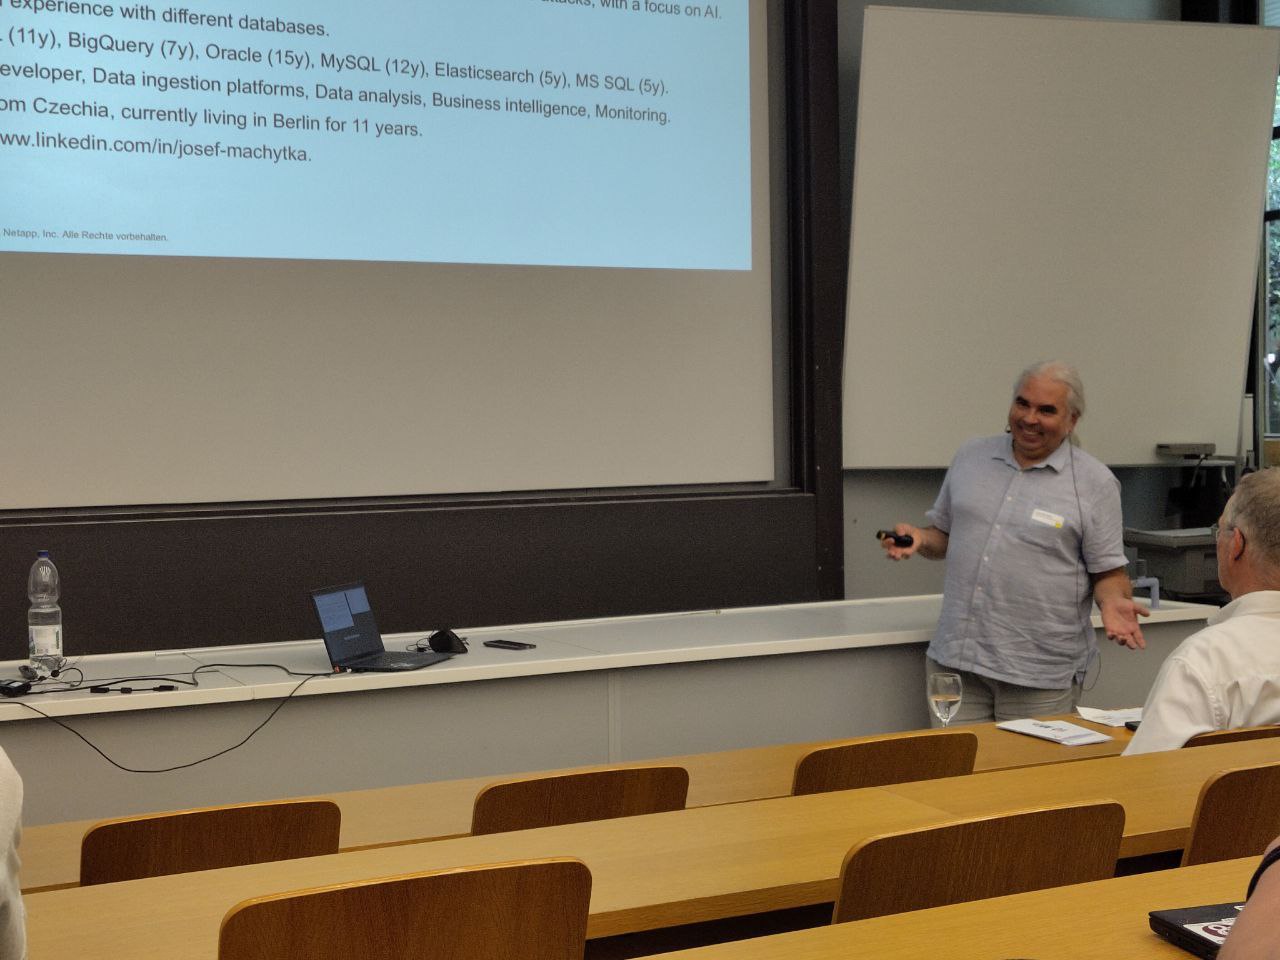
On Thursday, 27 June, and Friday, 28 June 2024, I had the amazing opportunity to attend Swiss PGDay 2024. The conference was held at the OST Eastern Switzerland University of Applied Sciences, Campus Rapperswil, which is beautifully situated on the banks of Lake Zurich in a nice, green environment. With approximately 110 attendees, the event had mainly a B2B focus, although not exclusively. Despite the conference being seemingly smaller in scale compared to PostgreSQL events in larger countries, it actually reflected perfectly the scope relevant for Switzerland.
During the conference, I presented my talk “GIN, BTREE_GIN, GIST, BTREE_GIST, HASH & BTREE Indexes on JSONB Data“. The talk summarized the results of my long-term project at NetApp, including newer interesting findings compared to the presentation I gave in Prague at the beginning of June. As far as I could tell, my talk was well received by the audience, and I received very positive feedback.
At the very end on Friday, I also presented a lightning talk, “Can PostgreSQL Have a More Prominent Role in the AI Boom?” (my slides are at the end of the file). In this brief talk, I raised the question of whether it would be possible to implement AI functionality directly into PostgreSQL, including storing embedding models and trained neural networks within the database. Several people in the audience, involved with ML/AI, reacted positively on this proposal, acknowledging that PostgreSQL could indeed play a more significant role in ML and AI topics.
The conference featured two tracks of presentations, one in English and the other in German, allowing for a diverse range of topics and speakers. I would like to highlight some of them:
- Tomas Vondra presented “The Past and the Future of the Postgres Community“, explaining how work on PostgreSQL changes and fixes is organized in Commitfests and discussing future development ideas within the community.
- Laurenz Albe’s talk, “Sicherheitsattacken auf PostgreSQL“, highlighted several potential attack vectors in PostgreSQL, capturing significant attention with surprising examples.
- Chris Engelbert’s presentation, “PostgreSQL on Kubernetes: Dos and Don’ts“, addressed the main issues related to running PostgreSQL on Kubernetes and discussed solutions, including pros and cons of existing PostgreSQL Kubernetes operators.
- Maurizio De Giorgi and Ismael Posada Trobo discussed “Solving PostgreSQL Connection Scalability Issues: Insights from CERN’s GitLab Service“, detailing the challenges and solutions for scalability in CERN’s vast database environment.
- Dirk Krautschick’s talk, “Warum sich PostgreSQL-Fans auch für Kafka und Debezium interessieren sollten?“, showcased examples of using Debezium connectors and Kafka with PostgreSQL for various use cases, including data migrations.
- Patrick Stählin discussed “Wie wir einen Datenkorruptions-Bug mit der Hilfe der Community gefunden und gefixt haben,” addressing issues with free space map files after migration to PostgreSQL 16.
- Marion Baumgartner’s presentation, “Geodaten-Management mit PostGIS,” provided interesting details about processing geo-data in PostgreSQL using the PostGIS extension.
- Prof. Stefan Keller, one of the main organizers and a professor of Data Engineering at Rapperswil OST University, presented “PostgreSQL: A Reliable and Extensible Multi-Model SQL Database“, discussing the multi-model structure of PostgreSQL amid declining interest in NoSQL solutions.
- Luigi Nardi from DBTune presented “Lessons Learned from Autotuning PostgreSQL“, describing an AI-based performance tuning tool developed by his company.
- Kanhaiya Lal and Belma Canik delved into “Beyond Keywords: AI-powered Text Search with pgvector for PostgreSQL,” exploring the use of the pgvector extension to enhance full-text search capabilities in PostgreSQL.
- Gabriele Bartolini, the creator of the PostgreSQL Kubernetes Operator “CloudNativePG,” discussed the history and capabilities of this operator in his talk, “Unleashing the Power of PostgreSQL in Kubernetes“.
At the end of the first day, all participants were invited to a social event for networking and personal exchange, which was very well organized. I would like to acknowledge the hard work and dedication of all the organizers and thank them for their efforts. Swiss PGDay 2024 was truly a memorable and valuable experience, offering great learning opportunities. I am grateful for the chance to participate and contribute to the conference, and I look forward to future editions of this event. I am also very thankful to NetApp-credativ for making my participation in the conference possible.
Photos by organizers, Gülçin Yıldırım Jelínek and author:


NetApp Storage and NVMe-oF for Breakthrough Performance in Proxmox Virtualization Environments
What is NVMe-oF
NVMe over Fabrics (NVMe-oF) is a cutting-edge protocol that has been developed to bring the impressive performance and low-latency characteristics of NVMe storage devices over network fabrics. This innovation is particularly transformative for data centers, as it facilitates the separation of storage and compute resources, granting administrators the ability to deploy these resources more flexibly and with greater scalability which makes it perfectly fine for virtualization workloads.
NVMe-oF is versatile in its support for multiple transport layers where it can operate over Fibre Channel (FC), Ethernet with the TCP/IP protocol with RDMA capabilities through RoCE or iWARP, and even utilize InfiniBand, each offering unique performance features tailored to different deployment needs.
NVMe-oF via TCP
When NVMe-oF is deployed over Ethernet with TCP, it brings the benefits of NVMe storage to the broadest possible range of environments without the need for specialized network infrastructure like Fibre Channel or InfiniBand. This brings access to high-performance storage by utilizing the common and familiar TCP stack, significantly reducing complexity and cost. The adoption of NVMe-oF with TCP is further facilitated by the widespread availability of Ethernet and expertise, making it a compelling choice for organizations looking to upgrade their storage networks without a complete overhaul.
The protocol’s efficiency is well maintained even over TCP, allowing NVMe commands to be passed with minimal overhead, thus keeping latency at bay, which is critical for latency-sensitive applications like virtualized data servers.
Configuring NetApp Storage
General
The guide presumes that users have already established the foundational storage setup, including the configuration of Storage Virtual Machines (SVMs). It highlights that the administration of these systems is relatively straightforward, thanks to the intuitive web interface provided by NetApp storage systems. Users can expect a user-friendly experience when managing their storage solutions, as the web interface is designed to simplify complex tasks. This also includes the whole setup for NVMe-oF storage, which requires to enable NVMe in general on the SVM, setting up the NVMe namespace and the NVMe subsystem.
Note: All changes can of course also be performed in an automated way by orchestrating the OnTap API.
Enable NVMe on SVM
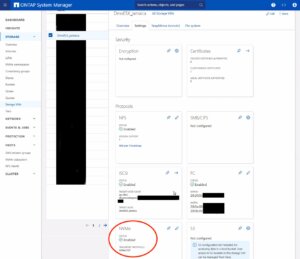 To enable NVMe at the SVM level on a NetApp storage system, this can typically be done by following these summarized steps, which can be accessed through the system’s web interface. Simply navigate to the Storage menu, then to Storage VMs, and finally selecting the specific SVM name you wish to configure:
- Configure NVMe Protocol: Within the SVM settings, look for a section or tab related to protocols. Locate the NVMe option and enable it. This might involve checking a box or switching a toggle to the ‘on’ position.
- Save and Apply Changes: After enabling NVMe, ensure to save the changes. There might be additional prompts or steps to confirm the changes, depending on the specific NetApp system and its version.
Remember to check for any prerequisites or additional configuration settings that might be required for NVMe operation, such as network settings, licensing, or compatible hardware checks. The exact steps may vary slightly depending on the version of ONTAP or the specific NetApp model you are using. Always refer to the latest official NetApp documentation or support resources for the most accurate guidance.
Creating the NVMe Subsystem
Afterwards, a new NVMe subsystem can be created on the NetApp storage system. This can be done by selecting the Hosts section, and choosing NVMe Subsystem to start the process of adding a new subsystem. A new wizard opens up which requires additional information regarding the newly to be created subsystem:
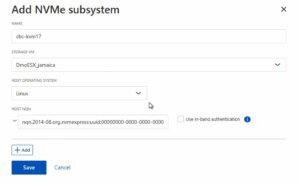 Name: <An identifier of the NVMe subsystem>
Storage VM: <The previously adjusted SVM>
Host Operating System: Linux (important for the block size)
Host NQN: <NQN of the Proxmox VE node>
It’s essential to ensure that all information, especially the Hosts NQN, is correctly entered to avoid connectivity issues. Additionally, consult the official NetApp documentation for any version-specific instructions or additional configuration steps that may be required.
Creating the NVMe Namespace
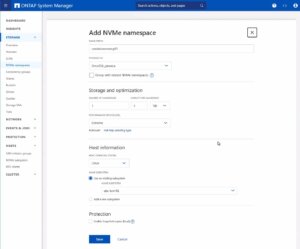 As a last step the NVMe namespace must be created. To add an NVMe namespace on a NetApp storage system, you would begin by logging into the web interface and navigating to the Storage section, followed by selecting NVMe Namespaces. In this area, you initiate the process of creating a new namespace. You will be prompted to provide specific details for the namespace, such as its name, size, and the associated SVM that will manage it.
Note: Also take an important note about the Performance Service Level which might be switched to a custom profile to avoid any limitations.
Once you have entered all the necessary information, you will typically proceed to choose the performance characteristics, like the service level or tiering policy, depending on your performance needs and the capabilities of your NetApp system.
After configuring these settings, you need to review your choices and save the new namespace configuration to make it available for use. It is important to ensure that the namespace is properly configured to match the requirements of your environment for optimal performance and compatibility. Always check for any additional steps or prerequisites by consulting the NetApp documentation relevant to your ONTAP version or storage model.
The configuration on the storage part is now complete. The next steps will be performed on the Proxmox VE node(s).
Configuring Proxmox Node
General
After configuring the NetApp storage appliance, all Proxmox VE nodes within the cluster must be configured to use and access the NVMe-oF storage. Unfortunately, Proxmox VE does not support this type of storage out of the box. Therefore, this cannot be easily configured by the Proxmox web interface. Luckily, Proxmox VE is based on Debian Linux from where all needed dependencies and configurations can be obtained but it requires us to do everything on the command line (CLI). Depending on the amount of nodes within the cluster, further config management tools like Ansible may boost up the initial setup process and make it repeatable for new potential nodes in the future. We may also assist you by setting up custom config management environments fitting your needs.
In general, this process consists of:
- Installing needed packages.
- Enabling the Kernel modules.
- Discovery of the storage.
- Connecting with the storage.
- Creating a LVM Volume Group.
- Assigning the storage in the Proxmox web interface.
The next steps in this blog post will cover the process in detail and guide you through the needed steps on the Proxmox VE nodes which must be done on the command line.
Installing Needed Packages
Using and accessing NVMe-oF requires the related user land tools (nvme-cli) to be present on the Proxmox VE node. Debian Linux already provides those tools within the Debian repository. As a result, the overall installation process is very easy. The package can simply be installed by the following command:
apt-get install nvme-cli
This package also already provides the required Kernel module which can simply be loaded by running:
modprobe nvme_tcp
Afterwards, the module should be added to be loaded at boot time:
echo "nvme_tcp" > /etc/modules-load.d/20-nvme_tcp.conf
After these steps, a connection with the storage can be initialized.
Connecting With the Storage
Interacting with the NetApp storage and its NVMe-oF functionality is a multi-step process and requires us to exchange the NVMe Qualified Name (NQN) address of each Proxmox VE node accessing the NVMe storage. The NQN address of a Proxmox VE node can be obtained by running the command:
cat /etc/nvme/hostnqn
![]()
Add the host NQN address on your NetApp export to allow the nodes accessing it. An example output is given in the screenshot.
Discovery & Connecting
In the next step, the NVMe’s will be discovered and connected to the Proxmox VE node. The discovery and connect process is simply done by running the following commands:
nvme discover -t tcp -a 192.168.164.100 -s 4420
 nvme connect -t tcp -n na01-nqn01 -a 192.168.164.100 -s 4420
To make this configuration persistent to system reboots, the commands will also be added to the nvme discovery file. The nvmf-autoconnect systemd unit file ensures to load this. Therefore, this systemd unit file must also be enabled.
echo "discover -t tcp -a 192.168.164.100 -s 4420" >> etc/nvme/discovery.conf
 systemctl enable nvmf-autoconnect.service
Volume Group
The last steps will partially be done on the command line and on the Proxmox web interface to add the new storage to the cluster.
Important:
This steps must only be done on a single Proxmox VE host node and not on all ones. The integration happens on cluster level and implies all Proxmox VE nodes once this has been done.
The last command on the command line results in creating a new LVM Volume Group (VG) on the new NVMe device which can simply be done by executing the command:
vgcreate shared_nvme01 /dev/nvme0n1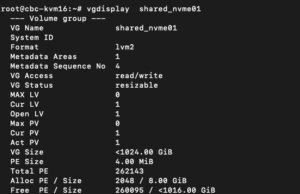
The newly created LVM Volume Group (VG) can be validated by running the command:
vgdisplay shared_nvme01
An output like in the given screenshot should be returned, including all further details of this VG. After validating the information, all tasks are completed on the command line.
To finally use this LVM Volume Group on all Proxmox VE nodes within the cluster, this Volume Group must be added and integrated on cluster level. Therefore, we need to login to the web frontend of the cluster and add this under:
- Datacenter
- Storage
- Add
- LVM
In the new window some more details for the new LVM storage have to be defined:
- ID: shared_nvme01 (this can be any text and is jut an identifier)
- Base storage: Existing volume groups
- Volume group: shared_nvme01
- Content: Disk image, Container (may vary)
- Nodes: <Select all nodes that should use it>
- Enables: Yes
- Shared: Yes
- Wipe Removed Volumes: No

By pressing on Add this will be attached to the selected nodes as a new volume and can directly be used.
Conclusion
The utilization of NVMe over Fabrics (NVMe-oF) via TCP in addition with Proxmox VE in a virtualization environment presents a compelling solution for organizations looking at cost-effective yet high-performance storage architectures. This approach leverages the widespread availability and compatibility of Ethernet-based networks, avoiding the need for specialized hardware such as Fibre Channel or InfiniBand, which can be cost-prohibitive for many enterprises.
By integrating NVMe-oF with Proxmox, a popular open-source virtualization platform, users can benefit from significantly improved data transfer speeds and lower latency compared to traditional storage solutions. NVMe-oF may not only be used with Proxmox VE but also on other operating systems like FreeBSD and hypervisors like bhyve. This provides a great benefit for latency-sensitive workloads, such as virtualized database servers, where rapid access to data is critical for performance. The NVMe protocol is designed to exploit the full potential of solid-state storage technologies. When used over a network fabric using TCP, it can deliver near-local NVMe performance by being very cost-effective.
At your convenience, we’re available to provide more insights into NetApp storage systems, covering both hardware and software aspects. Our expertise also extends to open-source products, especially in establishing virtualization environments using technologies like Proxmox and OpenShift or in maintaining them with config management. We invite you to reach out for any assistance you require.
You might also be interested in learning how to migrate VMs from VMware ESXi to Proxmox VE or how to include the Proxmox Backup Server into your infrastructure.
Creating a Virtualization Environment
Everyone is nowadays talking about containerization but there are still many reasons to run virtual machines and it doesn’t always have to be Proxmox VE on Linux systems to create a virtualization environment with open-source tools!

Next to the well known Proxmox, there are also other open-source alternatives when it comes to virtualization. A promising solution is also given by bhyve (pronounced bee-hive) which runs on FreeBSD based systems. It was initially written for FreeBSD but now also runs on a number of illumos based distributions like OpenIndiana. bhyve offers a robust and high-performance virtualization solution where it directly operates on the bare metal, utilizing the hardware virtualization features for enhanced performance and isolation between virtual machines. Known for its performance, stability and security, bhyve is integrated into FreeBSD, benefiting from the reliability of the FreeBSD kernel. Of course it also provides the typical feature set such as snapshotting and cloning of VMs. Especially in such cases it benefits from additional features in FreeBSD like the ZFS filesystem. Unfortunately, bhyve does not offer any web-frontend for its administration. This is where bhyve-webadmin (BVCP) steps in to fill the gap. This blog post we will cover the initial setup and features of bhyve and bhyve-admin to provide a fully usable virtualization environment.
Features
bhyve-webadmin (also known as BVCP) provides an API, CLI and a secure web interface for administrating bhyve and virtual machines. bhyve-webadmin mainly features:
- Modularity
- Backend, Frontend, API and helpers are working independently including separate privileges.
- Multi Node
- Multiple server/instances can be orchestrated by a single interface.
- Security
- Native Application
- Roles
- Providing user management including multiple roles.
Requirements
Some general requirements must be fulfilled to run bhyve bundled with bhyve-webadmin:
- System with a minimal FreeBSD image installed.
- 64-bit CPU
- POPCNT (POPulation Count) processor feature
Additional configuration regarding the underlying storage and network configuration are needed but while these are individual for each setup this is not covered in detail within this guide.
Installation
This guide is based on FreeBSD 14 and bhyve-webadmin v1.9.8p9 to provide a virtualization infrastructure. bhyve-webadmin’s concept relies on working as close as possibly to the FreeBSD system and will not change its configuration. Instead, it will install and maintain everything in dedicated directories, configurations and services. As a result, the whole installation including all further dependencies and configuration can be done in minutes.
Overview
File-Structure
By default, bhyve-webadmin will use the following directories for the content:
- /var/lib/nPulse/BVCP: bhyve-webadmin content
- /var/lib/nPulse/BVCP/bvcp.conf: configuration file
- /vms
- /vms/instances
- /vms/iso-images
- /vms/db
- /vms/logs
- /vms/tmp
- /vms/bootrom
Additional helper tools can be found within these directories. For example, a forgotten password can be resetted by running:
- /var/lib/nPulse/BVCP/Backend/vmm reset_password
Services
As already mentioned before, it consists of multiple and independently working software components that can also be orchestrated.
Frontend:
service bvcp-frontend start / stop / restart
Backend:
service bvcp-backend start / stop / restart
Helper:
service bvcp-helper start / stop / restart
Software Installation
cd /tmp/
fetch https://github.com/DaVieS007/bhyve-webadmin/archive/refs/tags/v1.9.8p9.tar.gz
tar xfvz v1.9.8p9.tar.gz
sha256sum /tmp/bhyve-webadmin-1.9.8p9.tar.gz
$> 758f5900c75a1832c980ed23c74a893f05252aa130e7c803843dac1d2531516f  /tmp/bhyve-webadmin-1.9.8p9.tar.gz
cd bhyve-webadmin-1.9.8p9/
./install.sh
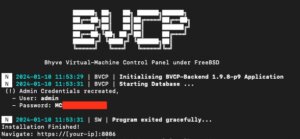
After finishing the installation, all needed directories, configuration and services have been created and the services are already running on the system. On the CLI, the login credentials for the web interface are provided and a login on the web frontend on https://<ip>:8086 is possible. By default, self-signed certificates are generated for the encryption of the web frontend and VNC sessions. The generated self-signed certificates can be later replaced by proper ones (e.g. by using Let’s Encrypt).
Adding ISO-Images
ISO-Images for virtual machines are located in /vms/iso_images. Adding images is simply done by dropping the images within that directory. This can be done on the uploading images via SCP, SFTP or on the system itself by downloading an image from a remote like in the given example:
cd /vms/iso_images/
fetch https://download.freebsd.org/releases/amd64/amd64/ISO-IMAGES/14.0/FreeBSD-14.0-RELEASE-amd64-bootonly.iso
Configuration
An initial first login on the web frontend can now be done. The web frontend can be reached on https://<ip>:8086 and uses self-signed certificates by default. The credentials for the root user login have been printed on the CLI during the setup runtime.
bhyve BVCP Login
After a successful login, the default overview page is being displayed.
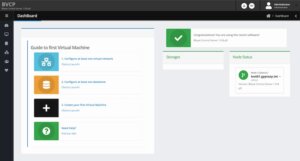
After an initial installation it will guide you through the following three next steps which will be covered in detail:
- Configure Network
- Configure Storage
- Create VM
Configure Network
Networking is one of the most important and complex parts when it comes to virtualized environments. Even more complex setups including VLAN separations etc. are possible but not covered within this guide which primarily focuses on a simple bridged– & NAT– networking setup.
Bridged Network
A simple bridged network can be created by clicking on the first Option 1. Configure at least one virtual network where we can create a new network on our cluster. Creating a new network is simple where just the desired network interface on the cluster must be selected.
Within this guide we select the following options which may vary depending on your personal setup:
Network Gateway to bound: (+) [em0] (mtu: 1500) 10.10.10.77
Unique Network Name: uplink-dev
Descriptive Text: Uplink network for the dev environments
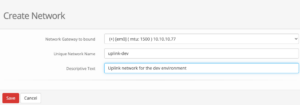
bhyve BVCP – Create Network
In the given drop-down menu all available network cards will be shown with their interface name and assigned ip address(es) which makes it easy to choose the right one. After saving the configuration, the newly created network is directly usable.
NAT Network
NAT is already considered as a more advanced networking setup but often needed when working with RFC 1918 addresses. NAT is not supported by default and needs to be configured manually. Within this guide a NAT networking will be created for the interface em1 by using PF (a FreeBSD integrated firewall).
Therefore, we enable the PF service in the rc.conf file by running the following command, enabling IP forwarding and directly edit the firewall configuration file:
echo 'pf_enable="YES"' >> /etc/rc.conf
echo "net.inet.ip.forwarding=1" >> /etc/sysctl.conf
sysctl -f /etc/sysctl.conf
vi /etc/pf.conf
The firewall configuration for NAT networking on the em1 interface will be extended by the following content:
nat on em1 from {10.10.10.1/24} to any -> (em1)
Optional: Also port forwarding can be defined in this file which would need to add:
# Forward SSH (tcp/22) to NAT destination host 192.168.1.99
rdr on em1 proto tcp from any to em1 port 22 -> 192.168.1.99 port 22
As a last step, a dummy interface must be created, that be selected in the web frontend service. As a result, this will be added to the /etc/rc.conf file by adding:
cloned_interfaces="nat0"
ifconfig_nat0="inet 192.168.1.1 netmask 255.255.255.0 up"
Finally, the required services can be restarted by running:
service netif restart && service routing restart
Configure Storage
In a next step the storage must be configured. Therefore, this can simply be initiated by clicking on 2. Configure at least one data store in the web UI. By default, no one is created and configured:

bhyve BVCP – Storage Overview
By clicking on Create Storage a new storage will be created. Newly created storages must be a mount point.
Create VM
Within the last step, the first virtual machine gets created. This can be finally done by clicking on 3. Create your first Virtual Machine where the options for the VM will be defined.
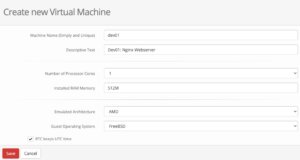
bhyve BVCP – Create VM
Within this menu, a unique name, a description, the hardware resources like number of cores and memory als the underlying hardware architecture must be defined. After saving, the VM object gets created and we can perform additional tasks like defining an ISO-Image that should be booted in the VM.
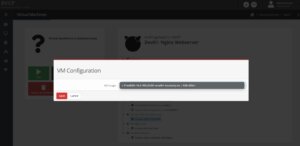
bhyve BVCP – Add ISO Image to VM
As already mentioned before in the File Structure chapter, all available ISO-Images must be located in /vms/iso-images. Placed images can be directly selected from the drop-down menu.
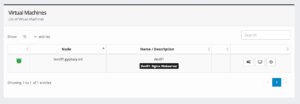
Within the last step, the VM can be started by clicking on the play button. Switching back to the Virtual Machine overview (List of Virtual Machines) the VM will be displayed with a green icon as an indication that this virtual machine is up and running.
The VM can now be accessed by the integrated VNC server by clicking on the monitor icon in the middle of the option menu.
Statistics
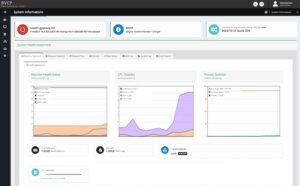
Performance metrics and statistics of the system usage are an important task. BVCP offers many options to validate the machine health status including performance metrics and statistics of the memory-, CPU-, storage-, networking, etc. usage to quickly detect any negative impacts on an overloaded host node. Beside this, it can also help to evaluate the source of any performance problems in the setup or of a single virtual machine instance.
Conclusion
It doesn’t always have to be Proxmox on Linux systems to create a fast and secure virtualization environment with open-source tools. FreeBSD, bhyve and bhyve-webadmin (BVCP) offer a great bundled solution to run a dedicated virtualization infrastructure which does not need any knowledge in FreeBSD, bhyve or any CLI commands for the end user. Given by the included IAM, users are able to login to a graphical web frontend and to manage their virtual machines on their own.
As a specialists for open-source and open-source infrastructure we are also happy to assist you and your business in BSD based systems including their features like ZFS, PF, Jails, bhyve etc.. Since 1999, credativ® has been recognized for providing 24/7 open source support that rivals manufacturer support. We do not just provide technical support, we also provide all other services across the entire lifecycle of open-source landscapes completed by high flexibility.
From April, 18th until Friday, 21st the KubeCon in combination with the CloudNativeCon took place in Amsterdam: COMMUNITY IN BLOOM. An exciting event for people with interest in Kubernetes and cloud native technologies.

At credativ, it is must to pre-train us in many relevant areas. This of course includes Kubernetes and Cloud Native technologies. The KubeCon/Cloud Native Con has been one of the conferences on our must-attend list for several years now.
A short diary
We started our journey to the KubeCon by Tuesday evening with the badge pickups. On Wednesday the Keynotes started with the usual welcome words and opening remarks.
The information that 10000 attendees have been registered with additional 2000 people on the wait list was really impressive and shows the importance of Cloud Native technologies. Nearly 58% of the attendees were new to the conference which proves that more and more people get in touch with Kubernetes and Co.
In addition to the common sponsored keynotes a short update of the CNCF graduated projects was presented. There was a wide variation of projects. From FluxCD to Prometheus, Linkerd, Harbor and many more.
The second day started once again with keynotes which included several project updates e.g. Kubernetes and incubating projects.
The last day as usual opened with keynotes. A highlight here was the presentation “Enabling Real-Time Media in Kubernetes” which gave some insights about a Media Streaming Mesh.
Supplemental to the talks and presentations some tutorials happened. Those tutorials usually take at least two time slots and therefore, provide a deeper insight into a specific topic and left room for questions. The tutorials we visited were well prepared and several people were cruising through the attendees to help and answer questions. One of those tutorials showed the usage and benefits of Pixie which provides deep insights into a system using eBPF and various open source projects.
Beyond the tracks a booth location was available, it has been divided (by halls) to the company related booths and an area with projects. NetApp was represented at several booths.
The main theme this year seemed to be all about eBPF and Cilium. Various presentations on different tracks highlighted this topic and showed areas of application for eBPF. Different Cilium talks presented various aspects of Cilium for e.g. observability or multi-cluster connections and application failover.
Not so good
One bad thing has to be mentioned. Some talks were full. Really full. To some of them we got no access due to the fact, that the room was filled 15-30 minutes before the talk started. Maybe it would be possible for the next time to ask all users to create a personal schedule in the corresponding app and reassign the rooms by the amount of interested (scheduled) people.
Keynotes, Talks and Presentations
A short overview about the (visited) highlights of the talks and presentations:
- “Improve Vulnerability Management with OCI Artifacts – It Is That Easy” a great talk about images and artifacts related to trivy
- “Anatomy of a Cloud Security Breach – 7 deadly sins” – a short recap of really occured security breaches. Nothing unknown but a good comprehension.
- “Creating a Culture of Documentation” – about integrating the documentation process and creating a culture.
- “Kubernetes Defense Monitoring with Prometheus” – an encouraging presentation about the usage of metrics
- “Breakpoints in Your Pod: Interactively Debugging Kubernetes Applications” – a great talk about requirements and how to achieve debugging in pods
- “Effortless Open Source Observability with Cilium, Prometheus and Grafana – LGTM!” Highlighting the observability features from Cilium and service dependency maps with Hubble.
Conclusion
As always, the conference was worthwhile for gaining new impressions, having exchange with interesting people and expanding one’s knowledge. We were certainly happy to participate are already looking forward to attending the next KubeCon.

What is it?
Yunohost enables users to manage a Linux server entirely via a web UI. This includes server administration, application deployment, and integration into existing infrastructure.
In general, Yunohost is available under the AGPL 3.0. However, since it is based on Debian, there may be deviations, as may also be the case with the applications used.It is developed primarily by a general group of developers rather than a dedicated company or association.
The goal is to give users a simple and convenient way to host their own applications without having to rely on potentially proprietary or paid services.
Further details can also be found in the project’s FAQ.
Structure
Yunohost is based on the free operating system Debian (version 10 “buster”), including various repositories. Administration is handled via a custom-developed web UI, which can be used for various system tasks such as updates as well as managing the applications installed on the server. The application catalog is provided via a dedicated Yunohost APT repository; otherwise, only the standard Debian repositories are configured.
Yunohost itself can also handle multiple domains as targets and provide applications multiple times in different areas. It also includes integrated Let’s Encrypt and an integrated mail server, making it easy to handle SSL certificates and emails. Overall, it comes with a solid base set of features, which still needs to be tailored.
If using the web UI is too cumbersome, there is also a CLI tool that covers the most common UI functions for domains, user/group management, and other areas.
Requirements
The basic hardware requirements are fairly minimal; however, the final requirements depend on the applications used later. For example, a small Raspberry Pi will likely be too limited to handle multiple databases, web apps, and collaborative office tools. An overview from the developers themselves can be found in the documentation.
Installation
Various images are available for different platforms (including Raspberry and ARM devices) and can be downloaded and used directly.
As with many Linux distributions, installation can be performed either via a graphical interface or in text mode. The installation is highly guided and automated, so even a less experienced user should be able to complete it without any issues. This does, of course, come at the expense of customization. For example, in the current version it is not possible to configure a custom disk layout.
After installation is complete, Yunohost can be initially configured via the web interface by accessing the IP/hostname. In the web UI, you are also prompted to set an initial admin password, which is then also set for the root SSH user. The initial SSH password without setup is `yunohost` and should be changed as soon as possible by completing the setup.
Yunohost is able to work with various external systems, e.g., for authentication and DynDNS. Depending on your infrastructure, it is helpful to review the documentation in advance to avoid effort later on.
Applications
Yunohost offers a large catalog of apps that can be installed and basically configured via the interface.
Please note that only a rough configuration is possible via the interface, such as setting a URL and the application’s hostname, as well as creating an administrative user from the Yunohost user base. For granular settings, you will need to use SSH on the host again. While the applications are provided with a general best-practice configuration rather than completely unconfigured, this is not necessarily sufficient, especially for more complex or more flexible applications such as the Matrix server Synapse.
However, after the initial (possibly manual) configuration, ongoing management for further updates and upgrades can at least be handled directly from the web UI.
When installing an application, you can also specify whether it should be publicly available or only available to users registered in Yunohost. However, these users are independent of any users that may need to be created within the application itself, but they do provide a way to separate applications into public and internal areas.
Conclusion
This is only intended as a brief initial overview of the project. Especially for private users who do not want to deal with deploying and maintaining services, but only want to make adjustments to the applications, it may well be worth a look. The large catalog of already supported applications is also regularly expanded, and integration is continuously improved.
The documentation is generally available in German, but localization is not yet fully complete, so if in doubt it makes sense to use the English documentation where possible. However, this primarily affects specific sub-areas; most general topics are also available in German. Thanks to the fairly intuitive operation of the web interface, you can, if necessary, also do without these parts of the documentation.
There is a dedicated link for contributing to the project.
If you would like to get an impression of the web UI and its capabilities before installing it yourself, you can also use the public demo instance.
We are Happy to Support You
Whether Yunohost, Debian, or Postgres: with more than 22+ years of development and service experience in the open source space, credativ GmbH can support you professionally with unparalleled, individually configurable support and fully assist you with all questions relating to your open source infrastructure.
Do you have questions about our article, or would you like credativ’s specialists to take a look at another software solution of your choice?
Then drop by and get in touch via our contact form or email us at info@credativ.de.
PostgreSQL® 9.3 ist da! Die neue Hauptversion bringt viele Verbesserungen und neue Funktionen. Dieser Artikel stellt einige der interssanten Neuerungen vor.
Verbessertes Locking mit Fremdschlüsseln
Fremdschlüssel sind unabdingbar für die referentielle Integrität der Daten. Allerdings brachten diese bis einschließlich PostgreSQL® 9.2 auch unter bestimmten Bedingungen Lockingprobleme bei UPDATE auf Spalten mit Fremdschlüsseln mit sich. Vor allem bei überlappenden Aktualisierungen mehrerer Transaktionen über einen Fremdschlüssel kann es sogar zu Deadlocks kommen. Das folgende Beispiel ist in PostgreSQL® 9.2 problematisch, exemplarisch an diesem einfachen Datenmodell demonstriert:
CREATE TABLE parent(id integer, value text);
ALTER TABLE parent ADD PRIMARY KEY(id);
CREATE TABLE child(id integer, parent_id integer REFERENCES parent(id), value text);
INSERT INTO parent VALUES(1, 'bob');
INSERT INTO parent VALUES(2, 'andrea');
Zwei Transaktionen, jeweils Session 1 und Session 2 genannt, werden zeitgleich in der Datenbank gestartet:
Session 1
BEGIN;
INSERT INTO child VALUES(1, 1, 'abcdef');
UPDATE parent SET value = 'thomas' WHERE id = 1;
Session 2
BEGIN;
INSERT INTO child VALUES(2, 1, 'ghijkl');
UPDATE parent SET value = 'thomas' WHERE id = 1;
Session 1 und Session 2 führen beide den INSERT erfolgreich aus, der UPDATE blockiert jedoch in Session 1, da der INSERT in Session 2 einen sogenannten SHARE LOCK auf das Tupel mit dem Fremdschlüssel hält. Dieser steht in Konflikt mit der Sperre, die der UPDATE auf den Fremdschlüssel haben möchte. Nun versucht Session 2 seinerseits seinen UPDATE abzusetzen, dies erzeugt jedoch wiederum einen Konflikt mit dem UPDATE aus Session 1; Ein Deadlock ist entstanden und wird automatisch in PostgreSQL® 9.2 aufgelöst. In diesem Fall wird jedoch die Transaktion in Session 2 abgebrochen:
ERROR:  deadlock detected
DETAIL:  Process 88059 waits for ExclusiveLock on tuple (0,1) of relation 1144033 of database 1029038; blocked by process 88031.
Process 88031 waits for ShareLock on transaction 791327; blocked by process 88059.
In PostgreSQL® 9.3 gibt es jetzt ein deutlich verfeinertes Locking bei Aktualisierungen auf Zeilen und Tabellen mit Fremdschlüsseln, die das angeführte Problem entschärfen. Hierbei werden Tupel, die kein gezieltes UPDATE auf einen Fremdschlüssel darstellen (d.h. der Wert eines Fremdschlüssels wird nicht verändert), mit einem schwächeren Lock (FOR NO KEY UPDATE) gesperrt. Für das einfache Prüfen eines Fremdschlüssels verwendet PostgreSQL® des weiteren den neuen FOR KEY SHARE Lock, der hiermit nicht in Konflikt steht. Dies verhindert im gezeigten Beispiel einen Deadlock, der UPDATE in Session 1 wird zunächst ausgeführt, der in Konflikt stehende UPDATE in Session 2 muss warten, bis Session 1 erfolgreich die Transaktion bestätigt oder zurückrollt.
Parallel pg_dump
pg_dump besitzt mit der neuen Kommandozeilenoption -j die Möglichkeit, parallel Tabellen und deren Daten zu sichern. Diese Funktion kann einen Dump sehr großer Datenbanken erheblich beschleunigen, da Tabellen gleichzeitig gesichert werden können. Dies funktioniert nur mit dem Directory Ausgabeformat (-Fd) von pg_dump. Mittels pg_restore können diese Dumps dann ebenfalls mit mehreren Restoreprozessen gleichzeitig wiederhergestellt werden.
Updatable Foreign Data Wrapper und postgres_fdw
Mit PostgreSQL® 9.3 wurde die API für Foreign Data Wrapper (FDW) für DML-Kommandos erweitert. Dies ermöglicht die Implementierung von aktualisierbaren FDW-Modulen. Gleichzeitig wurde der Foreign Data Wrapper für PostgreSQL® (postgres_fdw) als Extension integriert. Dies erlaubt nun den transparenten Zugriff auf entfernte PostgreSQL®-Instanzen. Tabellen erscheinen dabei in der Datenbank als lokale Tabellen und können ohne weiteres zum Beispiel in komplexen SQL-Konstrukten wie JOINs oder Views verwendet werden. FDW werden in einem späteren Artikel an dieser Stelle noch ausführlicher erläutert.
Event Trigger
Ein schon länger von Anwendern gewünschtes Feature sind Event Trigger für DDL (Data Definition Language) Operationen, wie beispielsweise ALTER TABLE oder CREATE TABLE. Dies ermöglicht das automatische Reagieren auf bestimmte Ereignisse per DDL, wie beispielsweise bestimmte Aktionen zu protokollieren. Unterstützt werden im Moment Aktionen für ddl_command_start, sql_drop und ddl_command_end. Triggerfunktionen können mit C oder PL/PgSQL erstellt werden. Folgendes Beispiel für sql_drop verhindert beispielsweise das Löschen von Tabellen:
CREATE OR REPLACE FUNCTION del_event_func() RETURNS event_trigger AS $$
DECLARE
        v_item record;
BEGIN
        FOR v_item IN SELECT * FROM pg_event_trigger_dropped_objects()
        LOOP
                RAISE EXCEPTION 'deletion of object %.% forbidden', v_item.schema_name, v_item.object_name;
        END LOOP;
END;
$$ LANGUAGE plpgsql;

CREATE EVENT TRIGGER delete_table_obj ON sql_drop WHEN tag IN ('drop table') EXECUTE PROCEDURE del_event_func();

DROP TABLE child ;
FEHLER:  deletion of object public.child forbidden
Prüfsummen in Tabellen
Mit PostgreSQL® 9.3 gibt es nun die Möglichkeit, in Umgebungen, in denen die Zuverlässigkeit der verwendeten Speicherlösungen nicht garantiert werden kann (beispielsweise bestimmte Cloudumgebungen), den Datenbankcluster mit Prüfsummen zu initialisieren. PostgreSQL® organisiert Tupel in standardmäßig 8KB großen Blöcken. Diese bilden die kleinste Einheit, mit der die Datenbank auf dem Speichersystem arbeitet. Prüfsummen versehen diese Blöcke nun mit zusätzlichen Informationen, um Speicherfehler wie korrupte Blockheader oder Tupelheader frühzeitig erkennen zu können. Prüfsummen lassen sich nicht nachträglich aktivieren, sondern erfordern das Initialisieren des physikalischen Datenbankverzeichnisses mit initdb und dem neuen Kommandozeilenparameter –data-checksums. Dies gilt dann für sämtliche Datenbankobjekte wie Tabellen oder Indexe und hat eine Auswirkung auf die Geschwindigkeit.
Materialized Views
Die neue PostgreSQL® Version 9.3 enthält nun auch eine grundlegende Implementierung für Materialized Views. Normale Views in PostgreSQL® sind keine materialisierten Objekte im Sinne einer Tabelle. Im übertragenen Sinne muss man sich Views als eine Art Makro vorstellen, die PostgreSQL®auf die zugrundeliegende View anwendet. So wird ein SELECT * FROM <view> dann zum eigentlichen, beliebig komplexen SELECT umgeschrieben. Dies hat jedoch zur Folge, dass bei großen Datenmengen immer wieder das Ergebnis von neuem geplant, ausgeführt und materialisiert werden muss. Mit Materialized Views lassen sich Views erstellen, die die materialisierte Ergebnismenge direkt vorhalten. Die Implementierung in PostgreSQL® 9.3 ist jedoch noch sehr generisch. Auch blockiert das REFRESH MATERIALIZED VIEW Kommando alle Zugriffe auf den Materialized View.
Dies sind nur einige Beispiele aus der langen Liste von Neuerungen, die in die neue PostgreSQL® Version Einzug gehalten haben. Mit JSON, Verbesserungen in Streaming Replication und einigen Verbesserungen in der Konfiguration wie Shared Memory Nutzung sind noch viele andere Neuigkeiten hinzugekommen. Allen, die an detaillierten Ausführungen aller neuen Features interessiert sind, seien die Release Notes ans Herz gelegt. Für RedHat, CentOS, Scientific Linux und Fedora liegen RPM Pakete unter http://yum.postgresql.org bereit. Für Debian steht das PGAPT Repository zur Verfügung. Genaue Instruktionen findet man unter http://wiki.postgresql.org/wiki/Apt
Dieser Artikel wurde ursprünglich von Bernd Helmle geschrieben.
Auch lesenswert: PostgreSQL Foreign Data Wrapper für Informix