This weekend, it was time once again for FrOScon 2025. With perfect summer weather – not too hot, not too cold – the event took place at the university in Sankt Augustin, as it does every year. But this year was different: FrOScon celebrated its 20th anniversary. I have a special connection to the conference. Not only is it the largest local open source conference, but I have also been a part of it for many years. I have given countless presentations, organised Debian stands, and run and organised developer tracks. In 2007, I even had the pleasure of being part of the organising team. In a way, FrOScon is like coming home. Everywhere you look, you see familiar faces you've known for many years, former and current colleagues, good friends from the open source scene. The only comparable event is Fosdem in Brussels – which is not surprising, as Fosdem is the great role model for FrOScon.
A journey through time – 20 years of FrOScon

I was already involved in the first FrOScon as an exhibitor for the Debian project, speaker and organiser of the Debian track (together with my colleague Martin Zobel-Helas, who is still involved). I could probably still give the presentation on techniques for combating spam today without changing a word, as the topic has lost none of its relevance. The first FrOScon closed its doors with a very respectable attendance of around 300 visitors. I was so enthusiastic that I got directly involved in the organisation the following year – this was also the year we introduced the famous bouncy castle ;). Over the course of 20 years, FrOScon has developed into one of the largest German OSS community events and now attracts around 1,500 visitors every year. Over the years, the conference has also attracted various prominent keynote speakers, including Andrew Tanenbaum and Richard Stallman, to name but a few. Then as now, I can say that FrOScon is the best conference in the West.
FrOScon 2025
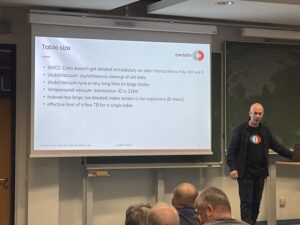
Let's get to the actual content of this blog post – FrOScon 2025. We were represented this year with two presentations and several colleagues as visitors. My colleague Patrick Lauer dedicated one of the rooms to the topic of "Postgres with many data". Thanks to c3voc, the presentation is also available as a stream for anyone who was unable to attend, so everyone can fill this knowledge gap at a later date.
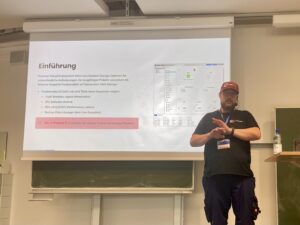
I also gave a presentation again this year. The topic was Proxmox VE and external block devices. I talked about the different types of block devices, such as ISCSI, Fibre Channel and NVMEoF, and how to use them. This presentation is also available in the c3voc video archive.
Conclusion
This FrOScon was once again a successful event for community members and interested professionals. It's a bit like a class reunion: you see lots of familiar faces and are excited to find out what everyone has been up to since you last met. Even if I'm hopefully retired by then, I would be delighted to give a presentation at FrOScon #40 ;).
From July 14 to 19, 2025, this year’s Debian Conference (DebConf25) is taking place in Brest, Western France, with over 450 participants – the central meeting of the global Debian community. The DebConf annually brings together developers, maintainers, contributors, and enthusiasts to collaboratively work on the free Linux distribution Debian and exchange ideas on current developments.
credativ is once again participating as a sponsor this year – and is also represented on-site by several employees.
A Week Dedicated to Free Software
DebConf25 offers a diverse program with over 130 sessions: technical presentations, discussion panels, workshops, and BoF sessions (“Birds of a Feather”) on a wide variety of topics from the Debian ecosystem. Some key topics this year:
- Progress surrounding Debian 13 “Trixie”, whose release is currently being actively worked on
- Reproducible Builds, System Integration, and Security Topics
- Debian in Cloud Environments and Container Contexts
- Improved CI/CD Infrastructure and New Tools for Maintainers
Many of the presentations will, as always, be recorded and are publicly available on video.debian.net, or can be viewed live via https://debconf25.debconf.org/.
Credativ’s Commitment – not just On-Site
As a long-standing part of the Debian community, it is natural for credativ to contribute as a sponsor to DebConf again in 2025. Furthermore, our colleagues Bastian, Martin, and Noël are on-site to exchange ideas with other developers, attend presentations or BoFs, and experience current trends in the community.
Especially for companies focused on professional open-source services, Debian remains a cornerstone – whether in data centers, in the embedded sector, or in complex infrastructure projects.
Debian Remains Relevant – both Technically and Culturally
Debian is not only one of the most stable and reliable Linux distributions but also represents a special form of community and collaboration. The open, transparent, and decentralized organization of the project remains exemplary to this day.
For us at credativ, the Debian project has always been a central element of our work – and at the same time, a community to which we actively contribute through technical contributions, package maintenance, and long-term commitment.
Thank You, DebConf Team!
Heartfelt thanks go to the DebConf25 organizing team, as well as to all helpers who made this great conference possible. Brest is a beautiful and fitting venue with fresh Atlantic air, a relaxed atmosphere, and ample space for exchange and collaboration.
Outlook for 2026
Planning for DebConf26 is already underway. We look forward to the next edition of DebConf, which will take place in Santa Fe, Argentina – and to continuing to be part of this vibrant and important community in the future.
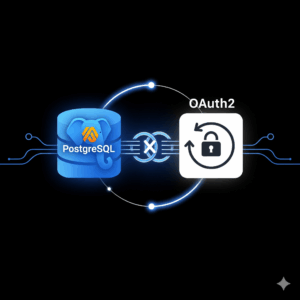 With the release of the beta version of PostgreSQL 18, an exciting new feature was introduced: native support for OAuth2. Since I couldn’t find any guide or blog post online showing how to use this feature, I decided out of curiosity to try it out myself.
I created a new project directory and started experimenting.
Environment and Objective
The goal was to set up PostgreSQL 18 Beta with OAuth2 authentication; for the identity provider, I chose Keycloak.
I decided to use Docker Compose to quickly and easily spin up both services.
Docker Compose Configuration
Here is the docker-compose.yml, which I used:
services:
  mock-oauth2:
    image: quay.io/keycloak/keycloak:24.0
    command: start --https-port=8080 --https-key-store-file=/etc/x509/https/localhost.p12 --https-key-store-password=changeit --import-realm --hostname-strict=false --hostname-url=https://mock-oauth2:8080
    ports:
      - "8080:8080"
    environment:
      KEYCLOAK_ADMIN: admin
      KEYCLOAK_ADMIN_PASSWORD: admin
    volumes:
      - ./certs:/etc/x509/https
      - ./keycloak-realm.json:/opt/keycloak/data/import/realm.json
    networks:
      - pgnet

  postgres18:
    build: .
    ports:
      - "5432:5432"
    environment:
      POSTGRES_PASSWORD: postgres
    volumes:
      - ./postgres/postgresql.conf:/etc/postgresql/postgresql.conf
      - ./postgres/pg_hba.conf:/etc/postgresql/pg_hba.conf
    command: ["-c", "config_file=/etc/postgresql/postgresql.conf"]
    networks:
      - pgnet

networks:
  pgnet:
    driver: bridge
PostgreSQL expects a connection to the OAuth2 issuer via HTTPS. The same URL must also be accessible from the host, for example, when using the Keycloak UI. This means the certificate must be valid and trusted on both the host and in the container.
The hostname used (e.g., https://mock-oauth2:8080) must be correctly resolvable in both environments.
For this, I added the following line to my /etc/hosts file on the host:
127.0.0.1 mock-oauth2This allowed both the PostgreSQL container and my host to reach the Keycloak service at https://mock-oauth2:8080.
TLS Certificate for Keycloak
Keycloak absolutely requires an HTTPS endpoint for the OAuth2 issuer URL to be accepted by PostgreSQL.
For this, I created a self-signed certificate and converted it into a .p12 keystore package that Keycloak can use.
The .p12 certificate is integrated into the container via the following mount:
volumes:
  - ./certs:/etc/x509/https
In the certs directory, there is the localhost.p12 file, which I created from my self-signed key and certificate as follows:
openssl req -x509 -nodes -days 365 \
  -newkey rsa:2048 \
  -keyout server.key \
  -out server.crt \
  -subj "/CN=mock-oauth2" \
  -addext "subjectAltName = DNS:mock-oauth2,DNS:localhost,IP:127.0.0.1"
Keycloak Realm Configuration
I created a minimalist realm file for Keycloak. It contains a client named postgres and a user with corresponding credentials.
Content of keycloak-realm.json:
{
  "realm": "pg",
  "enabled": true,
  "clients": [
    {
      "clientId": "postgres",
      "enabled": true,
      "publicClient": false,
      "redirectUris": ["*"],
      "protocol": "openid-connect",
      "secret": "postgres",
      "directAccessGrantsEnabled": true,
      "standardFlowEnabled": true
    }
  ],
  "users": [
    {
      "username": "postgres",
      "enabled": true,
      "credentials": [
        {
          "type": "password",
          "value": "postgres"
        }
      ]
    }
  ]
}
After importing the realm, Keycloak was ready and the default scope was visible in the UI.
Installation of libpq-oauth and oauth_validator
I had to extend the official PostgreSQL image to include additional dependencies such as the extension libpq-oauth as well as the validator oauth_validator to install.
PostgreSQL 18 experimentally supports OAuth2 authentication. However, PostgreSQL does not provide its own validator library. The official documentation states:
The PostgreSQL distribution does not include libraries for validating OAuth2 tokens. Users must provide their own solution or compile one themselves.
PostgreSQL
Docs –oauth_validator_libraries
For testing, I used the following open-source implementation:
This minimalist C library can be compiled and used as oauth_validator_library in PostgreSQL.
Used Dockerfile
FROM postgres:18beta1

USER root

RUN apt-get update \
    && apt-get install -y libpq-oauth build-essential libkrb5-dev \
       libsasl2-dev libcurl4-openssl-dev postgresql-server-dev-18 git \
    && git clone https://github.com/TantorLabs/oauth_validator.git /tmp/oauth_validator \
    && cd /tmp/oauth_validator \
    && make && make install \
    && rm -rf /tmp/oauth_validator \
    && apt-get remove -y build-essential git \
    && apt-get autoremove -y && rm -rf /var/lib/apt/lists/*
I then used this image for the `postgres18` service in my Docker Compose setup.
Making PostgreSQL Trust the Keycloak CA
PostgreSQL must trust the certificate presented by Keycloak, otherwise the connection to the OAuth2 issuer will be rejected.
For this, I copied the `mock-oauth.crt` file into the PostgreSQL container and placed it in the typical CA path:
/usr/local/share/ca-certificates/Then, inside the container, I executed the following command:
update-ca-certificatesAfter that, the certificate was accepted, and PostgreSQL could successfully verify the connection to the HTTPS issuer.
PostgreSQL Configuration
In pg_hba.conf , I added the following line:
host all all all oauth scope="profile" issuer="https://mock-oauth2:8080/realms/pg" map="oauthmap"In pg_ident.conf, I mapped the identity provided by the token to the PostgreSQL user:
oauthmap "postgresID" "postgres"This mapping may need to be adjusted – depending on how your Keycloak client is configured and which field (e.g.,
preferred_username or sub) is passed in the token.
Connection Test with OAuth2
To test the connection, I used the following `psql` command:
psql "host=localhost \
      port=5432 \
      dbname=postgres \
      user=postgres \
      oauth_issuer=https://mock-oauth2:8080/realms/pg \
      oauth_client_id=postgres \
      oauth_client_secret=changeme \
      oauth_scope=profile"
After the call, a device code message appears, such as:
Visit `https://mock-oauth2:8080/realms/pg/device` and enter the code FBAD-XXYZ.
After logging in with the user credentials, `psql` successfully establishes a connection to PostgreSQL via OAuth2.
Insights and Tips
- PostgreSQL 18 requires HTTPS for the OAuth2 issuer URL – even in a local setup.
pg_hba.confis sensitive to formatting errors. I had to reload the configuration multiple times (SELECT pg_reload_conf();) and carefully analyze the logs.- To trust a local certificate authority, it is sufficient to copy the
.crtcertificate into the container and register it withupdate-ca-certificates. - Keycloak is well-suited for testing with OAuth2, but you may need to experiment with scopes, claims, and secrets until everything aligns with PostgreSQL.
Conclusion
This was an exciting, practical experiment with a promising new feature in PostgreSQL. OAuth2 integration brings PostgreSQL closer to modern identity management solutions and simplifies operations in environments with centralized authentication.
We are very pleased to be hosting the 5th PostgreSQL User Group NRW Meetup – in our new offices right next to Borussia Park in Mönchengladbach! (more…)
Introduction
If you regularly deal with code that needs extensive internationalization capabilities, chances are, that you’ve used functionality from one of the ICU libraries before. Being developed by the Unicode Consortium, ICU provides reliable, mature and extensive implementations for all kinds of tools for internationalization and Unicode text operations. Traditionally, there have been two implementations of ICU, ICU4C implemented in C and ICU4J implemented in Java. These libraries have been the gold standard in correct Unicode text handling and i18n for many years. But for some years now, the Unicode Consortium has been developing on ICU4X, a relatively new implementation in Rust.
The focus of ICU4X is on availability on many platforms and in many programming languages. While older implementations like ICU4C and ICU4J are very mature and at the moment provide more functionality than ICU4X, these libraries have a very large code size and large runtime memory footprint, making them infeasible to use in resource constrained environments like in web browsers or on mobile or embedded devices. ICU4X takes care to reduce library code size and provides additional facilities to optimize the code size of both the library itself and the Unicode data shipped with an application.
In this article, I will provide an overview of what ICU4X can do and how to do it. If you’ve worked with other ICU implementations before, many of them will probably feel familiar, if, on the other hand, you never came in contact with ICU, this article should give you a good introduction on how to perform various Unicode text operations using ICU4X.
Prerequisites
I will be showing a lot of code examples on how to use ICU4X in Rust. While it should not be strictly necessary to understand Rust to understand the basics of what’s going on, some familiarity with the language will definitely help to understand the finer details. If you’re unfamiliar with Rust and want to learn more, I recommend The Rust Book as an introduction.
During the examples I’ll be referring to various functions and types from ICU4X without showing their types in full detail. Feel free to open API documentation alongside this article, to look up any types for the functions mentioned.
Test setup
If you want to run the example for yourself, I recommend setting up a cargo project with the appropriate dependency:
$ cargo new --bin icu4x-blog
$ cd icu4x-blog
$ cargo add icu
This initializes a basic Cargo.toml and src/main.rs. Now you can paste any example code into the generated main functions inside main.rs and run your examples using cargo run:
$ cargo run
    Finished `dev` profile [unoptimized + debuginfo] target(s) in 0.02s
     Running `target/debug/icu4x-blog`
Hello, world!
For now this only outputs the default “Hello, world!“ message generated by cargo. So let’s go on to add our own examples.
Locales
The behavior of some of ICU4X’s operations depends on lingual or cultural context. When they do, we need to specify what lingual or cultural background we want. We do this in the form of so-called Locales. At its core, a locale is identified by a short string identifying a language and region. They usually look something like “en-US” for an American English locale, or “de-AT” for German language locale as spoken in Austria.
Locales don’t do anything exciting on their own. They only tell other operations how to behave, so construction is basically the only thing we do with Locales. There are two main ways to construct a locale. We can use the locale! macro to construct and validate a static Locale like this:
let en_us = icu::locid::locale!("en-US");
println!("{en_us}");
Or we can try to parse a locale from a string at runtime:
let de_at = "de-AT".parse::<icu::locid::Locale>().unwrap();
println!("{de_at}");
Note that parsing a locale can fail on invalid inputs. This is encoded by the parse function returning a Result<Locale, ParserError>. In the example above we use unwrap to ignore the possibility of an error, which will panic on actual invalid inputs:
let invalid_locale = "Invalid!".parse::<icu::locid::Locale>().unwrap();
println!("{invalid_locale}");
Taken together, these examples will produce the following output:
$ cargo run
[...]
en-US
de-AT

thread 'main' panicked at src/main.rs:8:67:
called `Result::unwrap()` on an `Err` value: InvalidLanguage
note: run with `RUST_BACKTRACE=1` environment variable to display a backtrace
In practical scenarios, you will probably want to detect locales dynamically at runtime via some standard mechanism provided by your operating system or some other execution platform. Unfortunately, there is currently no standardized way to detect ICU4X locales from external sources, but progress to implementing such a solution is tracked in this issue.
Now that we’ve looked on how to construct Locales, let’s look at some operations that need locales to function.
Collation
The first operation we’re going to look at is collation. You’re probably familiar with the concept of comparing strings lexicographically. In Rust the str type already implements the Ord trait, allowing us easy lexicographic comparisons and sorting of strings. However not all languages and cultures agree on which order letters should be sorted in. As an example, in Germany the letter Ä is usually sorted right after A, while in Sweden the letter Ä is usually sorted after Z. Rust’s standard method of comparing strings does not take these regional differences into account. ICU4X provides us with collation functionality to compare and sort strings with these cultural differences in mind.
Construction
The first step for doing so is to create a Collator like this:
let de_de = icu::locid::locale!("de-DE");
let collator_de = icu::collator::Collator::try_new(&de_de.into(), Default::default()).unwrap();
The first parameter is the locale we want collation for. Or technically, it’s a DataLocale, because that’s what try_new wants. The difference doesn’t need to concern us too much right now. Just know, that we can convert a Locale to a DataLocale using .into(). The second parameter is a CollatorOptions structure, which we could use to specify more specific options for the collation. We won’t look at the specific options here and instead just use the default options, but check out the API documentation if you’re curious about what options you can specify. At last, we unwrap the Collator, since creating it can fail in cases where no collation data for the given locale could be found. We’ll talk about this possibility later when talking about data handling.
Now that we have one collator for the de-DE locale, let’s build another for Swedish (sv-SE):
let sv_se = icu::locid::locale!("sv-SE");
let collator_sv = icu::collator::Collator::try_new(&sv_se.into(), Default::default()).unwrap();
Usage
Now that we have built some collators, let’s sort some strings with the standard Rust comparison and different locales to see the different results:
let mut strings = ["Abc", "Äbc", "ZYX"];
strings.sort_by(Ord::cmp);
println!("Rust default sorted: {strings:?}");
strings.sort_by(|a, b| collator_de.compare(a, b));
println!("Collated de-DE: {strings:?}");
strings.sort_by(|a, b| collator_sv.compare(a, b));
println!("Collated sv-SE: {strings:?}");
This produces the following output:
$ cargo run
[...]
Rust default sorted: ["Abc", "ZYX", "Äbc"]
Collated de-DE: ["Abc", "Äbc", "ZYX"]
Collated sv-SE: ["Abc", "ZYX", "Äbc"]
As predicted, the German collation sorted the strings differently than the Swedish collation. Incidentally, the default Rust order sorted these specific strings the same as the Swedish collation, though in practice you shouldn’t rely on coincidences like this and always use the correct collation when sorting Strings for display purposes.
Calendars
Sometimes it’s easy to forget, but not all cultures use the same calendar system. And even different cultures sharing the same calendar system might use different formats to represent dates. ICU4X provides support for converting between representations of different calendars and formatting them according to local taste. Besides the Gregorian calendar, popular in most regions of the world, and the ISO calendar often used for technical purposes, many other calendars, such as Japanese, Ethiopian or Indian are supported. However, no functionality for retrieving the current time is currently provided, so in real applications you will have to convert from some other representation first.
Construction
In the next example, we have a known date given as an ISO date, that we want to display in some locale:
let iso_date = icu::calendar::Date::try_new_iso_date(1978, 3, 8).unwrap();
Next we create a DateFormatter:
let local_formatter = icu::datetime::DateFormatter::try_new_with_length(
    &icu::locid::locale!("th").into(),
    icu::datetime::options::length::Date::Medium,
)
.unwrap();
We will use the formatter to format dates into locale specific textual representation. During creation we get to pick a locale (or rather a DataLocale again). We’re picking the Thai locale, because unlike most of the world it uses the Buddhist calendar instead of the Gregorian calendar. We also get to pick a format length that gives us some control over the length of the date format. We use the medium length, which uses abbreviated month names, if these are available in the locale, or numeric months otherwise.
Formatting
Now we just format the date and print it:
let local_format = local_formatter.format(&iso_date.to_any()).unwrap();
println!("{local_format}");
Which gives us this output:
$ cargo run
[...]
8 มี.ค. 2521
If, like me, you’re not well versed in the Buddhist calendar and Thai month names, this probably won’t tell you much. But that’s exactly the point of using an i18n library like ICU4X. We can use general operations that do the correct thing for any supported locale, without having to understand the intricacies of every specific locale.
When calling format you have to be careful to pass a date that belongs to a calendar suitable for the locale of the formatter. Even though its parameter type suggests that a date from any calendar can be used, the operation only accepts dates from the ISO calendar or dates from correct calendar for that locale (i.e. in this example we could have also passed a date that was already formatted according to the Buddhist calendar). In this case, we used a ISO date, which is always accepted. If you have a date in an entirely different calendar it gets more complicated. You would need to convert your date to the correct target calendar explicitly and then pass it to format. For this you obtain the needed calendar using AnyCalendar::new_for_locale and do the conversion using Date::to_calendar.
Normalization
Unicode texts are represented as a sequence of numbers called code points. But not each code point has its own atomic meaning. Some sequences of code points combine into groups to represent more complex characters. Due to this complexity it is possible in many cases, that different sequences of code points represent the same sequence of semantic characters. As an example, the letter Ä can be represented as the single code point U+00C4 or as the sequence of code points U+0041 U+0308 (an A followed by combining two dots above). This has implications when we want to compare strings for equality. Naively we might want to compare strings by checking if each of the code points are equal. But that would mean that strings that compare different, because they contain different code points, actually contain the semantically same characters.
To deal with this situation, ICU4X gives us string normalization. The idea is as follows: Before comparing strings to each other we “normalize” each string. Normalization transforms the string into a normalized representation, thereby ensuring that all strings that are semantically equal also have the same normalized representation. This means that once we have normalized the strings we want to compare, we can simply compare the resulting strings by code point to determine if the original strings where semantically the same.
Normalization forms
Before we can perform this normalization, we need to understand that there are multiple forms of normalization. These forms are differentiated by two properties. On one axis, they can be composing or decomposing. On the other axis, they can be canonical or compatible.
Composed normalization forms ensure that the normalized form has as few code points as possible, e.g. for the letter Ä the single code point form would be used. Decomposed normalization on the other hand always chooses the representation requiring the most code points available, e.g. for the letter Ä the two code point form would be used. With composed normalization we need less storage space to store the normalized form. However, composed normalization is also usually slower to perform than decomposed normalization, because internally composed normalization first has to run decomposed normalization and then compress the result. As a rule of thumb, it is usually recommended that composed normalization be used when the normalized strings are stored on disk or sent over the network, whereas decomposed normalization should be used when the normalized form is only used internally within an application.
Canonical normalization only considers different code point representations of the same characters to be equal. Compatible normalization goes a step further and considers characters that convey the same meaning, but differ in representation, to be equal. As an example, under compatible normalization the characters “2”, “²” and “②” are all considered equal, whereas under canonical normalization they are different. Compatible normalization can be appropriate when normalizing identifiers such as usernames to detect close-but-different lookalikes.
Taking all of this together, this gives us four different possible forms of normalization:
- NFC: Composing and Canonical
- NFKC: Composing and Compatible
- NFD: Decomposing and Canonical
- NFKD: Decomposing and Compatible
Performing normalization
Once we have decided on a normalization form to use, actually performing the normalization is easy. Here’s an example using NFD normalization:
let string1 = "\u{00C4}";
let string2 = "\u{0041}\u{0308}";

let rust_equal = string1 == string2;

let normalizer = icu::normalizer::DecomposingNormalizer::new_nfd();
let normalized1 = normalizer.normalize(string1);
let normalized2 = normalizer.normalize(string2);
let normalized_equal = normalized1 == normalized2;

println!(
    "1: {string1}, 2: {string2}, rust equal: {rust_equal}, normalized equal: {normalized_equal}"
)
$ cargo run [...] 1: Ä, 2: Ä, rust equal: false, normalized equal: true
As we can see, string1 and string2 look the same when printed, but the == operator doesn’t consider them equal. However, normalizing both strings and comparing the results, does compare them equal.
NFKD normalization can be used by constructing the normalizer using DecomposingNormalizer::new_nfkd. NFC and NFKC are accessible using ComposingNormalizer::new_nfc and ComposingNormalizer::new_nfkc respectively.
Segmentation
When we look into Unicode texts, we’ll often find that they aren’t only made up of individual code points, but rather of larger constructs consisting of multiple code points, such as words or lines. When processing text, it is often necessary to recognize, where boundaries between these individual pieces are. In ICU4X this process is called segmentation and it provides us with four different types of segments to recognize: graphemes, words, sentences, and lines. The process of segmenting is very similar for each one, but each of them also has their own quirks, so we’ll look at each of them in turn.
Graphemes
As previously mentioned, some code points combine with other code points thereby gaining a different meaning than each code point would have individually. If we break strings apart between two combined code points, the code points can no longer combine and thus revert to their individual meaning. Here’s an example of such unintentional changes in meaning happening:
let string1 = "\u{61}\u{308}\u{6f}\u{308}\u{75}\u{308}";
let string2 = "stu";
println!("string1: {string1}, string2: {string2}");

let (split1, split2) = string1.split_at(4);
println!("split1: {split1}, split2: {split2}");
println!("combined: {string2}{split2}");
$ cargo run
[...]
string1: äöü, string2: stu
split1: äo, split2: ̈ü
combined: stüü
First, note that the output of split1 and split2 shows that what was previously an ö has now been split into an o and a loose pair of two dots. Even worse: when we combine string2 and split2 in a single output, the dots at the start of split2 combine with the last character of string2 forming an extra “ü” that was never intended to exist.
Graphemes to the rescue
So how do we know where it is safe to split a string, without altering the meaning of its contained characters? For this purpose, Unicode defines the concept of grapheme clusters, which is a sequence of code points that have a single meaning together, but are unaffected by the meaning of code points around them. As long as we’re careful to split strings only on the boundaries between grapheme clusters, we can be sure not to inadvertently change the semantics of characters contained in the string. Similarly, when we build a user interface for text editing or text selection, we should be careful to present a single grapheme cluster to the user as a single unbreakable unit.
To find out, where the boundaries between grapheme cluster are, ICU4X gives us the GraphemeClusterSegmenter. Let’s look at how it would have segmented our string from earlier:
let string = "\u{61}\u{308}\u{6f}\u{308}\u{75}\u{308}";
println!("string: {string}");
let grapheme_boundaries: Vec<usize> = icu::segmenter::GraphemeClusterSegmenter::new()
    .segment_str(string)
    .collect();
println!("grapheme boundaries: {grapheme_boundaries:?}");
$ cargo run [...] string: äöü grapheme boundaries: [0, 3, 6, 9]
As we can see, the segment_str function returns an iterator over indices where boundaries between grapheme clusters are located. Naturally the first index is always 0 and the last index is always the end of the string. We can also see, that the index 4, where we split our string in the last example, was not a boundary between grapheme clusters, and thus our split caused the change in meaning we observed. Had we instead split the string at the indices 3 or 6, we would have not had the same problems.
Words
Sometimes it is helpful to separate a string into its individual words. For this purpose, we get the aptly named WordSegmenter. So let’s get right into it:
let string = "Hello world";
println!("string: {string}");
let word_boundaries: Vec<usize> = icu::segmenter::WordSegmenter::new_auto()
    .segment_str(string)
    .collect();
println!("word boundaries: {word_boundaries:?}");
$ cargo run [...] string: Hello world word boundaries: [0, 5, 6, 11]
So far this is very similar to the GraphemeClusterSegmenter we’ve seen before. But what if we want the words themselves and not only their boundaries? We can just iterate over windows of two boundaries at a time and slice the original string:
let words: Vec<&str> = word_boundaries
    .windows(2)
    .map(|bounds| &string[bounds[0]..bounds[1]])
    .collect();
println!("words: {words:?}");
$ cargo run
[...]
words: ["Hello", " ", "world"]
This looks better. It gives use the two words we expect. It also gives us the white space between words. If we do not want that, we can ask the WordSegmenter to tell us if a given boundary comes after a real word or just some white space and filter on that:
let word_boundaries: Vec<(usize, icu::segmenter::WordType)> =
    icu::segmenter::WordSegmenter::new_auto()
        .segment_str(string)
        .iter_with_word_type()
        .collect();
println!("word boundaries: {word_boundaries:?}");
let words: Vec<&str> = word_boundaries
    .windows(2)
    .filter_map(|bounds| {
        let (start, _) = bounds[0];
        let (end, word_type) = bounds[1];
        if word_type.is_word_like() {
            Some(&string[start..end])
        } else {
            None
        }
    })
    .collect();
println!("words: {words:?}");
$ cargo run
[...]
word boundaries: [(0, None), (5, Letter), (6, None), (11, Letter)]
words: ["Hello", "world"]
In case you were wondering why the constructor for WordSegmenter is called new_auto, it’s because there are multiple algorithms for word segmentation to choose from. There are also new_dictionary and new_lstm and not every algorithm works equally well for different writing systems. new_auto is a good choice in the general case, as it automatically picks a good implementation based on the actual data encountered in the string.
Sentences
If we want to break strings into sentences, SentenceSegmenter does just that. There’s not much special to it, so let’s get right into it:
let string = "here is a sentence. This is another sentence.";
println!("string: {string}");
let sentence_boundaries: Vec<usize> = icu::segmenter::SentenceSegmenter::new()
    .segment_str(string)
    .collect();
println!("sentence boundaries: {sentence_boundaries:?}");
let words: Vec<&str> = sentence_boundaries
    .windows(2)
    .map(|bounds| &string[bounds[0]..bounds[1]])
    .collect();
println!("words: {words:?}");
$cargo run [...] string: here is a sentence. This is another sentence. sentence boundaries: [0, 20, 45] words: ["here is a sentence. ", "This is another sentence."]
No surprises there, so let’s move on.
Lines
The LineSegmenter identifies boundaries at which strings may be split into multiple lines. Let’s see an example:
let string = "The first line.\nThe\u{a0}second line.";
println!("string: {string}");
let line_boundaries: Vec<usize> = icu::segmenter::LineSegmenter::new_auto()
    .segment_str(string)
    .collect();
println!("line boundaries: {line_boundaries:?}");
let lines: Vec<&str> = line_boundaries
    .windows(2)
    .map(|bounds| &string[bounds[0]..bounds[1]])
    .collect();
println!("lines: {lines:?}");
$ cargo run
[...]
string: The first line.
The second line.
line boundaries: [0, 4, 10, 16, 28, 33]
lines: ["The ", "first ", "line.\n", "The\u{a0}second ", "line."]This gives us more individual “lines” than we might have previously anticipated. That’s because the LineSegmenter not only gives us boundaries on line breaks already contained in the string, but also gives us boundaries in places where a soft line break could be placed. This can be very useful if you want to wrap a long string over multiple lines.
If you want to differentiate whether a given boundary is a hard line break contained in the string or just an opportunity for an optional line break, you can negotiate the character right before the line break using icu::properties::maps::line_break.
Case Mapping
When processing Unicode texts, there is sometimes the need to transform letter between lower case and upper case. ICU4X gives us various tool for this, so let’s look at each of them.
UPPERCASE and lowercase
Lowercasing and uppercasing are very simple operations on the surface. They do similar things to Rust’s built-in str::to_lowercase and str::to_uppercase methods. So let’s see why ICU4X has separate support for them:
let string = "AaBbIıİi";
println!("string: {string}");

let locale = icu::locid::locale!("de-DE");

let cm = icu::casemap::CaseMapper::new();
let lower = cm.lowercase_to_string(string, &locale.id);
let upper = cm.uppercase_to_string(string, &locale.id);
println!("lower: {lower}, upper: {upper}");
$cargo run [...] string: AaBbIıİi lower: aabbiıi̇i, upper: AABBIIİI
So far this looks like the familiar lowercasing and uppercasing operations from most languages’ standard libraries. But note that we had to provide locale.id to run these operations. The twist here is that the rules for lowercasing and uppercasing can vary by language, which is reflected in ICU4X’s variants of these operations. Observe how the result changes if we use the locale tr-TR instead of de-DE:
$ cargo run
[...]
string: AaBbIıİi
lower: aabbııii, upper: AABBIIİİ
With ICU4X we don’t need to know the details of how different lowercase and uppercase letters pair up in different languages. As long as we pass the correct locale, ICU4X will do the correct thing.
Note however, that uppercasing and lowercasing operations are only intended for display purposes. If you want to compare strings case-insensitively, you want case folding instead, which we will look at later.
Titlecasing
Titlecasing is the process of uppercasing the first letter of a segment and lowercasing all other characters. So for example, if we wanted to titlecase every word in a string, we would first use a WordSegmenter to extract every word and then use a TitlecaseMapper to perform the titlecasing on every word.
let string = "abc DŽ 'twas words and more wORDS";
println!("string: {string}");

let locale = icu::locid::locale!("de-DE");

let cm = icu::casemap::TitlecaseMapper::new();
let word_segments: Vec<usize> = icu::segmenter::WordSegmenter::new_auto()
    .segment_str(string)
    .collect();

let titlecased: String = word_segments
    .windows(2)
    .map(|bounds| {
        let word = &string[bounds[0]..bounds[1]];
        cm.titlecase_segment_to_string(word, &locale.id, Default::default())
    })
    .collect();
println!("titlecased: {titlecased}");
$ cargo run [...] string: abc DŽ 'twas words and more wORDS titlecased: Abc Dž 'Twas Words And More Words
Again we had to provide &locale.id to specify which language-specific rules to obey during case transformations. Additionally we can pass other options as a third parameter. Here we’ve used the default options, but feel free to checkout out the API documentation to see what other options are supported.
Note how DŽ was transformed to Dž, even though it is a single letter whose regular uppercase form is DŽ. This is because each character has separate uppercase and titlecase forms, which just happen to be the same for most latin characters. Also note that 'twas was transformed to 'Twas. This is because the TitlecaseMapper titlecases the first letter in a word and skips over non-letter characters at the start of a word when doing so.
Case folding
Sometimes we want to tell whether two strings are equal while ignoring differences in casing. Traditionally this has been done by transforming both strings to lower case or upper case to eliminate differences in casing and comparing those strings. With Unicode strings, for some characters simple lowercasing or uppercasing isn’t enough to eliminate all differences in casing. As an example, the German letter ß uppercases to SS, but there’s also an uppercase version of ß: ẞ, which uppercases to itself, but lowercases to a regular ß. To consistently eliminate all casing differences, we need to map SS, ß, and ẞ all to the same output character. Luckily for us, ICU4X gives us the case folding operation, which promises to do just that. Let’s see it in action:
let string = "SSßẞ";
println!("string: {string}");

let locale = icu::locid::locale!("de-DE");

let cm = icu::casemap::CaseMapper::new();
let upper = cm.uppercase_to_string(string, &locale.id);
let lower = cm.lowercase_to_string(string, &locale.id);
let folded = cm.fold_string(string);
println!("upper: {upper}, lower: {lower}, folded: {folded}");
$ cargo run [...] string: SSßẞ upper: SSSSẞ, lower: ssßß, folded: ssssss
As we see, in the folded string all the different versions of ß have been consistently turned into ss, which successfully eliminates all casing differences. It also means that a single ß would be considered equal to a lowercase ss, which we might not have considered equal otherwise. This is a kind of ambiguity that is hard to avoid when comparing strings case-insensitively.
Note that we didn’t have to specify any locale or language for the case folding operation. This is because case folding is often used for identifiers that are supposed to behave identically regardless of the lingual context they’re used in. The case folding operation tries to use rules that work best across most languages. However, they don’t work perfectly for Turkic languages. To deal with this, there’s an alternative case folding operation fold_turkic_string just for Turkic languages. In most cases you’ll probably want to use the general folding operation, unless you’re really sure you need the special behavior for Turkic languages.
Case-insensitive comparison
Given the case folding operation, we could implement a function to compare two strings case-insensitively like this:
fn equal_ci(a: &str, b: &str) -> bool {
    let cm = icu::casemap::CaseMapper::new();
    cm.fold_string(a) == cm.fold_string(b)
}
Data handling
So far we’ve looked at various operations that work correctly in a vast number of locales over strings made up of a huge amount of valid code points. On the surface, these operations were relatively easy to use and most of the time we only needed to specify our input and a desired locale to get the correct result. However, in the background ICU4X needs a lot of data about different locales and Unicode characters to do the right thing in every situation. But so far, we never had to be concerned with this data at all.
So where does ICU4X get all this data from? In the default configuration we’ve been using so far, the data is shipped as part of the library and compiled directly into our application executable. This has the benefit that we don’t need to worry about shipping the data along with the binary and getting access to it at runtime, as the data is always included in the binary. But it comes at the cost of sometimes dramatically increased binary sizes. Since data for a large number of locales is included by default, we’re talking about tens of megabytes of data being included in the binary.
Alternatives to embedded data
Since ICU4X is designed to run even in minimalist environments, such as embedded devices, forcing this increased application binary size on every application would be unacceptable. Instead, ICU4X provides multiple ways to access the relevant data. Besides using the included default set of data, you can also generate you own set of data using icu4x-datagen. This allows you to reduce the data included from the beginning, either by limiting the number of locales to include or by limiting the functionalities supported by the data. Furthermore you have the choice between compiling this data directly into your application binary or putting it into separate data files that your application then parses at runtime.
Reducing the set of available runtime data of course comes with the benefit of reducing the data size needed to ship with your application. On the other hand it has the drawback of reducing the set of operations you can successfully run at runtime. Each bit of data you remove, can have the effect of making some operation fail, if no data is available to perform that operation with the requested locale. As with many other things, reducing the data size has obvious benefits, but it is always a tradeoff. In the examples above we usually used unwrap to ignore the possibility of errors, but in a real application you’ll probably want more sophisticated error handling, like falling back to some non-failing behavior or at least reporting the error to the user.
I’ll avoid going through all the available options in detail, and instead refer to ICU4X’s official Tutorial on data management instead. It should explain all the supported ways to make the required data available to your application.
Conclusion
I hope this has given you a satisfactory overview of what ICU4X can do. As we have seen, a lot of functionality works well out of the box. In other areas functionality is still lacking. For example, I’ve mentioned earlier, that there’s currently no comfortable way to detect the user’s preferred locale in a standard way from the execution environment. Another area where ICU4X is currently lacking behind its C and Java counterparts is translation support. ICU4X and ICU4J provide capabilities for formatting localized message using MessageFormats, which ICU4X still lacks. Similarly, ICU4X doesn’t currently seem to have functionality to deal with resource bundles.
Even though ICU4X doesn’t have all the functionality you might expect of it yet, overall it seems like a good choice for those cases, where it already brings all the required functionality. Given some more time, we may even see more and more of the missing functionality to land in ICU4x.
ProxLB – Version 1.1.0 of the Advanced Loadbalancer for Proxmox Clusters is Ready!
Finally, it’s here – and it’s no April Fool’s joke! The long-awaited version 1.1.0 of ProxLB has been officially released! This new version features a complete code refactoring, making maintenance easier and laying the groundwork for future expansions. Additionally, numerous bugs have been fixed, and more features have been implemented. ProxLB is the result of the dedication of our employee Florian Paul Azim Hoberg, better known as gyptazy, who has applied his knowledge and passion to create a powerful open-source solution for Proxmox clusters. We – as credativ GmbH – believe in the power of open-source software and support him by spending time to this project during the business time.
Closing the gap
 ProxLB fills the gap left by the absence of a Dynamic Resource Scheduler (DRS) in Proxmox. As a powerful load balancer, it intelligently migrates workloads or virtual machines (VMs) across all nodes in the cluster, ensuring optimal resource utilization. ProxLB takes CPU, memory, and disk usage into account to prevent over-provisioning and maximize performance.
Automatic maintenance mode handling
One of the standout features of ProxLB is its maintenance mode. When one or more nodes are placed in maintenance mode, all VMs and containers running on them are automatically moved to other nodes, ensuring the best possible resource utilization across the cluster. This allows for seamless updates, reboots, or hardware maintenance without disrupting ongoing operations.
Custom affinity rules
Furthermore, ProxLB offers extensive customization options through affinity and anti-affinity rules. Administrators can specify whether certain VMs should run together on the same node or be deliberately separated. This is particularly useful for high-availability applications or specialized workloads. Another practical feature is the ability to identify the optimal node for new guests. This function can be easily integrated into CI/CD pipelines using tools like Ansible or Terraform to automate deployments and further enhance cluster efficiency. You can see how this works with ProxLB and Terraform in this example.
ProxLB also stands out with its deep integration into the Proxmox API. It fully supports the Access Control List (ACL), eliminating the need for additional SSH access. This not only enhances security but also simplifies management.
Whether used as a one-time operation or in daemon mode, ProxLB is a flexible, transparent, and efficient cluster management solution. Thanks to its open-source license, users can customize the software to meet their specific needs and contribute to its further development.
Download
ProxLB can be installed in many different ways where it can operate and run inside of an dedicated VM (even inside the Proxmox cluster), on bare-metal, on a Proxmox node itself or on containers like LXC or Docker. The project also provides ready to use container images that can directly be used in Docker or Podman. The project’s docs provide you a more detailed overview of the different types and ways to install and use ProxLB, which can simply be found right here. While you can find below resources for a quick-start you should think about switching to the project’s Debian based repository for long-term usage.
| Typ | Download |
| Debian Package | proxlb_1.1.0_all.deb |
| Container Image | cr.gyptazy.com/proxlb/proxlb:latest |
Conclusion
With version 1.1.0, ProxLB lives up to its reputation as an indispensable tool for Proxmox administrators, especially for those transitioning from VMware. Try out the new version and experience how easy and efficient load balancing can be in your cluster! We are also happy to support you with the integration and operation of ProxLB in your cluster, as well as with all other Proxmox-related topics, including planning a migration from other hypervisor technologies to Proxmox!
Effective March 1, 2025, the Mönchengladbach-based open-source specialist credativ IT Services GmbH will once again operate as an independent company in the market. In May 2022, credativ GmbH was acquired by NetApp and integrated into NetApp Deutschland GmbH on February 1, 2023. This step allowed the company to draw on extensive experience and a broader resource base. However, after intensive collaboration within the storage and cloud group, it has become clear that credativ, through its regained independence, can offer the best conditions to address customer needs even more effectively. The transition is supported by all 46 employees.
“We have decided to take this step to focus on our core business areas and create the best possible conditions for further growth. For our customers, this means maximum flexibility. We thank NetApp Management for this exceptional opportunity.”, says David Brauner, Managing Director of credativ IT Services GmbH.
“The change is a testament to the confidence we have in the credativ team and their ability to lead the business towards a prosperous future.“, commented Begoña Jara, Vice President of NetApp Deutschland GmbH.
What Does this Change Mean for Credativ’s Customers?
As a medium-sized company, the open-source service provider can rely on even closer collaboration and more direct communication with its customers. An agile structure is intended to enable faster and more individualized decisions, thus allowing for more flexible responses to requests and requirements. Naturally, collaboration with the various NetApp teams and their partner organizations will continue as before.
Since 1999, credativ has been active in the open-source sector as a service provider with a strong focus on IT infrastructure, virtualization, and cloud technologies. credativ also has a strong team focused on open-source-based databases such as PostgreSQL and related technologies. In the coming weeks, the new company will be renamed credativ GmbH.
Update:
The credativ IT Services GmbH was renamed to credativ GmbH on March 19, 2025. The commercial register entry HRB 23003 remains valid. We kindly ask all customers, however, not to use any bank details of the former credativ GmbH that may still be saved. This GmbH was also renamed by its owners and has no direct relationship with the new credativ GmbH.
Introduction
Proxmox Virtual Environment (VE) is a powerful open-source platform for enterprise virtualization. It supports advanced Dynamic Memory Management features, including Kernel Samepage Merging (KSM) and Memory Ballooning, which can optimize memory usage and improve performance. This blog post evaluates the effectiveness of KSM and Memory Ballooning features in Proxmox VE using Linux virtual machines (VMs). We will set up a VM with Proxmox VE for a test environment, perform tests, and analyze the results to understand how these features can benefit virtualized environments. Additionally, we will have a look at the security concerns of enabling KSM and the risks associated with using ballooning, especially in database environments.
What’s KSM?
Kernel Samepage Merging (KSM), is a memory deduplication feature in Linux kernel that scans for identical memory pages in different processes and merge them into a single page to reduce the memory usage. It is particularly useful in virtualized environments where multiple VMs may have similar or identical data in memory, such as when running the same operating system or applications.
KSM was introduced long ago since the Linux kernel version 2.6.32 in 2009. However, it does not stop the developers to introduced new features for KSM as shown by the 6.x kernel. There are new changes introduced that you can find here: Breakdown of changes to Kernel Samepage Merging (KSM) by Kernel Version. As you can see, the kernel developers are constantly adding new features for KSM to the Linux Kernel to further improve its functionality.
The current Linux Kernel used in Proxmox VE is 6.8.x for example. It supports the newly added „Smart Scan“ feature which we going to test together in this blog post.
What’s Memory Ballooning?
Memory Ballooning is a technique used in virtualized environments to dynamically adjust the memory allocation of VMs based on their current needs. A “balloon driver” within the guest VM allocates unused memory into a pool of memory (the “balloon”), allowing the hypervisor to reallocate memory resources to other VMs as needed. This helps optimizing memory usage across the host system, ensuring that memory is efficiently utilized and not wasted on idle VMs.
Tests Setup
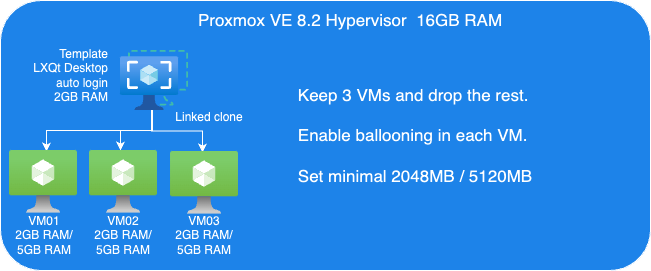
To evaluate KSM and ballooning features in Proxmox VE, we set up a test cluster consisting of one node which we operate within a VM that offers 16GB of RAM. That sample cluster will then run multiple Linux Guest VMs on top of it to demonstrate the KSM and Memory Ballooning features.
The following picture shows an overview of our test VM setup:
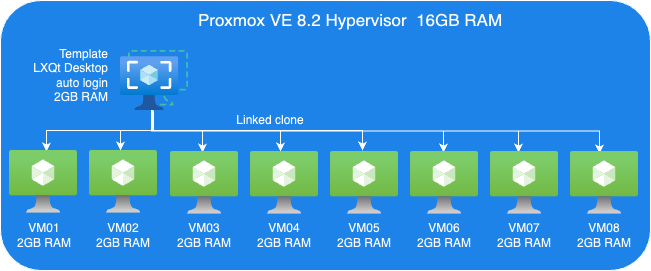
Proxmox VE Host:
- A VM to install Proxmox VE 8.2.
- 8 Cores vCPU
- 16GB RAM
- 200GB Virtio storage
Linux Guest VM Template:
- Linux Guest
- 2GB RAM
- Install Debian LXQt desktop
- 16GB Virtio storage
Linux Guest VMs:
- 8 VMs, Linked-Clone from template
Perform tests
We perform two sets of tests. First, we just evaluate KSM. Then, we perform another tests set to testing Memory ballooning without KSM.
Guest VMs Setup for KSM Tests:
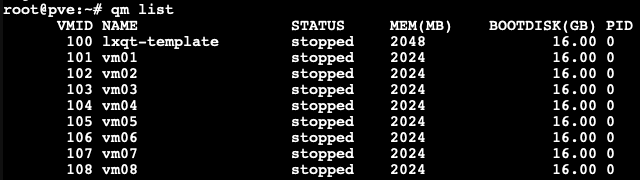
- We cloned 8 VMs out of our VM template with 2GB RAM each, as you can see in the picture below.
Each VM configured with 2GB RAM without ballooning enabled.
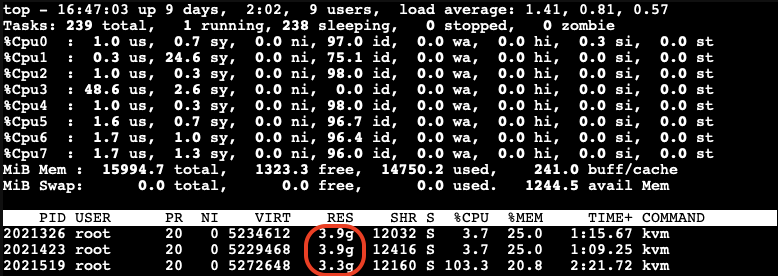
Next, we boot those 8 VMs up and start them with LXQt desktop auto-login without triggering KSM. Here, we want to check how much memory each of those VMs consumes before applying any kind of reducing mechanism.

As you can see, all 8 VMs consume 13154.1MB in total. The screenshot above has been captured on our Proxmox VE host.
- Enable KSM Smart Scan by the command on host:
# echo "scan-time" > /sys/kernel/mm/ksm/advisor_mode
- Enable KSM run:
# echo 1 > /sys/kernel/mm/ksm/run

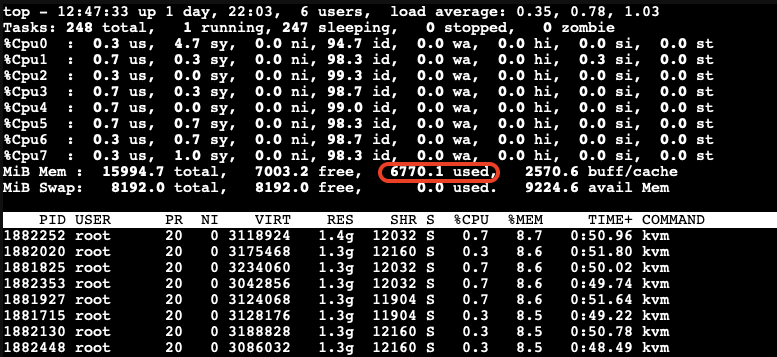
Observations on KSM Smart Scan
The KSM Smart Scan feature appears to be more efficient compared to the classic ksmtuned method, as it comes with optimizations for page scanning that skip pages if de-duplication was not successful in previous attempts. This reduces the CPU time required for scanning pages significantly, which is especially helpful when the system has reached a “steady state“. During our tests, we did not observe ksmd occupying significant system resources, resulting that KSM Smart Scan can optimize memory usage with minimal overhead.
Test Results
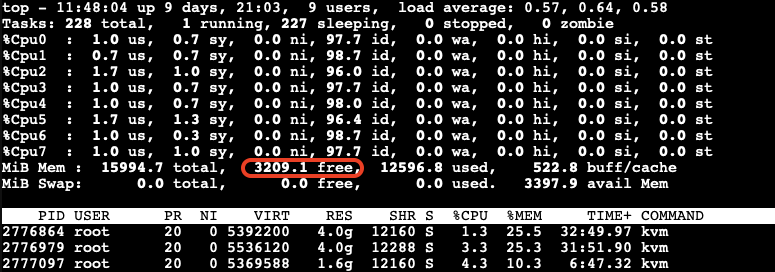
- After a while as the KSM is scanning and merging pages. The used Mem reduced to 6770.1 Mib.
- We also can see the KSM sharing status on Proxmox VE WebUI.

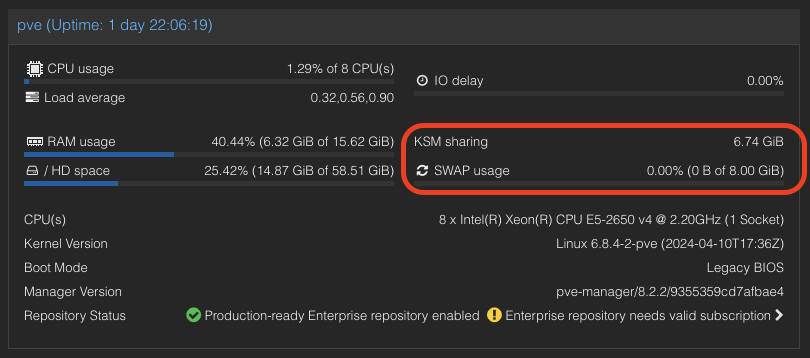
A significant reduction in memory usage was observed. Although there was a slight increase in CPU usage by ksmd during KSM operation, there was no significant degradation in VM performance. This indicates that KSM operates efficiently without imposing a heavy load on the system. The merging of identical pages resulted in better memory utilization, allowing more VMs to run on the same host without additional hardware.
Kernel Samepage Merging (KSM) in Windows VMs
KSM is a native feature in the Linux kernel that works at the hypervisor level, scanning memory pages across all VMs and merging identical pages into a single shared page. This process reduces the overall memory footprint of the VMs.
For Windows VMs, the hypervisor treats their memory similarly to Linux VMs, identifying and merging identical pages. This means that the benefits of KSM can also extend to Windows VMs running on Proxmox VE due to the fact that Proxmox itself runs Linux and therefore utilizes the KSM kernel feature no matter what OS the guests VMs on top of Proxmox VE are running.
Guest VMs Setup for Ballooning Tests:
Next, let’s have a look at Memory Balloning in another test. In order to evaluate the balloning features in Proxmox VE. To evaluate the ballooning features in Proxmox VE, we will repurpose the Proxmox VE environment used for KSM tests with the following adjustments:
- Retain three VMs and remove the others.
- Enable Ballooning in each VM.
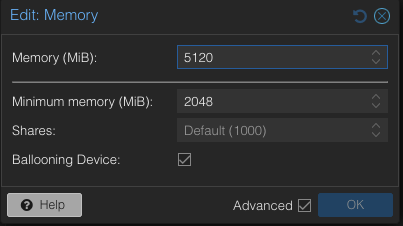
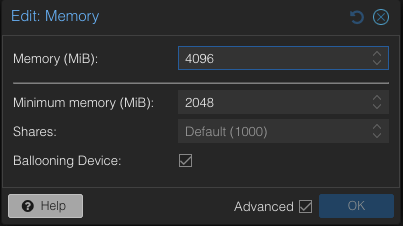
- Set the minimum memory to 2048MB and the maximum memory to 5120MB in each VM
.
Disable the KSM:
To disable KSM manually, execute the following command:
# echo 2 > /sys/kernel/mm/ksm/run
The following picture shows an overview of our Ballooning test VMs setup:
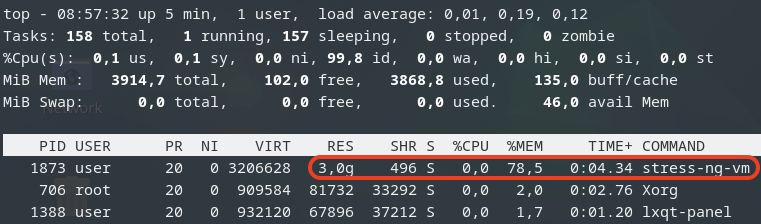
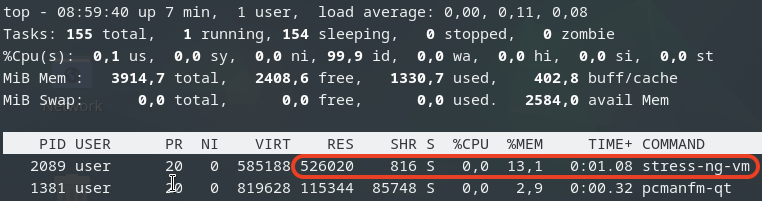
Due to memory ballooning, we should now have more memory available for each VM. Let’s test this by using stress-ng to allocate 4GB of memory on each guest VM, and hold the allocated memory in seconds you may specify:
$ stress-ng --vm-bytes 4G -m 1 –vm-hang <seconds>
The –vm-hang <seconds> option specify how many seconds that VM hangs before unmapping memory.
OOM-Killer!
We observed the OOM-killer being triggered on the Proxmox VE host.

Having the OOM-killer triggered on the host is problematic. Allocating 5GB of memory to each VM resulted in excessive overcommitment, causing the OOM-killer to activate due to insufficient memory to handle the host’s workload.
OOM-killer triggered are always problematic, but it triggered on the host are even worse compared to triggered within guest VMs since you never know what VM gets terminated and killed or at least it’s really hard to forecast.
One of the basic purpose of Memory ballooning is to ovoid OOM-killer triggered on the host system since they can cause „more“ damage than a OOM-killer triggered within a specific VM.
Reduce Maximum Memory Configuration in VMs for Ballooning Tests
To address the overcommitment issue, let’s reduce the maximum memory configuration in each VM to 4GB.

- Adjust the maximum memory setting for each VM to 4GB.
- Boot up three VMs.
Next, we’ll use stress-ng in the guest VM to allocate 3GB of memory and then hang for a specified duration without CPU usage on each guest VM:
$ stress-ng--vm-bytes 3G -m 1 --vm-hang <seconds>
 This is top command in the guest VM.
Check Memory Usage on the Host
After running the stress-ng test, we check the memory usage on the host:
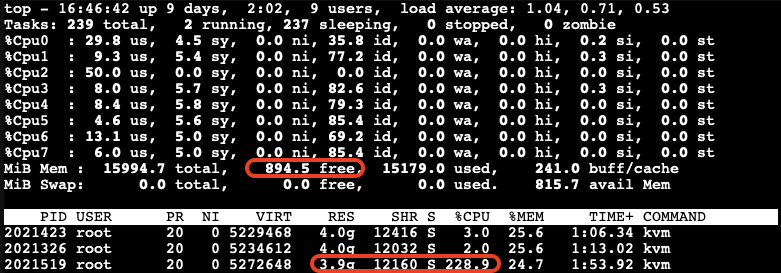
The free memory on the host is now low. The third VM, which is trying to allocate memory, experiences very high CPU usage due to the limited resources available on the host.
After a while, we can observe the ballooning driver starting to reclaim memory from the guest VMs on the host. Each VM’s RES (occupied physical memory) got reduced:
The ballooning driver is now reclaiming memory from each guest VM to increase the available free memory on the host. This action helps to maintain the host’s workload but causes all other guest VMs to slow down due to reduced memory allocation.

Impact of Ballooning on Guest VMs
The slowed down VMs eventually do not have enough available free memory to maintain their workloads. As a result, the OOM-killer is triggered inside the guest VMs:

All the VMs hang for a while, and then the OOM-killer triggers to terminate the stress-ng process. After this, the VMs return to their normal state, and there is sufficient available free memory on the host:
When Does Memory Stealing Get Triggered?
To determine when memory stealing gets triggered, let’s conduct another tests. We will use the same stress-ng command to allocate 3GB of memory on two VMs.
Next, we will gradually allocate memory on the third VM, starting with 512MB and then incrementally adding another 512MB until we observe memory reclaiming being triggered.
As we gradually increase the memory allocation on the third VM, we monitor the host’s memory usage:
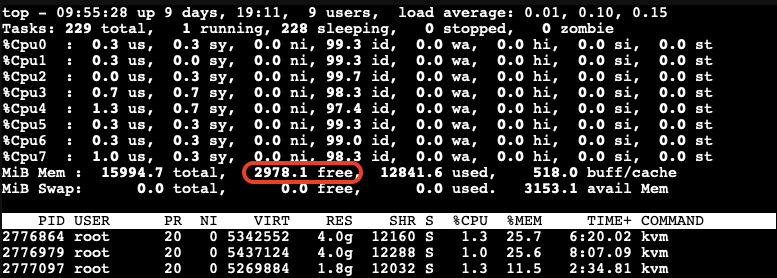
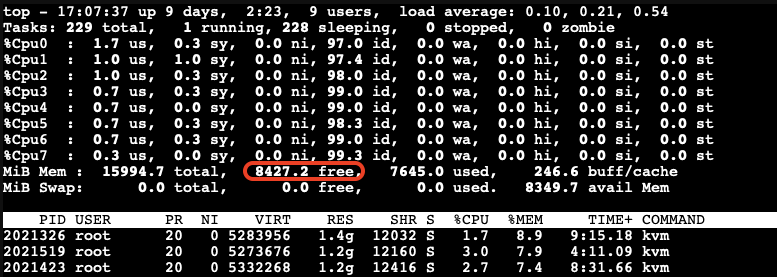
We observe that memory stealing is not yet triggered when the available free memory on the host reaches 2978.1MB (approximately 18.5%) of the total memory.
Let’s allocate a bit more memory on the third VM to further reduce the available free memory on the host. We found that when the available free memory on the host reaches around 15% of the total memory, the ballooning driver triggers to stealing memory from the guest VMs: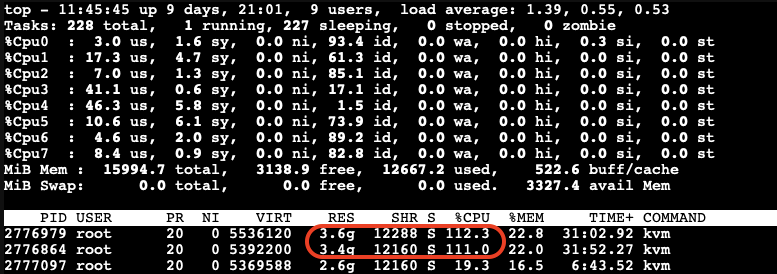
At this point, we can see the memory allocated to the VMs being reduced and the CPU usage increasing significantly.
The memory stealing process continues until the available free memory on the host reaches 20% of the total memory again. After releasing the allocated memory from the third VM, we observe that the reclaiming process stops when the available free memory on the host reaches 20% of the total memory.
Visualizing the Ballooning Tests Results
The following picture below illustrates the observations from our tests:

In this picture, you can see the following key points:
- More than 20% free available memory on host: The initial memory allocation to the VMs, where each VM is configured to be able allocated a maximum 4GB of memory.
- Free available memory reached 18.6% on host: The first and second VMs have allocated their maximum of 4GB of memory. The incremental allocation of memory to the third VM begins, starting with 512MB and increasing by 512MB increments.
- Triggering Memory Stealing: The point at which the available free memory on the host drops to around 15% of the total memory, triggering the ballooning driver to reclaim memory from the guest VMs. The red color in guest VMs indicates increased CPU usage as the ballooning driver stealing memory, affecting the performance of the guest VMs.
Memory Ballooning in Windows VMs
Memory ballooning also works with Windows VMs in Proxmox VE by Windows VirtIO Drivers. You can find the drivers ISO from the Proxmox wiki or download directly from upstream VirtIO drivers ISO.
Compared to Linux VMs
Memory hot plug is supported in Linux VMs, allowing the total amount of memory to change dynamically when the ballooning driver is active. This means that in Linux VMs, you can see the total memory allocation adjust in real-time as the ballooning driver works. Windows does not support memory hot plug in the same way. As a result, you won’t see the total amount of memory adjusted in a Windows VM. Instead, you will observe an increase in the amount of used memory. Despite this difference, the end result is the same: the available free memory is reduced as the ballooning driver reclaims memory.
This screenshot shows you will observe the used memory increased when ballooning is active to stealing memory inside Windows VM.
Results
Memory ballooning in Proxmox VE is a powerful feature for dynamically managing memory allocation among VMs, optimizing the host’s overall memory usage. However, it’s crucial to understand the thresholds that trigger memory reclaiming to avoid performance degradation. It is recommended to set an appropriate minimum memory limit to ensure that no more memory can be stolen once this minimum threshold is reached, this way to keep the stability of the guest VM and preventing the OOM-killer from terminating processes inside the guest VM. By appropriately setting, carefully monitoring, and adjusting memory allocations, you can ensure a stable and efficient virtual environment.
Security Concerns
Implications of Enabling KSM
According to the Kernel Samepage Merging (KSM) document from Proxmox VE wiki. It mentioned the implications of KSM. There are already some document proof by researchers that “Memory Deduplication as Threat to the Guest OS” , it is possible to perform “Remote Memory-Deduplication Attacks”, and also possible compromising Linux VMs by “New FFS Rowhammer Attack Hijacks Linux VMs”.
In the concern, you should only enable KSM when you have full control of all the VMs. If you are using Proxmox VE to provide hosting services, you better consider disabling KSM to protect your users. Furthermore, you should check your country’s regulations, as disabling KSM may be a legal requirement.
Risks When Using Databases with Ballooning
Memory ballooning dynamically adjusts the memory allocation of VMs based on demand. While this feature is beneficial for optimizing memory usage, it poses certain risks when used with database like PostgreSQL, which rely heavily on available memory for performance. If the balloon driver reclaims too much memory, where overcommitting memory pages can lead to trigger OOM-Killer to kill the process with the highest score until the high memory stress situation is over. And the process with the highest score metrics could be on memory consumption which highly possibility the database itself.
In the concern, you better running database server in VM without Memory Ballooning enabled, or set no overcommit policy in the Linux kernel inside the guest VM if you don’t have such control.
Conclusion
Our tests demonstrate that KSM and memory ballooning are effective features in Proxmox VE for optimizing memory usage in virtualized environments. KSM can significantly reduce memory usage by merging identical pages across VMs, while memory ballooning allows dynamic adjustment of memory allocation based on demand.
Memory ballooning in Proxmox VE is a powerful feature for dynamically managing memory allocation among VMs, optimizing the host’s overall memory usage. However, it’s crucial to understand the thresholds that trigger memory reclaiming to avoid performance degradation. By carefully monitoring and adjusting memory allocations, you can ensure a stable and efficient virtual environment.
Together, these features can enhance the efficiency and performance of virtualized workloads, making Proxmox VE a robust solution for enterprise virtualization.
By leveraging KSM and memory ballooning, organizations can achieve better resource utilization and potentially reduce hardware costs. If you have full control of the host and all the VMs, consider enabling these features in Proxmox VE to explore these potential benefits.
This article was written originally bei Andrew Lee.
Introduction
In our previous article, we introduced NetApp Storage and NVMe-oF for Breakthrough Performance in Proxmox Virtualization Environments. That article introduced LVM with NVMe-oF via TCP in NetApp storage with Proxmox VE, highlighting its potential to deliver high-performance storage solution that suitable for latency-sensitive applications like virtualized data servers . And it works over Ethernet network without other specialized hardware such as Fibre Channel or InfiniBand, which can be cost-prohibitive for many enterprises.
While NVMe-oF offers significant performance benefits, it is primarily supported on newer and higher-end NetApp ONTAP storage systems, like the AFF series. For organizations with older or hybrid storage systems, iSCSI remains a viable and cost-effective alternative that leverages existing Ethernet infrastructure and provides reliable performance for virtualization environments.
In this blog post, we will delve into using iSCSI (Internet Small Computer Systems Interface) in NetApp Storage with Proxmox VE.
Setup
Hardware and Software Used in This Example
- NetApp Storage System: Provides shared storage capabilities essential for clustering in virtual environments via iSCSI. The example uses ONTAP Release 9.15.1.
- Proxmox VE Cluster: An open source virtualization platform. The example uses the current release 8.2.
- Network Infrastructure: Standard Ethernet network (1GbE or 10GbE).
- iSCSI Initiator: Built into Proxmox VE.
What is iSCSI
iSCSI (Internet Small Computer Systems Interface) is a network protocol that allows for the transport of block-level storage data over IP (Internet Protocol) networks. The protocol allows clients (called initiators) to send SCSI commands over TCP/IP to storage devices (targets) on remote servers. It allows for the connection of storage devices over a standard network infrastructure without requiring specialized hardware and cabling.
It offers a flexible, cost-effective, and scalable storage solution that integrates well with virtualization environments, providing the necessary features and performance to support modern virtualized workloads.
How iSCSI Works
- Initiator and Target: iSCSI communication involves two main components:
- Initiator: The client-side component, typically a server or host, that initiates the connection to the storage device.
- Target: The server-side component, typically a storage array or device, that provides access to the storage resources.
- LUNs (Logical Unit Numbers): Storage resources on the iSCSI target are presented as LUNs. The initiator accesses these LUNs as if they were local disks, allowing the operating system to format, partition, and use them just like any other block storage device.
Configuration
On NetApp Storage
The guide presumes that users have already established the foundational storage setup, including the configuration of Storage Virtual Machines (SVMs). It highlights that the administration of these systems is relatively straightforward, thanks to the intuitive web interface – ONTAP System Manager provided by NetApp storage systems. Users can expect a user-friendly experience when managing their storage solutions, as the web interface is designed to simplify complex tasks. This also includes the whole setup for iSCSI storage, which requires to enabling iSCSI in general on the SVM, setting up the SAN Initiator group and mapping it to LUNs.
Note: All changes can of course also be performed in an automated way by orchestrating the ONTAP API.
Enable iSCSI target on SVM
To enable iSCSI at the SVM level on a NetApp storage system, this can typically be done by following these summarized steps, which can be accessed through the system’s web interface ONTAP System Manager.
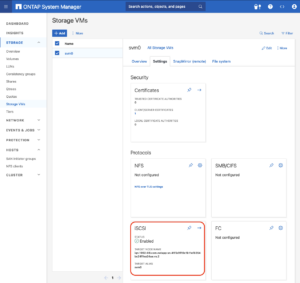
Navigate to the Storage menu. Then, navigate to Storage VMs. Specify the SVM name you wish to configure:
- Configure iSCSI Protocol: Within the SVM settings, look for a section or tab related to proto
cols. Locate the iSCSI option and enable it. This might involve checking a box or switching a toggle to the ‘on’ position. - Save and Apply Changes: After enabling iSCSI, ensure to save the changes. There might be additional prompts or steps to confirm the changes, depending on the specific NetApp system and its version.
Remember to check for any prerequisites or additional configuration settings that might be required for iSCSI operation, such as network settings, licensing, or compatible hardware checks. The exact steps may vary slightly depending on the version of ONTAP or the specific NetApp model you are using. Always refer to the latest official NetApp documentation or support resources for the most accurate guidance.
Create SAN initiator group
Navigate to the HOSTS menu. Then, navigate toSAN initiator groups. Select the specific initiator group name you wish to configure: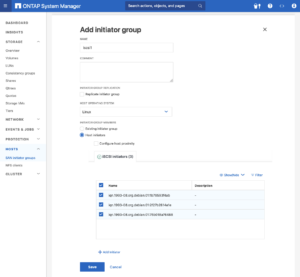
- Configure Host initiators: On each Proxmox VE nodes, look up /etc/iscsi/initiatorname.iscsi file and collect the InitiatorName (iSCSI host IQN). Add the each InitiatorName as host initiators in the initiator group in ONTAP System Manager.
- Save and Apply Changes: After adding all the initiators, ensure to save the changes. There might be additional prompts or steps to confirm the changes, depending on the specific NetApp system and its version.
Create LUNs with initiator group
Navigate to the Storage menu. Then, navigate to LUNS. Select and specific LUN name you wish to configure: 
- Add LUNs: Specify the number of LUNs you want to configure. Set the Host Operating System to Linux. Select the Initiator Group created in the previous step.
- Save and Apply Changes: After adding LUNs, ensure to save the changes. There might be additional prompts or steps to confirm the changes, depending on the specific NetApp system and its version.
Configuring Proxmox VE Node
General
After configuring the NetApp storage appliance for the creation of the iSCSI Target and LUNs, we can now configure Proxmox VE cluster to use and access the iSCSI storage. This can be easily configured by the Proxmox web interface. In general, this process consists of:
- Connecting with the iSCSI Block Storage.
- Creating an LVM (Logical Volume Manager) which is shareable across nodes on Proxmox VE, however, these instructions are likely to work on both older and newer versions, too.
The next steps in this blog post will cover the process in detail and guide you through the necessary steps on the Proxmox VE which can be done on the Proxmox web interface.
Connecting With the iSCSI Block Storage
To use this iSCSI block storage on Proxmox VE cluster, follow the steps to log in to the web frontend of the Proxmox VE cluster, and add the storage at the datacenter level:
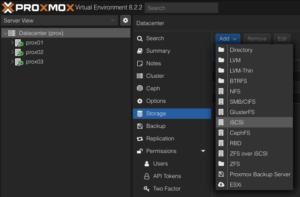
Navigate to the Storage Configuration: Go to Datacenter -> Storage -> Add -> iSCSI.
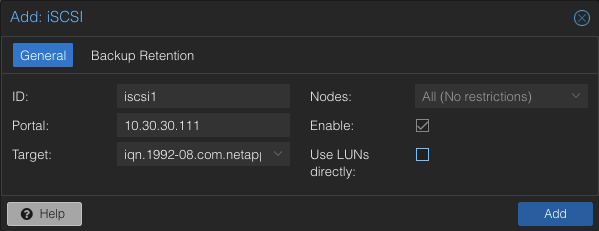
Define the New iSCSI Storage Details:
- ID: iscsi1 (this can be any text and is jut an identifier).

- Portal: Enter the IP address of the iSCSI-enabled SVM.
- Target: This will be detected if you specify the correct IP for the iSCSI-enabled SVM.
- Nodes: <Select all nodes that should use the iSCSI storage>
- Enable: Yes
- Use LUNs directly: No
Create LVM on the iSCSI Block Storage
To use this LVM Volume Group over iSCSI block storage on all Proxmox VE nodes within the cluster, the Volume Group must be added and integrated at the datacenter level. Follow these steps to configure it through the Proxmox VE web interface: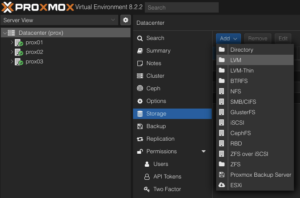
Navigate to the Storage Configuration: Go to Datacenter -> Storage -> Add -> LVM.
Define the New LVM Storage Details:
- ID: shared_iscsi1 (this can be any text and is just an identifier)

- Base storage: Existing volume groups
- Volume group: shared_iscsi1
- Content: Disk image, Container
- Nodes: <Select all nodes that should use it>
- Enables: Yes
- Shared: Yes
- Wipe Removed Volumes: No
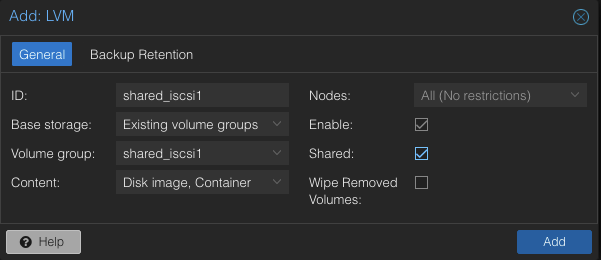
Press Add to attach the new volume to the selected nodes. The LVM storage will then available for use.
Conclusion
The utilization of iSCSI via TCP in addition to Proxmox VE in a virtualization environment presents a compelling solution for organizations looking for cost-effective shared storage architectures. This approach leverages the widespread availability and compatibility of Ethernet-based networks, avoiding the need for specialized hardware such as Fibre Channel, which can be cost-prohibitive for many enterprises.
However, block-level storage with SAN protocols (FC/iSCSI/NVMe-oF) is typically restricted to the VM Disk and Container Image content types supported by Proxmox VE. Additionally, guest VM snapshots and thin provisioning are currently not supported when using LVM/iSCSI storage in Proxmox VE.
There are alternatives that NetApp storage can also serve to meet the more complete needs of Proxmox VE. The NAS protocols, such as NFS, support all content types of Proxmox VE and are typically configured once at the datacenter level. Guest VMs can use disks of type raw, qcow2, or VMDK on NAS protocol storage. Furthermore, guest VM snapshots and thin provisioning are supported with the qcow2 format.
At your convenience, we are available to provide more insights into NetApp storage systems, covering both hardware and software aspects. Our expertise also extends to open-source products, especially in establishing virtualization environments using technologies like Proxmox and OpenShift or in maintaining them with configuration management. We invite you to reach out for any assistance you require.
You might also be interested in learning how to migrate VMs from VMware ESXi to Proxmox VE or how to include the Proxmox Backup Server and NetApp Storage and NVMe-oF for Breakthrough Performance in Proxmox Virtualization Environments into your infrastructure.
This article was initially written by Andrew Lee.
ONTAP snapshots for Proxmox VE
In modern IT infrastructure, virtualization is the key to efficient resource management. With virtualization, memory, cpu, network and storage resources can easily be assigned to and shared between virtual machines (VM). Virtualization also comes with the advantage of being able to easily change the resources assigned to virtual machines or to clone virtual machines as needed. Since the virtual machines hard disk is just a file, it can easily be resized, copied and backuped.
Motivation
One of the many advantages of virtualization is the ability to easily create snapshots of the virtual machine disk images.
Proxmox VE offers this ability for the qcow2 disk image format, but not for the raw format on NFS based storage. When creating a VM disk snapshot with Proxmox VE on the local filesystem, Proxmox VE uses the features of the underlying filesystem to create snapshots. In cases, in which the VM disk is placed on a NFS storage, it is not possible for Proxmox VE to use any filesystem features to create a snapshot and therefore has to fallback to file based snapshots.
Since NetApp ONTAP offers snapshot features on file level and on volume level using its own filesystem features, it could be an advantage to use this features over the Proxmox VE file based snapshots.
The common way to connect Proxmox VE with NetApp ONTAP would be NFS. NetApp ONTAP also supports iSCSI, but that is out of scope, as an iSCSI connected storage offers full access to the filesystem and therefore Proxmox VE could use the filesystem features.
ONTAP snapshots
A FileClone is a copy of a file, that points to the same blocks as the original file, only changes are written to new blocks. Therefore creating a FileClone happens instantly and writing to a FileClone does not create any overhead as a file based snapshot in Proxmox VE does. Also deleting or better merging the snapshot back into the virtual disk image is not necessary, as a FileClone is a full copy of the original virtual disk. Just delete the original virtual disk and continue using the FileClone or switch back to the original virtual disk image and delete the clone if a roll-back is necessary.
A VolumeClone works the same way as the FileClone, but on volume level. A VolumeClone creates an instant copy of a complete volume, a Snapshot. The Snapshot references the same blocks as the original volume and changes on the original volume are written to new blocks. It is also possible to access the Snapshot by creating a new volume from it, this is called a FlexClone volume.
This can be used to create a snapshot of a Proxmox VE storage with all its virtual machine disk images instead of creating snapshots of single virtual machine disk images. With the FlexClone volume functionality it is easy to access the data in the clone.
Since Proxmox VE does not support ONTAP features directly, there is a small Python script that uses the ONTAP Rest API and the Proxmox VE API to make this features easily accessible. The script is able to create a FileClone of a virtual machine disk image, it can create the clone from a running VM, but is also able to suspend or stop a VM before creating the clone and then start the VM again.
The script also gives easy access to the VolumeClone and FlexClone features, it is able to create, manage, mount, unmount and delete clones of a volume. When mounting a clone of a volume, it will also automatically be attached as an additional storage to Proxmox VE.
NFS features
In Linux kernel 5.3 the NFS mount option `nconnect` was introduced. By default a NFS client will use one TCP connection to the server, this can be a bottleneck in the case of high NFS work loads. With the nconnect option the number of TCP connections per server can be increased up to 16 connections.
nconnect is supported by Proxmox VE since version 6.2 and by ONTAP 9 and can be easily used by adding the nconnect=<value> to the mount options for the NFS share on the client side.
The other interesting NFS mount option is max_connect. max_connect sets the maximum number of connections to different server IPs belonging to the same NFSv4.1+ server. This is called trunking and is a multipath functionality. The difference to nconnect is, that nconnect sets the number of TCP connections to one server IP, while max_connect sets the number of TCP connections to the same server over multiple IPs. This is supported by ONTAP since version 9.14.1.
Combining the options is possible, but might not lead to the desired result.
More
To further optimize the resource usage, data deduplication on storage systems is an important feature, since especially virtual machine disk images share the same (operating system) data between each other. Deduplication is reducing the used space in this use case very effective. ONTAP supports deduplication.
The issue of table and index bloat due to failed inserts on unique constraints is well known and has been discussed in various articles across the internet. However, these discussions sometimes lack a clear, practical example with measurements to illustrate the impact. And despite the familiarity of this issue, we still frequently see this design pattern—or rather, anti-pattern—in real-world applications. Developers often rely on unique constraints to prevent duplicate values from being inserted into tables. While this approach is straightforward, versatile, and generally considered effective, in PostgreSQL, inserts that fail due to unique constraint violations unfortunately always lead to table and index bloat. And on high-traffic systems, this unnecessary bloat can significantly increase disk I/O and the frequency of autovacuum runs. In this article, we aim to highlight this problem once again and provide a straightforward example with measurements to illustrate it. We suggest simple improvement that can help mitigate this issue and reduce autovacuum workload and disk I/O.
Two Approaches to Duplicate Prevention
In PostgreSQL, there are two main ways to prevent duplicate values using unique constraints:
1. Standard Insert Command (INSERT INTO table)
The usual INSERT INTO table command attempts to insert data directly into the table. If the insert would result in a duplicate value, it fails with a “duplicate key value violates unique constraint” error. Since the command does not specify any duplicate checks, PostgreSQL internally immediately inserts the new row and only then begins updating indexes. When it encounters a unique index violation, it triggers the error and deletes the newly added row. The order of index updates is determined by their relation IDs, so the extent of index bloat depends on the order in which indexes were created. With repeated “unique constraint violation” errors, both the table and some indexes accumulate deleted records leading to bloat, and the resulting write operations increase disk I/O without achieving any useful outcome.
2. Conflict-Aware Insert (INSERT INTO table … ON CONFLICT DO NOTHING)
The INSERT INTO table ON CONFLICT DO NOTHING command behaves differently. Since it specifies that a conflict might occur, PostgreSQL first checks for potential duplicates before attempting to insert data. If a duplicate is found, PostgreSQL performs the specified action—in this case, “DO NOTHING”—and no error occurs. This clause was introduced in PostgreSQL 9.5, but some applications either still run on older PostgreSQL versions or retain legacy code when the database is upgraded. As a result, this conflict-handling option is often underutilized.
Testing Example
To be able to do testing we must start PostgreSQL with “autovacuum=off”. Otherwise with instance mostly idle, autovacuum will immediately process bloated objects and it would be unable to catch statistics. We create a simple testing example with multiple indexes:
CREATE TABLE IF NOT EXISTS test_unique_constraints(
  id serial primary key,
  unique_text_key text,
  unique_integer_key integer,
  some_other_bigint_column bigint,
  some_other_text_column text);

CREATE INDEX test_unique_constraints_some_other_bigint_column_idx ON test_unique_constraints (some_other_bigint_column );
CREATE INDEX test_unique_constraints_some_other_text_column_idx ON test_unique_constraints (some_other_text_column );
CREATE INDEX test_unique_constraints_unique_text_key_unique_integer_key__idx ON test_unique_constraints (unique_text_key, unique_integer_key, some_other_bigint_column );
CREATE UNIQUE test_unique_constraints_unique_integer_key_idx INDEX ON test_unique_constraints (unique_text_key );
CREATE UNIQUE test_unique_constraints_unique_text_key_idx INDEX ON test_unique_constraints (unique_integer_key );
And now we populate this table with unique data:
DO $$
BEGIN
  FOR i IN 1..1000 LOOP
    INSERT INTO test_unique_constraints
    (unique_text_key, unique_integer_key, some_other_bigint_column, some_other_text_column)
    VALUES (i::text, i, i, i::text);
  END LOOP;
END;
$$;
In the second step, we use a simple Python script to connect to the database, attempt to insert conflicting data, and close the session after an error. First, it sends 10,000 INSERT statements that conflict with the “test_unique_constraints_unique_int_key_idx” index, then another 10,000 INSERTs conflicting with “test_unique_constraints_unique_text_key_idx”. The entire test is done in a few dozen seconds, after which we inspect all objects using the “pgstattuple” extension. The following query lists all objects in a single output:
WITH maintable AS (SELECT oid, relname FROM pg_class WHERE relname = 'test_unique_constraints')
SELECT m.oid as relid, m.relname as relation, s.*
FROM maintable m
JOIN LATERAL (SELECT * FROM pgstattuple(m.oid)) s ON true
UNION ALL
SELECT i.indexrelid as relid, indexrelid::regclass::text as relation, s.*
FROM pg_index i
JOIN LATERAL (SELECT * FROM pgstattuple(i.indexrelid)) s ON true
WHERE i.indrelid::regclass::text = 'test_unique_constraints'
ORDER BY relid;
Observed Results
After running the whole test several times, we observe the following:
- The main table “test_unique_constraints” always has 1,000 live tuples, and 20,000 additional dead records, resulting in approx 85% of dead tuples in the table
- Index on primary key always shows 21,000 tuples, unaware that 20,000 of these records are marked as deleted in the main table.
- Other non unique indexes show different results in different runs, ranging between 3,000 and 21,000 records. Numbers depend on the distribution of values generated for underlying columns by the script. We tested both repeated and completely unique values. Repeated values resulted in less records in indexes, completely unique values led to full count of 21,000 records in these indexes.
- Unique indexes showed repeatedly tuple counts only between 1,000 and 1,400 in all tests. Unique index on the “unique_text_key” always shows some dead tuples in the output. Precise explanation of these numbers would require deeper inspection of these relations and code of the pgstattuple function, which is beyond scope of this article. But some small bloat is reported also here.
- Numbers reported by pgstattuple function raised questions about their accuracy, although documentation seems to lead to the conclusion that numbers should be precise on tuple level.
- Subsequent manual vacuum confirms 20,000 dead records in the main table and 54 pages removed from primary key index, and up to several dozens of pages removed from other indexes – different numbers in each run in dependency on total count of tuples in these relations as described above.
- Each failed insert also increments the Transaction ID and thus increases the database’s transaction age.
Here is one example output from the query shown above after the test run which used unique values for all columns. As we can see, bloat of non unique indexes due to failed inserts can be big.
 relid |                       relation                                  | table_len | tuple_count | tuple_len | tuple_percent | dead_tuple_count | dead_tuple_len | dead_tuple_percent | free_space | free_percent
-------+-----------------------------------------------------------------+-----------+-------------+-----------+---------------+------------------+----------------+--------------------+------------+--------------
 16418 | test_unique_constraints                                         |   1269760 |        1000 |     51893 |          4.09 |            20000 |        1080000 |              85.06 |       5420 |         0.43
 16424 | test_unique_constraints_pkey                                    |    491520 |       21000 |    336000 |         68.36 |                0 |              0 |                  0 |      51444 |        10.47
 16426 | test_unique_constraints_some_other_bigint_column_idx            |    581632 |       16396 |    326536 |         56.14 |                0 |              0 |                  0 |     168732 |        29.01
 16427 | test_unique_constraints_some_other_text_column_idx              |    516096 |       16815 |    327176 |         63.39 |                0 |              0 |                  0 |     101392 |        19.65
 16428 | test_unique_constraints_unique_text_key_unique_integer_key__idx |   1015808 |       21000 |    584088 |          57.5 |                0 |              0 |                  0 |     323548 |        31.85
 16429 | test_unique_constraints_unique_text_key_idx                     |     57344 |        1263 |     20208 |         35.24 |                2 |             32 |               0.06 |      15360 |        26.79
 16430 | test_unique_constraints_unique_integer_key_idx                  |     40960 |        1000 |     16000 |         39.06 |                0 |              0 |                  0 |       4404 |        10.75
(7 rows)
In a second test, we modify the script to include the ON CONFLICT DO NOTHING clause in the INSERT command and repeat both tests. This time, inserts do not result in errors; instead, they simply return “INSERT 0 0”, indicating that no records were inserted. Inspection of the Transaction ID after this test shows only a minimal increase, caused by background processes. Attempts to insert conflicting data did not result in increase of Transaction ID (XID), as PostgreSQL started first only virtual transaction to check for conflicts, and because a conflict was found, it aborted the transaction without having assigned a new XID. The “pgstattuple” output confirms that all objects contain only live data, with no dead tuples this time.
Summary
As demonstrated, each failed insert bloats the underlying table and some indexes, and increases the Transaction ID because each failed insert occurs in a separate transaction. Consequently, autovacuum is forced to run more frequently, consuming valuable system resources. Therefore applications still relying solely on plain INSERT commands without ON CONFLICT conditions should consider reviewing this implementation. But as always, the final decision should be based on the specific conditions of each application.
Having a Build Infrastructure for Extended Support of End-of-Life Linux Distributions
Intro
When it comes to providing extended support for end-of-life (EOL) Linux distributions, the traditional method of building packages from source may getting certain challenges. One of the biggest challenges is the need for individual developers to install build dependencies on their own build environments. This often leads to different alternative build dependencies being installed, resulting in issues related to binary compatibility. Additionally, there are other challenges to consider, such as establishing an isolated and clean build environment in parallel different package builds, implementing an effective package validation strategy, and managing repository publishing..etc
To overcome these challenges, it is highly recommended to have a dedicated build infrastructure that enables the building of packages in a consistent and reproducible manner. With the build infrastructure, teams can address these issues effectively, and ensures that the necessary packages and dependencies are available, eliminating the need for individual developers to manage their own build environments.
OpenSUSE’s Open Build Service (OBS) offers a powerful build infrastructure that is already well known for teams working on customized or private software packages built on top of major Linux distributions, and we found it’s also useful to work on extended support for End-of-Life (EOL) Linux distributions. With support for RPM-based, Debian-based, and Arch-based Linux distributions, OBS proves to be a versatile solution capable of meeting the needs for Extended Support of End-of-Life(EOL) Linux distributions.
On June 30, 2024, two major Linux distributions, Debian 10 “Buster” and CentOS 7, are reaching their End-of-Life (EOL) status. These gained widespread adoption in numerous large enterprise environments. However, due to various factors, organizations may face challenges in completing migration processes in a timely manner, necessitating temporary extended support.
Once a distribution reaches its End-of-Life(EOL). Upstream support, including mirrors and infrastructure are typically removed. This makes a significant challenge for organizations seeking extended support, as they not only require access to a local offline mirror but also need the infrastructure to build packages in a manner consistent with the original upstream builds.
To achieve the goal of providing extended support for end-of-life (EOL) Linux distributions, we choice to have a local mirror of the EOL Linux distribution and also have a private OBS instance. To have an private OBS instance. You can download OBS code from the upstream GitHub repository and install it on your local Linux distribution, or alternatively, you can simply download the OBS Appliance Installer to integrate a private OBS instance as an build infrastructure.
By adopting a private OBS instance as the build infrastructure for extended support of EOL Linux distributions, teams can simplifies the package building process, minimize inconsistencies, and achieve reproducibility. This not only simplifies the development workflow but also enhances the overall quality and reliability of the packages being generated. Replicate the semi-original build process, ensuring that the resulting packages maintain the same quality, integrity, and compatibility as those generated upstream.
Allow us to demonstrate how OBS can be utilized for extended support of end-of-life (EOL) Linux distributions. However, please note that the following examples are purely for demonstrate purpose and may not precisely reflect the specific approach nor EOL product used in our actual project.
Config local mirror as DoD Repository
Once your private OBS instance is set up, you can login into OBS on it’s WebUI via https by ‘Admin’ with default password ‘opensuse’. You can only update some configurations with the Admin account. Including Manage Users and Groups, Add Download on Demand (DoD) Repository to establish a connection with the local mirror in Project created on private OBS instance.
Add DoD Repository in Repository tab on your private OBS instance:
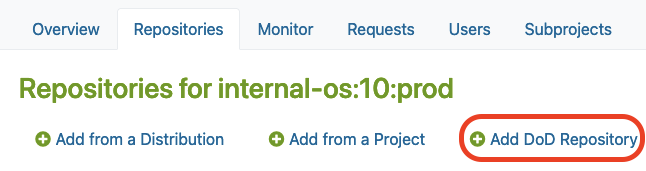
Config DoD with url for internal local mirror of EOL Linux Distribution:
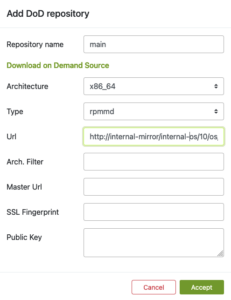
After you connected the local mirror with the EOL Linux Distribution in the private OBS instance. The private OBS instance became the build infrastructure, supporting various major distribution types, positions it as an ideal solution for a team seeking infrastructure to provide extended support for EOL Linux distributions.
Benefits of build infrastructure
OBS ensures consistency and reproducibility in the build process. Also provide a customizable build environment, allowing teams to tailor the environment to specific project requirements.
- Consistency and Reproducible Builds: OBS provides the option to perform builds in clean chroot or clean KVM environments, ensuring consistent and reproducible results. This reduces the risk of unexpected variations or errors during the build process.
- Customizable Build Environment: OBS allows teams to customize the build environment through project configuration, enabling them to define macros, packages, flags, and other build-related settings. This ensures compatibility with the specific requirements of the EOL Linux distribution being supported.
Customizable Build Environment.
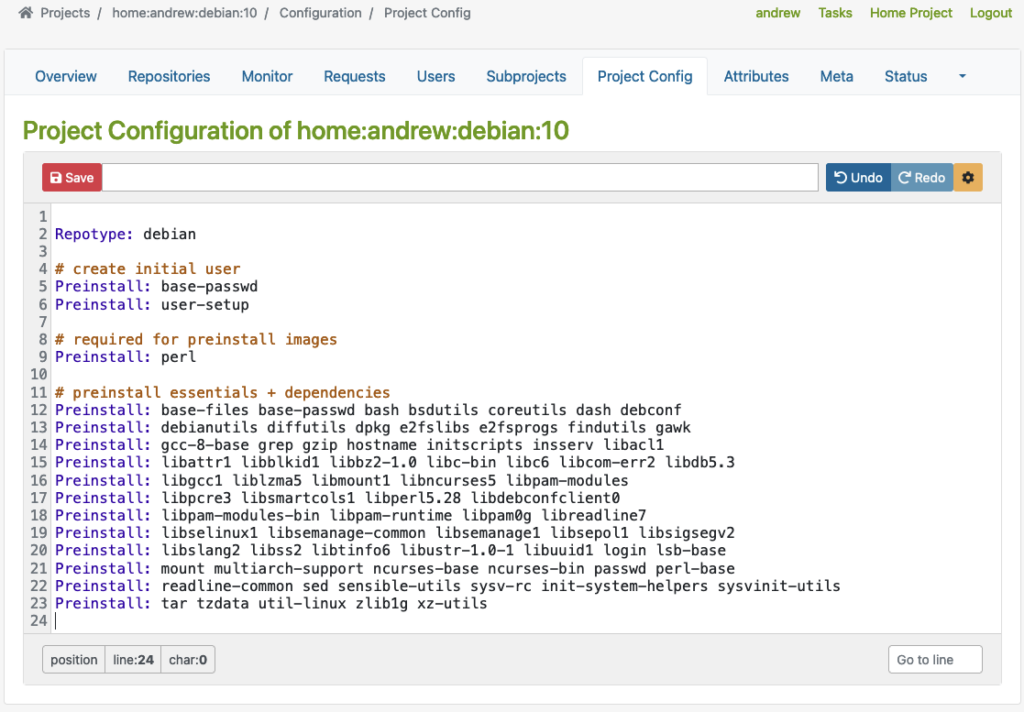
- Isolation of Build Environments: OBS allows teams to create separate build environments for different projects or distributions, preventing interference or conflicts between builds. This enables efficient and parallel development on multiple EOL distributions simultaneously.
Each worker runs isolated with customizable build environment efficiently in parallel.
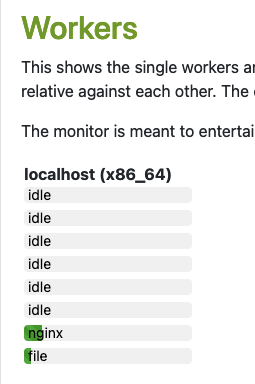
- Release Number Control: OBS offers control over the release numbers of built packages, ensuring compatibility and consistency with the original release numbering scheme. This is particularly important when working with EOL distributions.
See more details: https://en.opensuse.org/openSUSE:Build_Service_prjconf#Release
Demonstrate of other key benefits
Here are some benefits of using OBS with screenshots:
- Built-in Access Control: OBS offers flexible access control, allowing team members to have different roles and permissions for various projects or distributions. This ensures efficient collaboration and streamlined workflow management.
Manage users and groups and different roles:
- Download on Demand (DoD): OBS supports the Download on Demand feature, which fetches build dependencies on-demand during the build process. This simplifies the build workflow and reduces the need for manual intervention.
- Offline Build Support: OBS enables the creation of an offline build environment via DoD, allowing teams to build packages without an internet connection. This is particularly crucial when working with EOL distributions, where internet access and official repositories may no longer be available.
Fetching build dependencies packages from offline local mirror via DoD:
Start the build process after downloaded build dependencies from DoD:
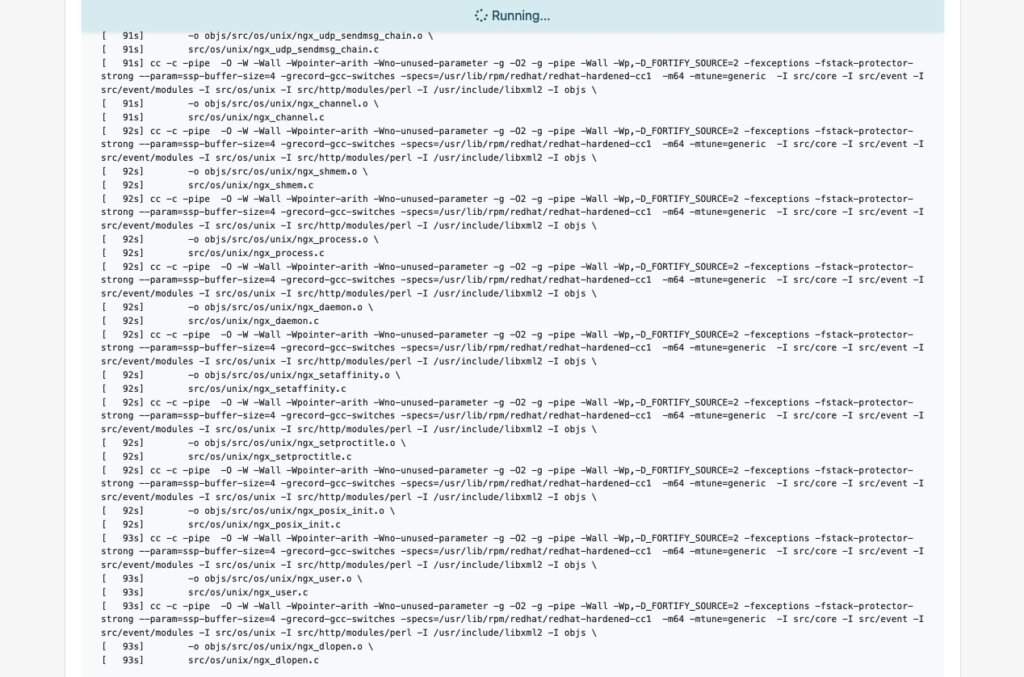
- Flexible Project Setup: OBS allows teams to create separate projects for development, staging, and publishing purposes. This controlled workflow ensures thorough testing and validation of packages before they are submitted to the production project for publishing.
Build Result for Staging repo:
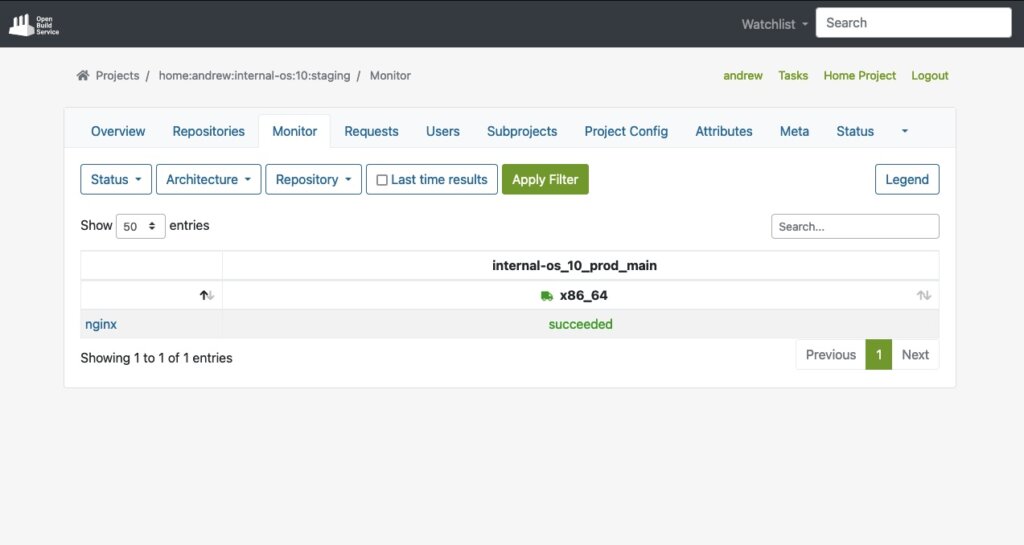
Automatically published in staging repo once package builds:
You can start the package validation process with staging repo. And then submit a package from staging to prod after it passed the validation process:
The package submit request can be reviewed by prod repo master to accept or decline: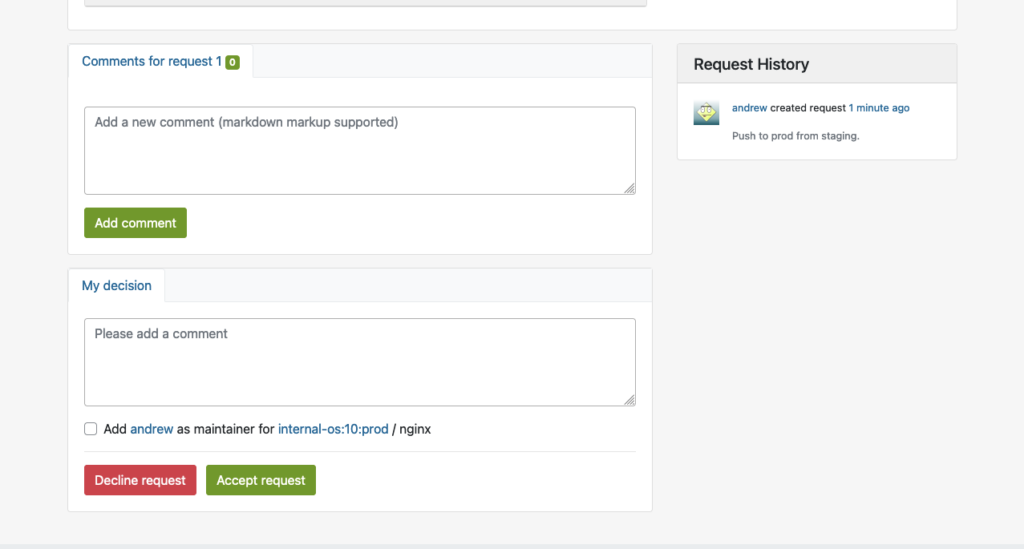
- Repository Publish Integration: OBS seamlessly integrates with local repository publishing, ensuring that all packages for the build process are readily available and published. This eliminates the need for additional configuration on internal or external repositories.
The build process starts after package accepted into Prod repo. Here shows build status in Prod repo: 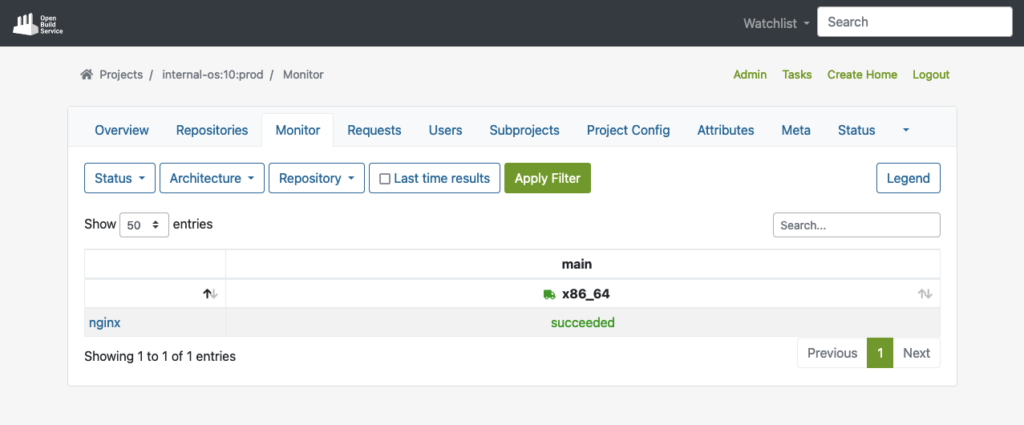
Automatically published to prod repo once package builds succeeded:
- Automated Build via Pipelines: OBS supports automated builds that seamlessly integrate into delivery pipelines. Teams can set up triggers to initiate builds automatically based on predefined criteria, reducing manual effort and ensuring timely delivery of updated packages to customers.
Package got automated builds when committed into an OBS project. Easily to integrate into a delivery pipelines.

In conclusion, OpenSUSE’s Open Build Service (OBS) provides a robust and comprehensive build infrastructure for teams working on extended support for EOL Linux distributions.
If you are interested to integrate a build infrastructure, or require extend support for any EOL Linux distribution. Please reach out to us. Our team is equipped with the expertise to assist you in integrate a private OBS instance into your exist infrastructure.
This article was originally written by Andrew Lee
